Brother International CP-2000 Owners Manual - English - Page 15
Remove the screws from the anchors, hang the copyboard back onto the,
 |
View all Brother International CP-2000 manuals
Add to My Manuals
Save this manual to your list of manuals |
Page 15 highlights
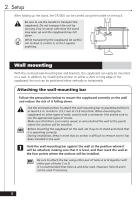
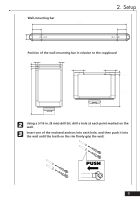
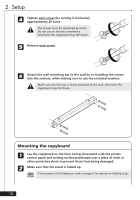
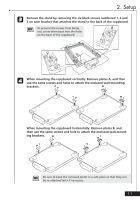
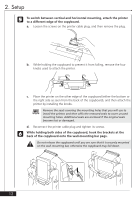
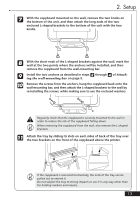
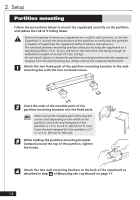
2. Setup 7 With the copyboard mounted on the wall, remove the two knobs on the bottom of the unit, and then attach the long ends of the two enclosed L-shaped brackets to the bottom of the unit with the two knobs. 8 With the short ends of the L-shaped brackets against the wall, mark the wall at the two points where the anchors will be installed, and then remove the copyboard from the wall-mounting bar. 9 Install the two anchors as described in steps 2 through 4 of Attaching the wall-mounting bar on page 9. 0 Remove the screws from the anchors, hang the copyboard back onto the wall-mounting bar, and then attach the L-shaped brackets to the wall by re-installing the screws, while making sure to use the enclosed washers. a bc Regularly check that the copyboard is securely mounted to the wall in order to reduce the risk of the copyboard falling down. When removing the copyboard from the wall, also remove the L-shaped brackets. - Attach the tray by sliding its slots on each sides of back of the tray over the two brackets on the front of the copyboard above the printer. bc If the copyboard is mounted horizontally, the ends of the tray can be pulled out to extend it. Do not subject the tray to strong impacts or use it in any way other than for holding markers and erasers. 13
-
 1
1 -
2
-
3
-
4
-
5
-
6
-
7
-
8
-
9
-
 10
10 -
 11
11 -
 12
12 -
 13
13 -
 14
14 -
 15
15 -
 16
16 -
 17
17 -
 18
18 -
 19
19 -
 20
20 -
21
-
22
-
23
-
24
-
25
-
26
-
27
-
28
-
29
-
30
-
31
-
32
-
33
 |
 |
