Brother International CP-2000 Owners Manual - English - Page 14
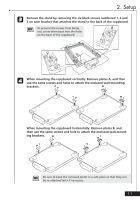
back of the copyboard onto the wall-mounting bar pegs., While holding both sides of the copyboard
 |
View all Brother International CP-2000 manuals
Add to My Manuals
Save this manual to your list of manuals |
Page 14 highlights
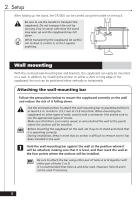
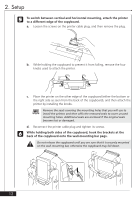
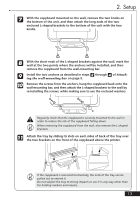
2. Setup 5 To switch between vertical and horizontal mounting, attach the printer to a different edge of the copyboard. a. Loosen the screws on the printer cable plug, and then remove the plug. b. While holding the copyboard to prevent it from falling, remove the four knobs used to attach the printer. c. Place the printer on the other edge of the copyboard (either the bottom or the right side as seen from the back of the copyboard), and then attach the printer by installing the knobs. + Remove the seals covering the mounting holes that you will use to install the printer, and then affix the removed seals to cover unused mounting holes. Additional seals are enclosed if the original seals become lost or damaged. d. Reconnect the printer cable plug and tighten its screws. 6 While holding both sides of the copyboard, hook the brackets at the back of the copyboard onto the wall-mounting bar pegs. a Do not release the copyboard until you are sure that it is securely mounted on the wall-mounting bar, otherwise the copyboard may fall down. 12
-
 1
1 -
2
-
3
-
4
-
5
-
6
-
7
-
8
-
 9
9 -
 10
10 -
 11
11 -
 12
12 -
 13
13 -
 14
14 -
 15
15 -
 16
16 -
 17
17 -
 18
18 -
 19
19 -
20
-
21
-
22
-
23
-
24
-
25
-
26
-
27
-
28
-
29
-
30
-
31
-
32
-
33
 |
 |
