Brother International CP60X Operation Manual - Page 6
Power supply, Foot controller, Operation panel, Settings/Functions
 |
View all Brother International CP60X manuals
Add to My Manuals
Save this manual to your list of manuals |
Page 6 highlights
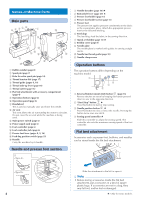
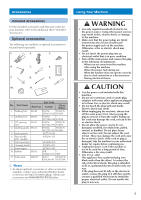
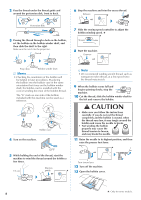
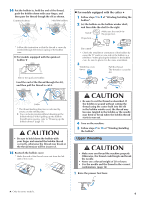
Power supply 1 Insert the plug into a household electrical outlet. 2 1 Operation panel 56 3 1 24 2 Turn on the machine. ON OFF Press the "I" mark on the main power switch to turn on the main power, sewing light, and LCD. To turn off the machine, press the "O" mark on the main power switch. XX The machine will make a sound. This is not a malfunction. Foot controller Insert. CAUTION • When inserting the foot controller plug, be sure to turn off the machine in order to prevent the machine from accidentally being started. Slowly depress the foot controller to start sewing, and adjust the sewing speed by changing the pressing force. Slower Faster Note • (For U.S.A. only) Foot controller: Model T This foot controller can be used on the machine with product code 888-N00/N02/N20/N22/ N40/N42. The product code is mentioned on the machine rating plate. • When the foot controller is connected, ("Start/ Stop" button) is disabled. ★ 6 1 LCD (Liquid crystal display) The selected stitch (1), presser foot that should be used (2), stitch length in millimeters (3), stitch width in millimeters (4), needle stop position (5), and single/twin needle mode (6) are displayed. 2 Stitch selection keys (page 15) Press keys to change the stitch pattern. 3 Stitch length keys (page 15) Press keys to change the stitch length of the selected stitch pattern. 4 Stitch width keys (page 15) Press keys to change the stitch width of the selected stitch pattern. Settings/Functions You can change settings of the following functions. The settings are stored even when the power switch is turned off. No. Function 1 Needle stop position 2 Initial needle position (left / middle (center)) 3 Operation beep ★ 4 Maximum sewing speed 5 Automatic reverse / reinforcement stitching 6 Needle mode (single needle / twin needle) 7 Stitch adjustment ★ 4 5 2 6 1 7 3 1 Changing the needle stop position You can change the needle stop position to either the lowered (in the fabric) or raised position. (Default: Lowered position) 1 Turn off the machine. 2 Holding down 1, turn on the machine. 3 After the machine has turned on, release 1. XX The needle stop position is changed. : Lowered position : Raised position ★: Only for some models.
-
 1
1 -
 2
2 -
 3
3 -
 4
4 -
 5
5 -
 6
6 -
 7
7 -
 8
8 -
 9
9 -
 10
10 -
 11
11 -
 12
12 -
13
-
14
-
15
-
16
-
17
-
18
-
19
-
20
-
21
-
22
-
23
-
24
-
25
-
26
-
27
-
28
-
29
-
30
-
31
-
32
 |
 |
