Brother International CP60X Operation Manual - Page 8
completely and the bobbin is wound, when
 |
View all Brother International CP60X manuals
Add to My Manuals
Save this manual to your list of manuals |
Page 8 highlights
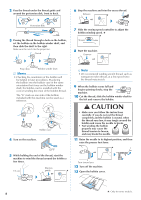
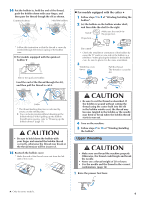
2 Pass the thread under the thread guide and around the pretension disk, front to back. Pretension disk 3 Passing the thread through a hole on the bobbin, set the bobbin on the bobbin winder shaft, and then slide the shaft to the right. Make sure the notch fits the projection. Notch 6 Stop the machine and trim the excess thread. Release. ★ or 7 Slide the sewing speed controller to adjust the bobbin winding speed. ★ ★ Slower Faster 8 Start the machine. Depress. ★ or Projection Bobbin winder shaft Memo • Checking the orientation of the bobbin will be helpful in later procedures. By placing the bobbin into the bobbin case in the same orientation that it was on the bobbin winder shaft, the bobbin can be installed with the correct winding direction of the bobbin thread. The "b" mark on one side of the bobbin included with this machine can be used as a reference. Bobbin case 4 Turn on the machine. ON OFF 5 While holding the end of the thread, start the machine to wind the thread around the bobbin a few times. 7-8 cm Depress gently. ★ or Note • We recommend winding stretch thread, such as transparent nylon thread, at a low speed since the thread may stretch. 9 When the bobbin seems full and begins spinning slowly, stop the machine. 10 Cut the thread, slide the bobbin winder shaft to the left and remove the bobbin. CAUTION • Make sure you follow the instructions carefully. If you do not cut the thread completely and the bobbin is wound, when the thread runs low, it may tangle around the bobbin and cause the needle to break. • Not winding the bobbin properly may cause the thread tension to loosen, and may break the needle. 11 Raise the needle to its highest position, and then raise the presser foot lever. ★ or Turn toward you. 12 Turn off the machine. 13 Open the bobbin cover. ★: Only for some models. 8
-
 1
1 -
2
-
 3
3 -
 4
4 -
 5
5 -
 6
6 -
 7
7 -
 8
8 -
 9
9 -
 10
10 -
 11
11 -
 12
12 -
 13
13 -
14
-
15
-
16
-
17
-
18
-
19
-
20
-
21
-
22
-
23
-
24
-
25
-
26
-
27
-
28
-
29
-
30
-
31
-
32
 |
 |
