Brother International MFC 845CW Cordless Handset Users Manual - English - Page 23
Storing Tel-Index numbers, from the Caller ID history, Changing numbers
 |
UPC - 012502615828
View all Brother International MFC 845CW manuals
Add to My Manuals
Save this manual to your list of manuals |
Page 23 highlights
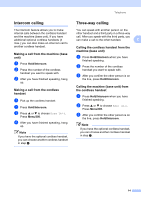
Telephone Storing Tel-Index numbers from the Caller ID history 2 If you have the Caller ID subscriber service from your telephone company you can also store Tel-Index numbers from incoming calls in the Caller ID history. (See Caller ID in the User's Guide.) a Pick up the cordless handset. b Press Menu/OK. c Press a or b to choose Caller ID hist.. Press Menu/OK. d Press a or b to choose the number you want to store. Press Menu/OK. e Press a or b to choose Set Tel-Index. Press Menu/OK. f Do one of the following: „ Enter the name (up to 14 characters) using the dial pad. Press Menu/OK. (To help you enter letters, see Entering Text on page 17.) „ To store the number without a name, press Menu/OK. g Press Menu/OK to confirm the number. Changing numbers 2 You can change or delete a name or number that has already been stored. a Pick up the cordless handset. 2 b Press a . c Press a or b to choose the location you want to change. Press Menu/OK. d Do one of the following: „ Press a or b to choose Change. Press Menu/OK and go to step e. „ Press a or b to choose Delete. Press Menu/OK. Then, confirm the Delete by pressing 1 and (Off). e Do one of the following: „ Enter the name (up to 14 characters) using the dial pad. Press Menu/OK. (See Entering Text on page 17.) „ If you do not want to change the name, press Menu/OK. Note If you want to change a character, press d or c to position the cursor under the incorrect character and press Clear. Re-enter the correct letter. f Do one of the following: „ Enter the new number. Press Menu/OK. „ If you do not want to change the number, press Menu/OK. g Press (Off). 12
-
 1
1 -
2
-
3
-
4
-
5
-
6
-
7
-
8
-
9
-
10
-
11
-
12
-
13
-
14
-
15
-
16
-
17
-
 18
18 -
 19
19 -
 20
20 -
 21
21 -
 22
22 -
 23
23 -
 24
24 -
 25
25 -
 26
26 -
 27
27 -
 28
28 -
29
-
30
-
31
-
32
-
33
-
34
-
35
-
36
-
37
-
38
-
39
-
40
-
41
-
42
-
43
 |
 |
