Brother International MFC 9760 Service Manual - Page 56
Lift up the ADF unit while pulling out the ADF motor harness, document sensor harness,
 |
View all Brother International MFC 9760 manuals
Add to My Manuals
Save this manual to your list of manuals |
Page 56 highlights
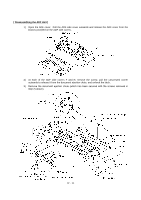
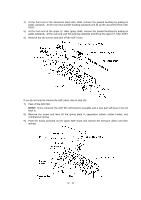
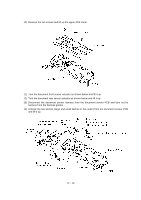
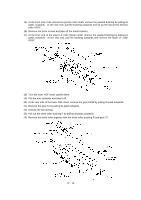
(4) Turn the ADF unit in the direction of arrow Q, remove the plastic retaining ring, and release the arm (arrow R) from the boss provided on the scanner top cover. Turn the ADF unit back into place. (5) Open the ADF cover (arrow S) and remove two screws "c." (6) Lift up the ADF unit while pulling out the ADF motor harness, document sensor harness, and grounding wire. The ADF supports also come off. (7) Remove screw "d" and take off the harness support together with the document tray open sensor. Remove the screw from the document tray open sensor. "c" ADF supports "c" Rear pin "x" ADF cover ADF motor harness Document sensor harness ADF grounding wire Harness support "d" ADF unit ADF unit Front pin "y" Arm Plastic retaining ring Scanner top cover Boss Harness support ADF motor harness, document sensor harness, and grounding wire Harness support IV - 10 "c" and "d": Taptite, cup B M3x8 Tapitite, pan P 1.6x8 (Tightening torque: 0.15 +0.03 N m) Document tray open sensor
-
 1
1 -
2
-
3
-
4
-
5
-
6
-
7
-
8
-
9
-
10
-
11
-
12
-
13
-
14
-
15
-
16
-
17
-
18
-
19
-
20
-
21
-
22
-
23
-
24
-
25
-
26
-
27
-
28
-
29
-
30
-
31
-
32
-
33
-
34
-
35
-
36
-
37
-
38
-
39
-
40
-
41
-
42
-
43
-
44
-
45
-
46
-
47
-
48
-
49
-
50
-
 51
51 -
 52
52 -
 53
53 -
 54
54 -
 55
55 -
 56
56 -
 57
57 -
 58
58 -
 59
59 -
 60
60 -
 61
61 -
62
-
63
-
64
-
65
-
66
-
67
-
68
-
69
-
70
-
71
-
72
-
73
-
74
-
75
-
76
-
77
-
78
-
79
-
80
-
81
-
82
-
83
-
84
-
85
-
86
-
87
-
88
-
89
-
90
-
91
-
92
-
93
-
94
-
95
-
96
-
97
-
98
-
99
-
100
-
101
-
102
-
103
-
104
-
105
-
106
-
107
-
108
-
109
-
110
-
111
-
112
-
113
-
114
-
115
-
116
-
117
-
118
-
119
-
120
-
121
-
122
-
123
-
124
-
125
-
126
-
127
-
128
-
129
-
130
-
131
-
132
-
133
-
134
-
135
-
136
-
137
-
138
-
139
-
140
-
141
-
142
-
143
-
144
-
145
-
146
-
147
-
148
-
149
-
150
-
151
-
152
-
153
-
154
-
155
-
156
-
157
-
158
-
159
-
160
-
161
-
162
-
163
-
164
-
165
-
166
-
167
-
168
-
169
-
170
-
171
-
172
-
173
-
174
-
175
-
176
-
177
-
178
-
179
-
180
-
181
-
182
-
183
-
184
-
185
-
186
-
187
-
188
-
189
-
190
-
191
-
192
-
193
-
194
-
195
-
196
-
197
-
198
-
199
-
200
-
201
-
202
-
203
-
204
-
205
-
206
-
207
-
208
-
209
-
210
-
211
-
212
-
213
-
214
-
215
-
216
-
217
-
218
-
219
-
220
-
221
-
222
-
223
-
224
-
225
-
226
-
227
-
228
-
229
-
230
-
231
-
232
-
233
-
234
-
235
-
236
-
237
-
238
-
239
-
240
-
241
-
242
-
243
-
244
-
245
-
246
-
247
-
248
-
249
-
250
-
251
-
252
-
253
-
254
-
255
 |
 |
