Canon 2064B001 DC210 Manual - Page 33
Displaying the Photos
 |
UPC - 013803079517
View all Canon 2064B001 manuals
Add to My Manuals
Save this manual to your list of manuals |
Page 33 highlights
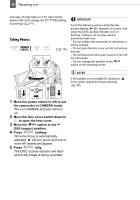
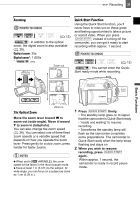
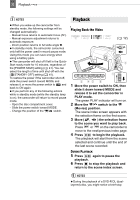
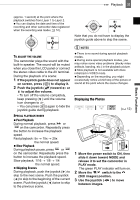
Playback 33 Basic Functions (approx. 1 second) at the point where the playback switches from Layer 1 to Layer 2. You can display the date and time of the recording and other camcorder data registered when the recording was made ( 51). Note that you do not have to display the joystick guide above to skip the scene. TO ADJUST THE VOLUME The camcorder plays the sound with the built-in speaker. The sound will be muted when you close the LCD panel or connect the stereo video cable to the AV terminal. During the playback of a scene: 1 If the joystick guide does not appear on screen, press ( ) to display it. 2 Push the joystick ( ) toward or to adjust the volume. • To turn off the volume completely, keep pressing ( ) until the volume icon changes to . • You can press ( ) again to hide the joystick guide during playback. SPECIAL PLAYBACK MODES Fast Playback During normal playback, press or on the camcorder. Repeatedly press the button to increase the playback speed. Fast playback: 5x → 15x → 25x the normal speed. Slow Playback During playback pause, press or on the camcorder. Repeatedly press the button to increase the playback speed. Slow playback: 1/16 → 1/8 → 1/4 the normal speed. Skipping Scenes During playback, push the joystick ( ) to skip to the next scene. Push the joystick ( ) to skip to the beginning of the current scene. Push the joystick ( ) twice to skip to the previous scene. NOTES There is no sound during special playback modes. During some special playback modes, you may notice some video problems (blocky video artifacts, banding, etc.) in the playback picture. Slow playback is not available with discs initialized in VIDEO mode. Depending on the recording, you might occasionally notice a brief stop of the picture or sound at the point where the scene changes. Displaying the Photos ( 12) 1 Move the power switch to ON, then slide it down toward MODE and release it to set the camcorder in PLAY mode. The green PLAY indicator will turn on. 2 Move the / switch to the (Still images) position. 3 Use the joystick ( ) to move between images.
-
 1
1 -
2
-
3
-
4
-
5
-
6
-
7
-
8
-
9
-
10
-
11
-
12
-
13
-
14
-
15
-
16
-
17
-
18
-
19
-
20
-
21
-
22
-
23
-
24
-
25
-
26
-
27
-
 28
28 -
 29
29 -
 30
30 -
 31
31 -
 32
32 -
 33
33 -
 34
34 -
 35
35 -
 36
36 -
 37
37 -
 38
38 -
39
-
40
-
41
-
42
-
43
-
44
-
45
-
46
-
47
-
48
-
49
-
50
-
51
-
52
-
53
-
54
-
55
-
56
-
57
-
58
-
59
-
60
-
61
-
62
-
63
-
64
-
65
-
66
-
67
-
68
-
69
-
70
-
71
-
72
-
73
-
74
-
75
-
76
-
77
-
78
-
79
-
80
-
81
-
82
-
83
-
84
-
85
 |
 |
