Canon 2064B001 DC210 Manual - Page 48
Image Effects
 |
UPC - 013803079517
View all Canon 2064B001 manuals
Add to My Manuals
Save this manual to your list of manuals |
Page 48 highlights
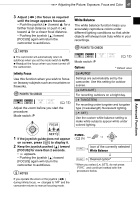
48 Adjusting the Picture: Exposure, Focus and Color TO SET THE CUSTOM WHITE BALANCE 1 Point the camcorder at a white object, zoom in until it fills the whole screen and press ( ). When the adjustment is completed, stops flashing and stays on. The camcorder retains the custom setting even if you turn off the camcorder. 2 Press FUNC. to save the setting and close the menu. NOTES When you have set the custom white balance: - Depending on the light source, may keep flashing. The result will still be better than with [ AUTO]. - Reset the white balance when the lighting condition changes. - Turn off the digital zoom. The camcorder retains the custom white balance setting even if you turn it off. Custom white balance may provide better results in the following cases: - Changing lighting conditions - Close-ups - Subjects in a single color (sky, sea or forest) - Under mercury lamps and certain types of fluorescent lights Image Effects You can use the image effects to change the color saturation and contrast to record images with special color effects. POINTS TO CHECK ( 12) Mode switch: P Options Default value [ IMAGE EFFECT OFF] Records with no image enhancing effects. [ VIVID] Emphasizes the contrast and color saturation. [ NEUTRAL] Tones down the contrast and color saturation. [ SOFT SKIN DETAIL] Softens the details in the skin tone area for a more complimentary appearance. To obtain the best effect, use this setting when recording a person in close-up. Note that areas similar to the skin color may lack in detail. FUNC. ( 25) FUNC. Icon of the currently selected Image Effect FUNC. Desired option
-
 1
1 -
2
-
3
-
4
-
5
-
6
-
7
-
8
-
9
-
10
-
11
-
12
-
13
-
14
-
15
-
16
-
17
-
18
-
19
-
20
-
21
-
22
-
23
-
24
-
25
-
26
-
27
-
28
-
29
-
30
-
31
-
32
-
33
-
34
-
35
-
36
-
37
-
38
-
39
-
40
-
41
-
42
-
 43
43 -
 44
44 -
 45
45 -
 46
46 -
 47
47 -
 48
48 -
 49
49 -
 50
50 -
 51
51 -
 52
52 -
 53
53 -
54
-
55
-
56
-
57
-
58
-
59
-
60
-
61
-
62
-
63
-
64
-
65
-
66
-
67
-
68
-
69
-
70
-
71
-
72
-
73
-
74
-
75
-
76
-
77
-
78
-
79
-
80
-
81
-
82
-
83
-
84
-
85
 |
 |
