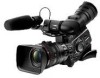
Canon 2080B001 XL H1S / XL H1A Instruction Manual - Page 60
Embedded Audio, Open the menu and select [SIGNAL SETUP]. Select [SDI OUTPUT], select a setting
 |
UPC - 013803079685
View all Canon 2080B001 manuals
Add to My Manuals
Save this manual to your list of manuals |
Page 60 highlights
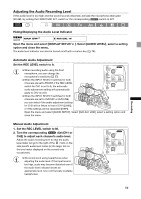
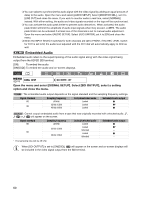
You can select to synchronize the audio signal with the video signal by adding an equal amount of delay to the audio. Open the menu and select [AUDIO SETUP]. Select [MONITOR SEL.], set it to [LINE OUT] and close the menu. If you wish to monitor audio in real time, select [NORMAL] instead. With either setting, the audio and video signals recorded on the tape will be synchronized. You can activate the audio peak limiter to prevent audio distortions. When activated, the audio peak limiter will limit the amplitude of audio input signals when they exceed -4 dBFS. The audio peak limiter can be activated if at least one of the channels is set to manual audio adjustment. Open the menu and select [AUDIO SETUP]. Select [AUD.LIMITER], set it to [ON] and close the menu. When the INPUT SELECT switches for both channels are set to FRONT, if the REC LEVEL switch for CH1 is set to M, the audio level adjusted with the CH1 dial will automatically apply to CH2 as well. Embedded Audio Embedded audio refers to the superimposing of the audio signal along with the video signal being output from the HD/SD SDI terminal. [ON]: To embed the audio. [ON(OSD)]: To embed the audio and on-screen displays. MENU ( 33) SIGNAL SETUP SDI OUTPUT••OFF Open the menu and select [SIGNAL SETUP]. Select [SDI OUTPUT], select a setting option and close the menu. : The embedded audio output depends on the signal standard and the sampling frequency settings. Signal standard HD SD Sampling frequency (48 kHz) 32 kHz (12bit) 48 kHz (16bit) Locked/unlocked audio Locked Locked Locked Embedded audio output * : Cannot output embedded audio from a tape that was originally recorded with unlocked audio. , 3/4 or 1/2 will appear on the screen. Signal standard HD SD Sampling frequency (48 kHz) 32 kHz (12bit) 48 kHz (16bit) Locked/unlocked audio Locked Locked Unlocked Locked Unlocked Embedded audio output * - - * The sampling rate will be 48 kHz. When [SDI OUTPUT] is set to [ON(OSD)], will appear on the screen and on-screen displays will be included in the video signal output from the SDI terminal. 60
-
 1
1 -
2
-
3
-
4
-
5
-
6
-
7
-
8
-
9
-
10
-
11
-
12
-
13
-
14
-
15
-
16
-
17
-
18
-
19
-
20
-
21
-
22
-
23
-
24
-
25
-
26
-
27
-
28
-
29
-
30
-
31
-
32
-
33
-
34
-
35
-
36
-
37
-
38
-
39
-
40
-
41
-
42
-
43
-
44
-
45
-
46
-
47
-
48
-
49
-
50
-
51
-
52
-
53
-
54
-
 55
55 -
 56
56 -
 57
57 -
 58
58 -
 59
59 -
 60
60 -
 61
61 -
 62
62 -
 63
63 -
 64
64 -
 65
65 -
66
-
67
-
68
-
69
-
70
-
71
-
72
-
73
-
74
-
75
-
76
-
77
-
78
-
79
-
80
-
81
-
82
-
83
-
84
-
85
-
86
-
87
-
88
-
89
-
90
-
91
-
92
-
93
-
94
-
95
-
96
-
97
-
98
-
99
-
100
-
101
-
102
-
103
-
104
-
105
-
106
-
107
-
108
-
109
-
110
-
111
-
112
-
113
-
114
-
115
-
116
-
117
-
118
-
119
-
120
-
121
-
122
-
123
-
124
-
125
-
126
-
127
-
128
-
129
-
130
-
131
-
132
-
133
-
134
-
135
-
136
-
137
-
138
-
139
-
140
-
141
-
142
-
143
-
144
-
145
-
146
-
147
-
148
-
149
-
150
-
151
-
152
-
153
-
154
-
155
-
156
-
157
-
158
-
159
-
160
-
161
-
162
-
163
 |
 |
