Canon 3000F PhotoBase_manual.pdf - Page 7
Making A Slide Show
 |
UPC - 013803028430
View all Canon 3000F manuals
Add to My Manuals
Save this manual to your list of manuals |
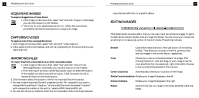
Page 7 highlights
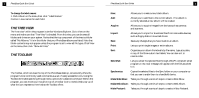
11 PhotoBase Quick Start Guide Zoom In: Zoom Out: Undo: Brightness: Contrast: Saturation: Red-eye Removal: Text: Play: Record: Magnifies your image on the screen. Makes your image smaller on the screen. Reverses the last edit made. Opens a slider on the right side o f the editing toolbar that allows you to adjust the b rightness/darkness of the image. Opens a slider on the right side o f the editing toolbar that allows you to adjust the image contrast. Opens a slider on the right side o f the editing toolbar that allows you to adjust the color intensity of the image. Reduces the amount of red in a small area. After selecting this tool, click on the red part of an eye to have it removed. Allows you to add text to an image. Choose the font,style, size,and color of the text. You can also add a drop shadow. Once you've added the text, you can click and drag it to the desired location on the image. Plays any audio attached to the current image. Opens a standard sound recorder that lets you record and save audio for attachment to the image. After closing the Edit Screen, you will be prompted to save your image. You can choose to save over the existing file,save as a new file, or not save at all. PhotoBase Quick Start Guide 12 MAKING A SLIDE SHOW PhotoBase lets you create Slide Shows of still images and videos with or without an audio track. You can preview Slide Shows within the program, or export them to your hard drive or CD (a compliant CD-burning program is required). To preview a Slide Show: 1. Click Create on the menu,then click "Perform Slide Show." 2. Choose to have the presentation loop over and over (check the Auto Loops box),use transition effects between slides (check the Effects box),set the display time for still images,and set your audio options. 3. During the Slide Show, you can pause,and skip back and forth among each slide. To create a Slide Show: 1. Click Create on the menu,then click "Create Slide Show." Alternately, you can click Make Slide Show on the Toolbar. 2. The creation process will begin. The first step involves selecting the images and videos in the current folder/album that you'd like to include in the presentation. Highlight the files you'd like to use,then click Add>. To add all available files to the presentation, click Add All>. Click the respective Remove button to remove files. 3. The next step in the creation process involves selecting your audio options. You can exclude audio, play audio attached to the thumbnails, or play selected audio tracks. If you choose this last option, click Add to browse your system to select audio files to play during the presentation. 4. The final step involves selecting your save destination. You can choose to burn the presentation to a CD, or save it to your hard drive. If you choose to save it to your hard drive, you can give the EXE file (the file that you'd run to start the Slide Show) a
-
 1
1 -
 2
2 -
 3
3 -
 4
4 -
 5
5 -
 6
6 -
 7
7 -
 8
8 -
 9
9 -
 10
10
 |
 |
