Canon A400 PowerShot A400 Camera User Guide - Page 18
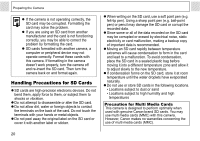
Insert the SD card as shown and, close the SD card slot/battery cover.
 |
UPC - 013803043846
View all Canon A400 manuals
Add to My Manuals
Save this manual to your list of manuals |
Page 18 highlights
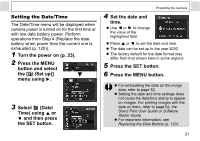
Preparing the Camera 4 Insert the SD card as shown and close the SD card slot/battery cover. z Insert the SD card as shown on the inside of the battery cover until you hear it click into place. z Do not touch or allow metal objects to contact the terminals on the back of the SD card. Back Terminals c d To remove the SD card Push in the SD card until you hear it click, then release it. 16 z Since the camera is writing, reading, erasing or transmitting data to or from the SD card when the indicator blinks green, never perform the following actions during this time. It could corrupt the image data. • Subject the camera body to vibration or shocks. • Turn the camera's power off or open the SD card slot/battery cover. z Please note that SD cards formatted with other manufacturers' cameras or a computer, or formatted or edited with application programs, may slow down writing to the SD card or may not operate correctly in the camera. z You are recommended to use SD cards that have been formatted in your camera (p. 19). The card supplied with the camera may be used without further formatting. z We recommend that you use the separately sold AC Adapter Kit ACK800 to power the camera during long usage sessions (p. 124). z The separately sold battery charger kit lets you use rechargeable NiMH batteries to power the camera (p. 121).
-
 1
1 -
2
-
3
-
4
-
5
-
6
-
7
-
8
-
9
-
10
-
11
-
12
-
 13
13 -
 14
14 -
 15
15 -
 16
16 -
 17
17 -
 18
18 -
 19
19 -
 20
20 -
 21
21 -
 22
22 -
 23
23 -
24
-
25
-
26
-
27
-
28
-
29
-
30
-
31
-
32
-
33
-
34
-
35
-
36
-
37
-
38
-
39
-
40
-
41
-
42
-
43
-
44
-
45
-
46
-
47
-
48
-
49
-
50
-
51
-
52
-
53
-
54
-
55
-
56
-
57
-
58
-
59
-
60
-
61
-
62
-
63
-
64
-
65
-
66
-
67
-
68
-
69
-
70
-
71
-
72
-
73
-
74
-
75
-
76
-
77
-
78
-
79
-
80
-
81
-
82
-
83
-
84
-
85
-
86
-
87
-
88
-
89
-
90
-
91
-
92
-
93
-
94
-
95
-
96
-
97
-
98
-
99
-
100
-
101
-
102
-
103
-
104
-
105
-
106
-
107
-
108
-
109
-
110
-
111
-
112
-
113
-
114
-
115
-
116
-
117
-
118
-
119
-
120
-
121
-
122
-
123
-
124
-
125
-
126
-
127
-
128
-
129
-
130
-
131
-
132
-
133
-
134
-
135
-
136
-
137
-
138
-
139
-
140
-
141
-
142
 |
 |
