Canon A400 PowerShot A400 Camera User Guide - Page 37
Press the MENU button., Select, Review using, Select a Review, setting using, and press the, MENU - is review
 |
UPC - 013803043846
View all Canon A400 manuals
Add to My Manuals
Save this manual to your list of manuals |
Page 37 highlights
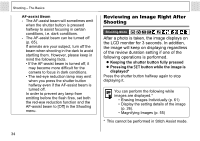
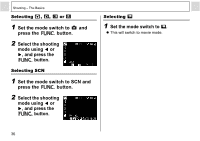
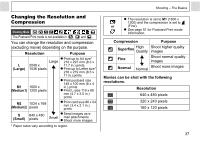
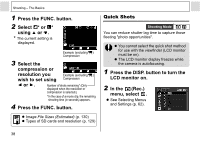
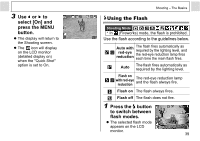
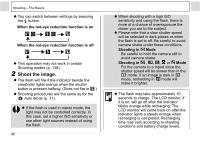
Changing the Image Display Duration The length of time images are displayed after a photo has been taken can be changed from between 3 seconds to 10 seconds or turned off. 1 Press the MENU button. z The [ (Rec.)] menu appears. 2 Select (Review) using or . 3 Select a Review setting using or and press the MENU button. z With the [Off] option, the image will not display. z With the [3 sec.] to [10 sec.] options, the image will appear for the time selected even if you release the shutter button. z You can continue to display the image as long as the shutter button is fully held pressed regardless of the Review setting. z Another picture can be taken even while the last is displayed. Shooting - The Basics Selecting a Shooting Mode The following modes are available with this camera. Auto The camera automatically makes most of the settings for you. You can manually adjust the Manual exposure, white balance, and other settings before shooting. Stitch For shooting panorama Assist composition images Select from 8 scene modes to shoot with the most appropriate Special Scene settings for the scene. Portrait Beach Night Scene Fireworks Foliage Underwater Snow Indoor Movie For shooting movies The settings selected for each mode are kept even if the shooting mode is changed. When the power is turned off, the settings are also retained for certain shooting modes, but not for others (p. 138). 35
-
 1
1 -
2
-
3
-
4
-
5
-
6
-
7
-
8
-
9
-
10
-
11
-
12
-
13
-
14
-
15
-
16
-
17
-
18
-
19
-
20
-
21
-
22
-
23
-
24
-
25
-
26
-
27
-
28
-
29
-
30
-
31
-
 32
32 -
 33
33 -
 34
34 -
 35
35 -
 36
36 -
 37
37 -
 38
38 -
 39
39 -
 40
40 -
 41
41 -
 42
42 -
43
-
44
-
45
-
46
-
47
-
48
-
49
-
50
-
51
-
52
-
53
-
54
-
55
-
56
-
57
-
58
-
59
-
60
-
61
-
62
-
63
-
64
-
65
-
66
-
67
-
68
-
69
-
70
-
71
-
72
-
73
-
74
-
75
-
76
-
77
-
78
-
79
-
80
-
81
-
82
-
83
-
84
-
85
-
86
-
87
-
88
-
89
-
90
-
91
-
92
-
93
-
94
-
95
-
96
-
97
-
98
-
99
-
100
-
101
-
102
-
103
-
104
-
105
-
106
-
107
-
108
-
109
-
110
-
111
-
112
-
113
-
114
-
115
-
116
-
117
-
118
-
119
-
120
-
121
-
122
-
123
-
124
-
125
-
126
-
127
-
128
-
129
-
130
-
131
-
132
-
133
-
134
-
135
-
136
-
137
-
138
-
139
-
140
-
141
-
142
 |
 |
