Canon A400 PowerShot A400 Camera User Guide - Page 33
Shooting - The Basics
 |
UPC - 013803043846
View all Canon A400 manuals
Add to My Manuals
Save this manual to your list of manuals |
Page 33 highlights
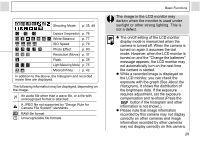
Shooting - The Basics See Functions Available in Each Shooting Mode (p. 138) at the end of this manual to find out which settings can be changed in which shooting modes. Auto Mode Shooting Mode In this mode, all you have to do is press the shutter button and let the camera do everything else. 1 Set the mode switch to . 2 Select from menu. z See Selecting Menus and Settings (p. 62). * The current setting is displayed. 3 Aim the camera at the subject you wish to shoot. 4 Use the zoom button to achieve the desired composition (relative subject size in the viewfinder). : Magnifies the size of subject (Telephoto) : Decreases the size of the subject (Wide angle) z The angle of view can be adjusted within the 45 to 100 mm range, in 35mm film equivalent. z When the LCD monitor is on, the combined use of the digital zoom and optical zoom enables magnified shooting up to approx. 7x (See Digital Zoom, p. 44). 5 Press the shutter button halfway. z The shutter button has a two-stage action. Pressing Halfway Pressing halfway automatically sets the exposure and focus. 31
-
 1
1 -
2
-
3
-
4
-
5
-
6
-
7
-
8
-
9
-
10
-
11
-
12
-
13
-
14
-
15
-
16
-
17
-
18
-
19
-
20
-
21
-
22
-
23
-
24
-
25
-
26
-
27
-
 28
28 -
 29
29 -
 30
30 -
 31
31 -
 32
32 -
 33
33 -
 34
34 -
 35
35 -
 36
36 -
 37
37 -
 38
38 -
39
-
40
-
41
-
42
-
43
-
44
-
45
-
46
-
47
-
48
-
49
-
50
-
51
-
52
-
53
-
54
-
55
-
56
-
57
-
58
-
59
-
60
-
61
-
62
-
63
-
64
-
65
-
66
-
67
-
68
-
69
-
70
-
71
-
72
-
73
-
74
-
75
-
76
-
77
-
78
-
79
-
80
-
81
-
82
-
83
-
84
-
85
-
86
-
87
-
88
-
89
-
90
-
91
-
92
-
93
-
94
-
95
-
96
-
97
-
98
-
99
-
100
-
101
-
102
-
103
-
104
-
105
-
106
-
107
-
108
-
109
-
110
-
111
-
112
-
113
-
114
-
115
-
116
-
117
-
118
-
119
-
120
-
121
-
122
-
123
-
124
-
125
-
126
-
127
-
128
-
129
-
130
-
131
-
132
-
133
-
134
-
135
-
136
-
137
-
138
-
139
-
140
-
141
-
142
 |
 |
