Canon CanoScan FB 1200S User Guide
Canon CanoScan FB 1200S Manual
 |
View all Canon CanoScan FB 1200S manuals
Add to My Manuals
Save this manual to your list of manuals |
Canon CanoScan FB 1200S manual content summary:
- Canon CanoScan FB 1200S | User Guide - Page 1
For Windows & Macintosh Canon Film Adapter Unit Software FilmGet FAU User's Guide Quick Start For those who prefer to jump right into scanning Steps 1-3 For those who prefer a methodical approach Other Functions For those who are detail oriented - Canon CanoScan FB 1200S | User Guide - Page 2
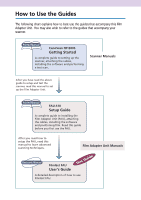
The following chart explains how to best use the guides that accompany this Film Adapter Unit. You may also wish to refer to the guides that accompany your scanner. Printed Manual CanoScan FB1200S Getting Started A complete guide to setting up the scanner, attaching the cables, installing the - Canon CanoScan FB 1200S | User Guide - Page 3
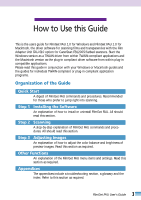
Use this Guide This is the users guide for FilmGet FAU 1.0 for Windows and FilmGet FAU 1.0 for Macintosh, the driver software for scanning films and transparencies with the Film Adapter Unit FAU-S10 option for CanoScan FB1200S flatbed scanners. Start the Windows version as a TWAIN driver from within - Canon CanoScan FB 1200S | User Guide - Page 4
supplementary information. Read these topics at your discretion. Notation FilmGet FAU 1.0 for Windows may be used with the Windows® 95, Windows® 98 and Windows NT® 4.0 operating systems. References to Windows in this guide include all three. FilmGet FAU 1.0 for Macintosh may be used with Version - Canon CanoScan FB 1200S | User Guide - Page 5
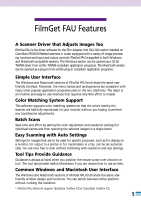
driver software for the Film Adapter Unit FAU-S10 option installed on CanoScan FB1200S flatbed scanners. It is also equipped with a variety of image processing functions and input and output controls. FilmGet FAU is supplied in both Windows Matching System Support This software supports color - Canon CanoScan FB 1200S | User Guide - Page 6
28 Preview All Window 29 Preview All Window 29 Toolbar in the Preview All Window 29 How to Find Help 30 Scanning Procedures 31 Positioning Film 32 Preparing the Film Adapter Unit 32 Positioning Film 32 Setting the Film Type 33 Setting the Image Mode 34 6 FilmGet FAU User's Guide - Canon CanoScan FB 1200S | User Guide - Page 7
Image for Verification 39 Moving Images within the Preview All Window 40 Settings for 120 Format Films 40 Previewing 41 Previewing Images 45 Adjusting the Scan Settings 46 Important Facts about Scan Settings 46 Guide to the Scan Settings Section 47 Procedures Common to All Scan Modes 48 - Canon CanoScan FB 1200S | User Guide - Page 8
Area 63 Adjusting the Scan Area Selection Frame 63 Adjusting the Selected Scan Area 63 Final Scan 64 Step 3 Adjusting Images Image Adjustment Modes 67 Guide to the Image Adjustment Section 67 Adjustment Mode Types 68 Procedures Common to all Image Adjustment Modes 69 How to Use Each Image - Canon CanoScan FB 1200S | User Guide - Page 9
Device and Help Menus 91 Selecting a Scanner 91 Checking a Scanner 91 Viewing the Device Version Information 92 Viewing the Software Version Information 92 Appendices Troubleshooting 94 Glossary 99 Index 103 9 FilmGet FAU User's Guide - Canon CanoScan FB 1200S | User Guide - Page 10
Quick Start For Those Who Prefer to Jump Right into Scanning - Canon CanoScan FB 1200S | User Guide - Page 11
, and start FilmGet FAU as a TWAIN driver. The following is a sample procedure using Adobe Photoshop 5.0 LE. (1) Start Adobe Photoshop 5.0 LE. (2) Click the [File] menu and select [Import], [Select TWAIN_32 Source... ], and [Canon FilmGet FAU 1.0 for Windows]. (3) Click the [File] menu and select - Canon CanoScan FB 1200S | User Guide - Page 12
the [File] menu and select [Import] and [FilmGet FAU 1.0...]. The FilmGet FAU main window will display. 3. Position the film. See the Getting Started, p. 24. Insert the film in a film guide and place the film guide on the scanner platen. Calibration Strip Align the alignment mark on the film - Canon CanoScan FB 1200S | User Guide - Page 13
41. The preview progress bar will display. Press the button if you wish to stop the preview scan. Main Window The image will display in the preview area. • NOTE • • The cancel command may take a few moments area or by doubleclicking an image in the preview all window. 13 FilmGet FAU User's Guide - Canon CanoScan FB 1200S | User Guide - Page 14
Section 11. Select the scan area for each image. See p. 63. Drag the '+' shaped mouse cursor diagonally to select a scan area. + 14 FilmGet FAU User's Guide - Canon CanoScan FB 1200S | User Guide - Page 15
button. See p. 64. The scanned image will appear in the window of the application program from which FilmGet FAU was summoned. Images from all the selected frames will display. 13. Retouch the image as required. See the Manual for your application program. Print or save inage to disk with - Canon CanoScan FB 1200S | User Guide - Page 16
STEP 1 Installing the Software Proceed directly to Step 2 if you have already installed FilmGet FAU with the instructions from the Getting Started. - Canon CanoScan FB 1200S | User Guide - Page 17
256 colors or more (32,000 colors recommended), 800 x 600 pixels or more Other: CD-ROM drive You are recommended to install the latest service pack for Windows. Operating System: System Software 7.5 or later CPU: PowerPC Hard Disk: 50 MB or more available RAM: 32 MB or more (64 MB or more - Canon CanoScan FB 1200S | User Guide - Page 18
FAU from its CD-ROM. For instructions, see p.17, 'Installing the FAU Software Program (Windows),' in the Getting Started. Uninstalling Click the Windows [Start] menu and select [Settings [Add/Remove Programs] icon. The Add/Remove Programs Properties window will display. 18 FilmGet FAU User's Guide - Canon CanoScan FB 1200S | User Guide - Page 19
[FilmGet FAU 1.0 for Windows] and click the button. 4. Click the [Yes] button. The FilmGet FAU Uninstall dialog will display. Continue the procedure by following the on-screen messages. • Place a check mark beside all of the uninstall categories. WARNING • If other Canon software for flatbed - Canon CanoScan FB 1200S | User Guide - Page 20
5. Click the [OK] button. The Add/Remove Programs Properties dialog will display again. 6. Click the close box at the upper right of the window. This completes the uninstall procedure. 20 FilmGet FAU User's Guide - Canon CanoScan FB 1200S | User Guide - Page 21
This topic explains the procedures for the Macintosh platform. For Windows, see p. 18. Installing Install FilmGet FAU from its CD-ROM. For instructions, see p. 21, 'Installing the FAU Software Program ( FAU] folder to the Trash. This concludes the uninstall procedures. 21 FilmGet FAU User's Guide - Canon CanoScan FB 1200S | User Guide - Page 22
STEP 2 Scanning - Canon CanoScan FB 1200S | User Guide - Page 23
and [Select TWAIN_32 Source...]. 3. The Select Source dialog will display. Select [Canon FilmGet FAU 1.0 for Windows] from the list and click the [Select] button. WARNING • The scanner or digital camera driver, such as ScanGear CS-S, has been used in the interim. 23 FilmGet FAU User's Guide - Canon CanoScan FB 1200S | User Guide - Page 24
items in steps 2 and 4. To use FilmGet FAU, select the TWAIN_32 option. • Please refer to the manuals accompanying the individual software package for the procedures for opening a TWAIN driver from within a TWAIN-compliant application program other than Adobe Photoshop 5.0 LE. Exiting FilmGet FAU - Canon CanoScan FB 1200S | User Guide - Page 25
FilmGet FAU This topic explains the procedures for the Macintosh platform. For Windows, see p. 23. Starting FilmGet FAU Start FilmGet FAU from within a Import] and [FilmGet FAU 1.0...]. w The FilmGet FAU main window will display. • This window is used to view the scanned images. 25 FilmGet FAU User - Canon CanoScan FB 1200S | User Guide - Page 26
manuals accompanying the individual software package for the procedures for opening a plug-in from within a plug-in compliant application program other than Adobe Photoshop 5.0 LE. Quitting FilmGet FAU 1. Click the (close box) at the upper left of the window . w The FilmGet FAU main window - Canon CanoScan FB 1200S | User Guide - Page 27
Window Scanning Main Window The main window window title. Click here and drag the window FAU (Windows). Show Preview All Window Shows the preview all window. frame in the preview all window. Preview Button Initiates a window of the application program from which FilmGet FAU was started. Window - Canon CanoScan FB 1200S | User Guide - Page 28
. See p. 91. Help Menu Displays FilmGet FAU help topics or software version data. See p. 92. Tool Bar in the Main Window Selector Tool. See p. 63. Grab Tool. See p. 45. Zoom In Tool. See p. 44. Zoom Out Tool. See p. . Flip Tool. See p. 45. Auto Correct Tool. See p. 45. 28 FilmGet FAU User's Guide - Canon CanoScan FB 1200S | User Guide - Page 29
the previewed film. Title Bar Displays the window title. Click here and drag the window to change its position on the desktop. Close Box Closes FilmGet FAU (Windows). Close Box Closes FilmGet FAU (Macintosh). Tool. See p. 39. 120 Format Settings Tool. See p. 40. 29 FilmGet FAU User's Guide - Canon CanoScan FB 1200S | User Guide - Page 30
tips that explain the functions of the buttons and tools in the window. When you click the button at the top right of the preview or preview all window, the button will change to the button. In this state, positioning Tool Tips Button Show/Hide Tool Tips Button Tool Tip 30 FilmGet FAU User's Guide - Canon CanoScan FB 1200S | User Guide - Page 31
to crop the image (frame by frame). (11) Initiate the final scan. See p. 64. Scan all the selected frames and display the images in the window of the application program from which FilmGet FAU was started. Use the application program to print or save the images. 31 FilmGet FAU User - Canon CanoScan FB 1200S | User Guide - Page 32
scanner. WARNING • Place the film face down to obtain the correct orientation. • Be sure not to obstruct the calibration slit when positioning the film guide. Always align the alignment marks. • Please refer to page 24 of the Getting Started for the proce- dures for placing the film in the film - Canon CanoScan FB 1200S | User Guide - Page 33
. • • NOTE • There are two formats for 35 mm film: sleeves or mounts. Select the correct option for each format. Sleeve Mount 33 FilmGet FAU User's Guide - Canon CanoScan FB 1200S | User Guide - Page 34
[36-Bit Color] and [24-Bit Color] options are grayed out and not available when a monochrome film type has been selected. 34 FilmGet FAU User's Guide - Canon CanoScan FB 1200S | User Guide - Page 35
by version 4.0 and later versions of Adobe Photoshop and by the Adobe Photoshop LE software shipped with the CanoScan FB1200S scanner. • If you are using a version of Adobe Photoshop that supports 36-bit color, images scanned in the 36-bit color and 12-bit grayscale modes become 16-bit channel - Canon CanoScan FB 1200S | User Guide - Page 36
[Preview All] button. The preview all window will display everything detected on the scanner Window (showing 35 mm sleeve film) When the preview all scan is complete, the preview all window preview all window by clicking the [Show Preview All Window] button at the top right of the main window. Click - Canon CanoScan FB 1200S | User Guide - Page 37
it. The trimming frame will disappear and the image frame will turn pale color. WARNING • The frame placed in position number one in the film guide will display at the top left of the preview all window. (The frame numbers in the preview all window correspond to the numbers on the film - Canon CanoScan FB 1200S | User Guide - Page 38
type of film selected. 35 mm Film (Sleeves) Frame Number 13 14 15 16 17 18 7 1 8 2 9 10 11 12 3 4 5 6 Film Guide 35 mm Film (Mounts) Preview All Window 7 4 1 8 5 2 9 6 3 4" x 5"/120 Format Film 120 Format Film 1 2 3 4" x 5" Format Film * Place the film face down in the - Canon CanoScan FB 1200S | User Guide - Page 39
frames to their default sizes and positions. Zooming an Image for Verification Click the zoom in tool to magnify the display of the preview all window by a factor of 2 with each click. Scroll Bars 39 FilmGet FAU User - Canon CanoScan FB 1200S | User Guide - Page 40
state over an image shifts the position of the image within the preview all window. • • NOTE • The grab tool is only activated when the preview all window has been zoomed with the zoom in tool. Settings for 120 Format Films . • The grayed out numbers cannot be selected. 40 FilmGet FAU User's Guide - Canon CanoScan FB 1200S | User Guide - Page 41
, that the preview scan is only an approximation of how the final scan will appear. The end result may differ slightly. 41 FilmGet FAU User's Guide - Canon CanoScan FB 1200S | User Guide - Page 42
multiple images have been batch scanned with the preview function, you can switch the image in the preview window by selecting its frame number from the list box at the top of the preview area. Click the initiate a preview scan of the image by clicking the [Yes] button. 42 FilmGet FAU User's Guide - Canon CanoScan FB 1200S | User Guide - Page 43
You can switch the image displayed in the preview area by clicking the (Show Preview All Window) button and double-clicking the frame you wish to view. Double-click a frame to switch the image in You can initiate a preview scan of the image by clicking the [Yes] button. 43 FilmGet FAU User's Guide - Canon CanoScan FB 1200S | User Guide - Page 44
edges of the preview area when it is zoomed. The scroll bars can be used to change the portion of the image appearing in the window. This function merely changes the display magnification. It will not affect the resolution or scan size (See pp. 46, 47.) of the scanned image. The - Canon CanoScan FB 1200S | User Guide - Page 45
the highlights and shadows, brightness and coloring of the preview image. • Click the (reset) button to reverse the changes. Reset button 45 FilmGet FAU User's Guide - Canon CanoScan FB 1200S | User Guide - Page 46
image on a printer, transmitting it as a fax or displaying it on a monitor are examples of how an image may be output. 46 FilmGet FAU User's Guide - Canon CanoScan FB 1200S | User Guide - Page 47
would require considerable forethought to set correctly if you had to manually set the input resolution, output resolution, and image width and merely by selecting one of these modes and adjusting its preset values. Guide to the Scan Settings Section The scan settings section is used to adjust - Canon CanoScan FB 1200S | User Guide - Page 48
Out Values In the scan settings section, grayed out figures indicate values that are automatically calculated as a function of other settings. 48 FilmGet FAU User's Guide This indicates that the value is automatically calculated as a function of other settings. - Canon CanoScan FB 1200S | User Guide - Page 49
. The items you add will display in the custom mode pull-down menu. See p. 60, 'Adding Scan Settings,' for more information. 49 FilmGet FAU User's Guide - Canon CanoScan FB 1200S | User Guide - Page 50
mm Film 1.4MB 22KB 75dpi 90KB 150dpi 360KB 300dpi 600dpi 1200dpi * These numbers are approximate and may differ from actual results. 50 FilmGet FAU User's Guide - Canon CanoScan FB 1200S | User Guide - Page 51
the fixed image size button, it will change into the locked button and fix the file size at the specified value. 51 FilmGet FAU User's Guide - Canon CanoScan FB 1200S | User Guide - Page 52
helpful to keep this relationship in mind. In this case, there is no need to pay attention to the output resolution. 52 FilmGet FAU User's Guide - Canon CanoScan FB 1200S | User Guide - Page 53
dots per inch Keep this relationship in mind when you need to pay attention to the size of the output image. 53 FilmGet FAU User's Guide - Canon CanoScan FB 1200S | User Guide - Page 54
size to fit within the margins below. Top Margin: 20.5 mm Bottom Margin: 20.5 mm Left Margin: 3.7 mm Right Margin: 3.7 mm 54 FilmGet FAU User's Guide - Canon CanoScan FB 1200S | User Guide - Page 55
'Adding and Deleting Items.' • NOTE • • The resolution of the text option is set to the following values. Windows: 96 dpi Macintosh: 72 dpi Image and File Sizes The image and file sizes are automatically calculated when you set as you change the settings above them. 55 FilmGet FAU User's Guide - Canon CanoScan FB 1200S | User Guide - Page 56
the monitor and the display size. The input boxes are grayed out and values cannot be entered directly into the boxes. 56 FilmGet FAU User's Guide Image Size File Size - Canon CanoScan FB 1200S | User Guide - Page 57
output target. The input boxes are grayed out and values cannot be entered directly into the boxes. Image Size File Size 57 FilmGet FAU User's Guide - Canon CanoScan FB 1200S | User Guide - Page 58
that the file will be quadruple the size of a MediumRes file. The input and output resolutions are set to [1200 dpi]. Medium-Res: Select this when you require the image quality to be somewhere between the Hi-Res and Low , the output target is set to [Printer (300 dpi)]. 58 FilmGet FAU User's Guide - Canon CanoScan FB 1200S | User Guide - Page 59
mark removes the item from the pull-down menu. • • NOTE • The preset items cannot be deleted from the pull-down menu. 59 FilmGet FAU User's Guide - Canon CanoScan FB 1200S | User Guide - Page 60
Settings Select the [Customize] item from the custom mode pull-down menu to delete a custom scan setting. See p. 59, 'Customizing the PullDown Menu,' for more instructions. 60 FilmGet FAU User's Guide - Canon CanoScan FB 1200S | User Guide - Page 61
items. • You cannot add or delete items to or from a pull-down menu that does not have a [Add and Delete] item. 61 FilmGet FAU User's Guide - Canon CanoScan FB 1200S | User Guide - Page 62
frame individually. • NOTE • • See page 67, 'Step 3 Adjusting Images,' for more information on adjusting the brightness and coloring. Image Adjustment Section 62 FilmGet FAU User's Guide - Canon CanoScan FB 1200S | User Guide - Page 63
selection frame around the image. • • NOTE • See page 49, Aspect Ratio of the Scan Area, for instructions on how to change the width-to-height proportions of the scan area selection frame. Adjusting the Selected Scan them until you achieve satisfactory results. 63 FilmGet FAU User's Guide - Canon CanoScan FB 1200S | User Guide - Page 64
of images from an application program that does not support batch scanning. Please check the specifications for your application program before attempting batch scanning. Adobe Photoshop 5.0 LE, which is shipped with the CanoScan FB1200S scanner, supports batch scanning. 64 FilmGet FAU User's Guide - Canon CanoScan FB 1200S | User Guide - Page 65
of the window to close FilmGet FAU and display the scanned image(s) in the application program window. Batch Scanned You can select frame numbers from the preview all window without actually initiating the preview all scan. Then you manually setting the exposure setting. This may not, however, - Canon CanoScan FB 1200S | User Guide - Page 66
STEP 3 Adjusting Images This section explains how to adjust the brightness and coloring of preview images. - Canon CanoScan FB 1200S | User Guide - Page 67
Adjustment Modes Adjusting Images You can use the image adjustments to correct a preview image if it is not quite to your satisfaction. Guide to the Image Adjustment Section Reset Button for the Tab Reset All Button Channel Selection Panel Adjustment Mode Tabs Adjustment Settings Area This is - Canon CanoScan FB 1200S | User Guide - Page 68
p. 81. Tone Curve. See p. 79. Brightness/Contrast. See p. 75. Histogram. See p. 73. Black and White Image Mode Threshold Value. See p. 83. 68 FilmGet FAU User's Guide - Canon CanoScan FB 1200S | User Guide - Page 69
will change accordingly. You may also input a value directly into the box. The slider will change accordingly. Slider Tab Input Box 69 FilmGet FAU User's Guide - Canon CanoScan FB 1200S | User Guide - Page 70
are displayed in the 'XXX/YYY' format, where 'XXX' represents the original color values and 'YYY' represents the adjusted color values. 70 FilmGet FAU User's Guide - Canon CanoScan FB 1200S | User Guide - Page 71
three color channels, red (R), green (G) and blue (B). See p. 77. Adjust the brightness Adjust the overall brightness of the image. See p. 75. 71 FilmGet FAU User's Guide - Canon CanoScan FB 1200S | User Guide - Page 72
. Adjust the tone curve Adjust the balance between the input and output brightness values of areas of the image. See p. 79. 72 FilmGet FAU User's Guide - Canon CanoScan FB 1200S | User Guide - Page 73
) and the darkest values (shadows). You can specify cutoff values for highlights or shadows to create a better distribution of the halftones. Guide to the Histogram Tab Individual Channels Click here to adjust each RGB channel separately (not available for grayscale images). Master Channel Click - Canon CanoScan FB 1200S | User Guide - Page 74
slider tabs inward. • NOTE • • Click the selector tool in the preview area to deselect the black or white point eyedropper tool. 74 FilmGet FAU User's Guide - Canon CanoScan FB 1200S | User Guide - Page 75
and shadows) of an image. It is particularly useful when the original image is too bright or dark, or the contrast is too flat. Guide to the Brightness/Contrast Tab Contrast Brightness Brightness Slider Drag the slider tab left (darker) or right (brighter) to change the brightness setting. Input - Canon CanoScan FB 1200S | User Guide - Page 76
in adding clarity to the image. Raising the contrast too high, however, will obscure the dark portions or create excessive highlights. 76 FilmGet FAU User's Guide - Canon CanoScan FB 1200S | User Guide - Page 77
to adjust the balance between the three colors; red (R), green (G) and blue (B). It is especially useful when a particular color tone is too strong or weak. Guide to the Color Balance Tab RGB Sliders Drag the slider tabs left (weaker) or right (stronger) to change the setting for each color. Red - Canon CanoScan FB 1200S | User Guide - Page 78
Adjust each color separately Red is accentuated Green is accentuated Blue is accentuated 78 FilmGet FAU User's Guide - Canon CanoScan FB 1200S | User Guide - Page 79
representation of the highlights and shadows. It is especially useful for making fine adjustments to the brightness of specific areas of an image. Guide to the Tone Curve Tab Individual Channels Click here to adjust each RGB channel separately (not available for grayscale images). Master Channel - Canon CanoScan FB 1200S | User Guide - Page 80
as smooth as possible to provide a natural appearance. You can check the preview image to see the effect of any changes. 80 FilmGet FAU User's Guide - Canon CanoScan FB 1200S | User Guide - Page 81
is especially useful for matching the colors that display on your monitor to the colors on the original image. Guide to the Gamma Value Tab Preset Gamma Values Click the radio button for any preset value to select it. Input High Gamma Value Input Input Low Gamma Value 81 FilmGet FAU User's Guide - Canon CanoScan FB 1200S | User Guide - Page 82
clicking the [Settings] menu, selecting [Preferences] and clicking the [Use ColorMatching] option. • Please read the documents shipped with your monitor or contact the manufacturer's customer service department to obtain the correct gamma value for your particular model. 82 FilmGet FAU User - Canon CanoScan FB 1200S | User Guide - Page 83
particular dot is assigned a black or white value is called the threshold value. The default threshold value is 128. Guide to the Threshold Value Tab Threshold Value Input Box Input a value from 0 to 255. You can also use (slider moved to the right) moved to the left) 83 FilmGet FAU User's Guide - Canon CanoScan FB 1200S | User Guide - Page 84
Other Functions This section explains the items displayed on the pull-down menus accessed from the FilmGet FAU menu bar. - Canon CanoScan FB 1200S | User Guide - Page 85
, however, a film is not reproducing well with this setting, you can adjust the exposure manually. You may also wish to use the manual setting if you are scanning a film that has been intentionally under- or overexposed, or that is on when the check mark is present. 85 FilmGet FAU User's Guide - Canon CanoScan FB 1200S | User Guide - Page 86
[Settings] menu and select [Preferences] A check mark beside an item makes it active. Color Matching Option Activates a color matching. 86 FilmGet FAU User's Guide Cancel Button Click here to reject the changes and close the dialog. OK Button Click here to accept the changes and close the dialog. - Canon CanoScan FB 1200S | User Guide - Page 87
to the borders shown around film frames in the preview all window and should not be confused with the scan area selection frame used in the preview window. Preview Size Set this option to the value corresponding to the also use the arrow keys to adjust the value. 87 FilmGet FAU User's Guide - Canon CanoScan FB 1200S | User Guide - Page 88
arrow button to select the monitor profile that matches your own. The default selection is [sRGB v1.10 (Canon)]. Change to another profile if the brightness or color balance are maladjusted in your image processing software or on The default setting for this option is off. 88 FilmGet FAU User's Guide - Canon CanoScan FB 1200S | User Guide - Page 89
to reset the default settings and close the dialog. Click here to cancel without resetting the defaults and close the dialog. 89 FilmGet FAU User's Guide - Canon CanoScan FB 1200S | User Guide - Page 90
Mode 24-Bit Color Scan Area Size and Position Same as Film Guide Scan Settings Custom Mode File Mode Text/Printer/Fax Mode Display Mode Photo Color Matching On Use Color Matching On Monitor Profile sRGB v1.10 (Canon) Close FilmGet FAU after Acquire Off Use Auto Exposure Compensation when - Canon CanoScan FB 1200S | User Guide - Page 91
Scanner FilmGet FAU should be used with a Film Adapter Unit FAU-S10 option installed on a CanoScan FB1200S scanner. If you are using more than one scanner, use the following procedures to select the the test. A message will display in the dialog if a problem is detected. 91 FilmGet FAU User's Guide - Canon CanoScan FB 1200S | User Guide - Page 92
WARNING • Never fail to remove all film, film guides and other objects off the scanner platen before conducting this test. Viewing the Device Version Information You can view . Click the [Help] menu and select [About FilmGet FAU] Click here to close the dialog. 92 FilmGet FAU User's Guide - Canon CanoScan FB 1200S | User Guide - Page 93
Appendices The appendices contain troubleshooting tips for problems encountered when installing, starting or using FilmGet FAU. They also include a glossary of terms and the index. Read this section as the need arises. - Canon CanoScan FB 1200S | User Guide - Page 94
Troubleshooting Check the suggestions here first if you encounter problems installing or using FilmGet FAU. If the suggestions do not solve the problem or the problem is not listed here, contact the dealer or a Canon Customer Help Support Desk listed at the back of this guide. • NOTE • • Before you - Canon CanoScan FB 1200S | User Guide - Page 95
compliant (Windows) Solution: Start FilmGet FAU from an application program that is TWAIN_32 compliant. Scanning Problems • Insufficient is upside down or reversed Cause: Film is oriented incorrectly in the film guide or on the scanner platen Solution 1: Reposition the film. See the Getting - Canon CanoScan FB 1200S | User Guide - Page 96
image is peculiar Cause 1: Trimming frame is misaligned in the preview all window Solution: Adjust the trimming frame position and size so that it is Solution 2: You can fix this problem to a certain degree with retouching software. See the manual accompanying your retouching software. Cause Guide - Canon CanoScan FB 1200S | User Guide - Page 97
Custom] and resize the scan area selection. See p. 49. Preview window displayed at a small size on monitor Cause: Monitor is set to not support batch scanning. See the application program manual Solution: Scan each frame individually. Scanning Quality Problems Scanning FilmGet FAU User's Guide - Canon CanoScan FB 1200S | User Guide - Page 98
peculiar with the image mode set to 36-bit color or 12-bit grayscale Cause: Application program does not support 36-bit color or 12-bit grayscale image modes. See the application program manual. Solution : Scan using the 24-bit color or 12-bit grayscale image modes. See p. 34. 98 FilmGet FAU - Canon CanoScan FB 1200S | User Guide - Page 99
of an image or part of an image detected by the scanner when scanning. Calibration A scanner driver function that automatically sets the correct white color balance, which is used as the registration key for ensures that the devices reproduce the colors the same way. 99 FilmGet FAU User's Guide - Canon CanoScan FB 1200S | User Guide - Page 100
the dot information, which is supplemented by other data in popular image formats, such as the TIFF, JPEG and BMP formats. 100 FilmGet FAU User's Guide - Canon CanoScan FB 1200S | User Guide - Page 101
scan area) as well as adjust the brightness and coloring. Preview Area The right side of the FilmGet FAU main window, which is used to display preview images. Click the [Preview] button to initiate a preview scan of the the scanner self test from the [Device] menu. 101 FilmGet FAU User's Guide - Canon CanoScan FB 1200S | User Guide - Page 102
to select a portion of an image for scanning. In the FilmGet FAU main window, the selector tool can be used to select a particular area of a preview Zoom In The process of magnifying the preview all or preview window to see an image in greater detail. It is performed with the zoom in tool. - Canon CanoScan FB 1200S | User Guide - Page 103
Index Appendices 12-Bit Grayscale 35, 70, 98, 99, 101 120 Format Film 120 Format Settings Tool 29 Film Guide 38 Settings 33, 40 16-Bit Channel Mode 35 24-Bit Color 35, 50, 68, 70, 88, 98, 101 Button 67, 70 Preview All Button 12, 27, 36 Preview Button 27, 41 103 FilmGet FAU User's Guide - Canon CanoScan FB 1200S | User Guide - Page 104
Show/Hide Tool Tips Button 27, 29-30 Show Preview All Window Button 27, 29, 36, 43 C Calibration 12, 36, 75 Close Box (Macintosh 26, 28-29 Close Box (Windows 20, 24, 27, 29 Customizing the Pull-Down Menu FAU (Windows 24 Exposure 85-86, 88 Auto Gain 85, 88 Auto Gain Check Box 85 Manual Setting - Canon CanoScan FB 1200S | User Guide - Page 105
57, 90 File Mode 47, 50, 53 File Size 50, 52 Film Guide 12, 32, 38 Film Type 12, 31, 32 Fixed Image Size Button Scan 15, 27, 31, 64-65 Flip Tool (Main Window 28, 45 G Gamma Value 81-82, 100 Grab Tool (Main Window 28, 45 (Preview All Window 29, 39 H Halftones 100 Help Menu 92 Highlights 72 - Canon CanoScan FB 1200S | User Guide - Page 106
11, 17, 21, 94 Installing FilmGet FAU (Windows 11, 17, 18-20, 94 L Load Button 67, 70 M Main Window 13, 27-28 Make Trimming Frame Smaller 87 Master All 12, 29, 31, 36, 86 Preview All Button 12, 27, 36 Preview All Window 13, 29, 36-40 Preview Area 13, 27, 41, 43-45, 101 Preview Button - Canon CanoScan FB 1200S | User Guide - Page 107
FilmGet FAU (Macintosh 26 R Reset Button 45, 67, 70 Reset All Button 67, 70 Reset Trimming Frames Tool (Preview All Window 29, 39 Resolution 31, 46, 50-53, 55, 56, 58, 100, 101 Input Resolution 46, 48-52 Output Resolution 27, 64 Scanner Self Test 28, 91-92, 101 107 FilmGet FAU User's Guide - Canon CanoScan FB 1200S | User Guide - Page 108
63 Selecting a Scanner 91 Settings 58 Selector Tool 74, 102 (Main Window 28, 63 (Preview All Window 29, 39 Self Test 28, 91-92, 101 Settings Default 90 Exposure /Hide Tool Tips Button 27, 29-30 Show Preview All Window Button 27, 29, 36, 43 Sleeve 33 Slider 102 Starting FilmGet FAU (Macintosh 12 - Canon CanoScan FB 1200S | User Guide - Page 109
29 Tool Tips 5, 27, 30 Trimming Frames 13, 29, 31, 37, 39, 87 Make Trimming Frame Smaller 87 Troubleshooting 94 TWAIN 3, 5, 11, 95, 102 TWAIN-Compliant Applications 3, 5, 11, 23-24 U Uninstalling FilmGet FAU (Macintosh 21 Uninstalling FilmGet FAU (Windows 18-20 109 FilmGet FAU User's Guide - Canon CanoScan FB 1200S | User Guide - Page 110
W White Point Eyedropper Tool 73, 102 Window Resizing 27 Z Zoom In Tool Main Window 28, 44 Preview All Window 29, 39 Zoom Out Tool Main Window 28, 44 Preview All Window 29, 40 Zoom Reset Tool Main Window 28, 44 Preview All Window 29, 40 110 FilmGet FAU User's Guide - Canon CanoScan FB 1200S | User Guide - Page 111
nearest Canon Customer Support Help Desk if you have any questions or suggestions about this guide. Canon of the software or equipment. • Canon and CanoScan are trademarks of Canon Inc. • Adobe, Adobe Acrobat Computer Inc. • Microsoft, Windows and Windows NT are registered trademarks of Microsoft - Canon CanoScan FB 1200S | User Guide - Page 112
ésident Paul-Doumer 92414 Courbevoie Cedex, France Tél.01 4199 7777 Fax.01 4199 7951 Hotline: Tél.01 4199 7070 CANON DEUTSCHLAND GmbH Postfach 528, 47705 Krefeld, Germany CANON- Hotline-Service Customer Support: (0 21 51)349-555 Info-Desk: (0 21 51)349-566 Mailbox: (0 21 51)349-577 Telefax: (0 21 51
-
 1
1 -
 2
2 -
 3
3 -
 4
4 -
 5
5 -
 6
6 -
 7
7 -
8
-
9
-
10
-
11
-
12
-
13
-
14
-
15
-
16
-
17
-
18
-
19
-
20
-
21
-
22
-
23
-
24
-
25
-
26
-
27
-
28
-
29
-
30
-
31
-
32
-
33
-
34
-
35
-
36
-
37
-
38
-
39
-
40
-
41
-
42
-
43
-
44
-
45
-
46
-
47
-
48
-
49
-
50
-
51
-
52
-
53
-
54
-
55
-
56
-
57
-
58
-
59
-
60
-
61
-
62
-
63
-
64
-
65
-
66
-
67
-
68
-
69
-
70
-
71
-
72
-
73
-
74
-
75
-
76
-
77
-
78
-
79
-
80
-
81
-
82
-
83
-
84
-
85
-
86
-
87
-
88
-
89
-
90
-
91
-
92
-
93
-
94
-
95
-
96
-
97
-
98
-
99
-
100
-
101
-
102
-
103
-
104
-
105
-
106
-
107
-
108
-
109
-
110
-
111
-
112
 |
 |

Canon Film Adapter Unit
Software
FilmGet FAU
User’s Guide
Quick Start
For those who prefer to jump right
into scanning
Steps 1-3
For those who prefer a methodical
approach
Other Functions
For those who are detail oriented
For Windows & Macintosh