Canon CanoScan FB 1200S User Guide - Page 39
Adjusting Trimming Frames, Moving the Trimming Frames, Restoring Default Trimming Frame Settings
 |
View all Canon CanoScan FB 1200S manuals
Add to My Manuals
Save this manual to your list of manuals |
Page 39 highlights
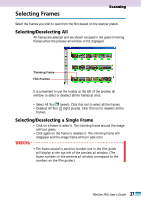
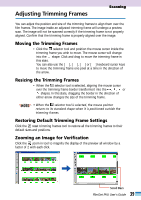
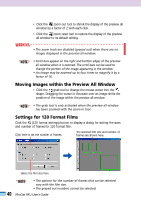
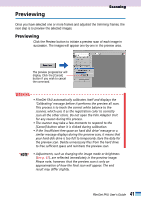
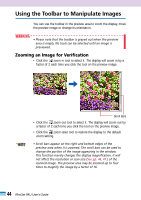
Adjusting Trimming Frames Scanning ¨ ¨ ¨ You can adjust the position and size of the trimming frames to align them over the film frames. The image inside an adjusted trimming frame will undergo a preview scan. The image will not be scanned correctly if the trimming frame is not properly aligned. Confirm that the trimming frame is properly aligned over the image. Moving the Trimming Frames • Click the selector tool and position the mouse cursor inside the trimming frame you wish to move. The mouse cursor will change into the shape. Click and drag to move the trimming frame in this state. You can also use the or [ ] keyboard cursor keys to move the trimming frame one pixel at a time in the direction of the arrow. Resizing the Trimming Frames • When the selector tool is selected, aligning the mouse cursor over the trimming frame border transforms it into the , , or shapes. In this state, dragging the border in the direction of either arrow changes the size of the trimming frame. • NOTE • • When the selector tool is selected, the mouse pointer returns to its standard shape when it is positioned outside the trimming frames. Restoring Default Trimming Frame Settings Click the reset trimming frames tool to restore all the trimming frames to their default sizes and positions. Zooming an Image for Verification Click the zoom in tool to magnify the display of the preview all window by a factor of 2 with each click. Scroll Bars 39 FilmGet FAU User's Guide
-
 1
1 -
2
-
3
-
4
-
5
-
6
-
7
-
8
-
9
-
10
-
11
-
12
-
13
-
14
-
15
-
16
-
17
-
18
-
19
-
20
-
21
-
22
-
23
-
24
-
25
-
26
-
27
-
28
-
29
-
30
-
31
-
32
-
33
-
 34
34 -
 35
35 -
 36
36 -
 37
37 -
 38
38 -
 39
39 -
 40
40 -
 41
41 -
 42
42 -
 43
43 -
 44
44 -
45
-
46
-
47
-
48
-
49
-
50
-
51
-
52
-
53
-
54
-
55
-
56
-
57
-
58
-
59
-
60
-
61
-
62
-
63
-
64
-
65
-
66
-
67
-
68
-
69
-
70
-
71
-
72
-
73
-
74
-
75
-
76
-
77
-
78
-
79
-
80
-
81
-
82
-
83
-
84
-
85
-
86
-
87
-
88
-
89
-
90
-
91
-
92
-
93
-
94
-
95
-
96
-
97
-
98
-
99
-
100
-
101
-
102
-
103
-
104
-
105
-
106
-
107
-
108
-
109
-
110
-
111
-
112
 |
 |
