Canon EOS 5D Mark II EOS 5D Mark II Instruction Manual - Page 194
Write the serial No. on a label., Take out the battery and affix the, label., Labeling the Serial No
 |
UPC - 013803105384
View all Canon EOS 5D Mark II manuals
Add to My Manuals
Save this manual to your list of manuals |
Page 194 highlights
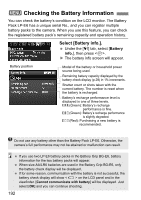
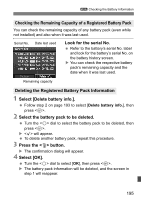
3 Checking the Battery Information Labeling the Serial No. on the Battery Affixing the serial No. onto all the registered Battery Pack LP-E6's with a label makes it convenient. Serial No. 1 Write the serial No. on a label. Write the serial No. displayed on the battery history screen on a label about 25 mm x 15 mm / 1.0 in. x 0.6 in. in size. a81a5900 2 Take out the battery and affix the label. Set the power switch to . Open the battery compartment cover and remove the battery. Affix the label as shown (side with no electrical contacts) in the illustration. Repeat this procedure for all of your battery packs so you can easily see the serial No. Do not affix the label on any part other than as shown in the illustration in step 2. Otherwise, the misplaced label might make it difficult to insert the battery or impossible to turn on the camera. 194
-
 1
1 -
2
-
3
-
4
-
5
-
6
-
7
-
8
-
9
-
10
-
11
-
12
-
13
-
14
-
15
-
16
-
17
-
18
-
19
-
20
-
21
-
22
-
23
-
24
-
25
-
26
-
27
-
28
-
29
-
30
-
31
-
32
-
33
-
34
-
35
-
36
-
37
-
38
-
39
-
40
-
41
-
42
-
43
-
44
-
45
-
46
-
47
-
48
-
49
-
50
-
51
-
52
-
53
-
54
-
55
-
56
-
57
-
58
-
59
-
60
-
61
-
62
-
63
-
64
-
65
-
66
-
67
-
68
-
69
-
70
-
71
-
72
-
73
-
74
-
75
-
76
-
77
-
78
-
79
-
80
-
81
-
82
-
83
-
84
-
85
-
86
-
87
-
88
-
89
-
90
-
91
-
92
-
93
-
94
-
95
-
96
-
97
-
98
-
99
-
100
-
101
-
102
-
103
-
104
-
105
-
106
-
107
-
108
-
109
-
110
-
111
-
112
-
113
-
114
-
115
-
116
-
117
-
118
-
119
-
120
-
121
-
122
-
123
-
124
-
125
-
126
-
127
-
128
-
129
-
130
-
131
-
132
-
133
-
134
-
135
-
136
-
137
-
138
-
139
-
140
-
141
-
142
-
143
-
144
-
145
-
146
-
147
-
148
-
149
-
150
-
151
-
152
-
153
-
154
-
155
-
156
-
157
-
158
-
159
-
160
-
161
-
162
-
163
-
164
-
165
-
166
-
167
-
168
-
169
-
170
-
171
-
172
-
173
-
174
-
175
-
176
-
177
-
178
-
179
-
180
-
181
-
182
-
183
-
184
-
185
-
186
-
187
-
188
-
 189
189 -
 190
190 -
 191
191 -
 192
192 -
 193
193 -
 194
194 -
 195
195 -
 196
196 -
 197
197 -
 198
198 -
 199
199 -
200
-
201
-
202
-
203
-
204
-
205
-
206
-
207
-
208
-
209
-
210
-
211
-
212
-
213
-
214
-
215
-
216
-
217
-
218
-
219
-
220
-
221
-
222
-
223
-
224
-
225
-
226
-
227
-
228
 |
 |
