Canon EOS 5D Mark II EOS 5D Mark II Instruction Manual - Page 41
Display the menu., Select a tab., Select the desired item., Select the setting., Set the desired
 |
UPC - 013803105384
View all Canon EOS 5D Mark II manuals
Add to My Manuals
Save this manual to your list of manuals |
Page 41 highlights
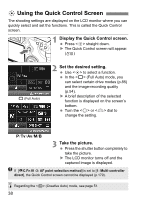
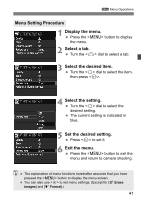
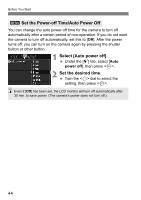
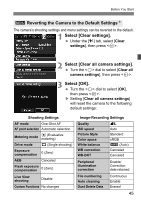
3 Menu Operations Menu Setting Procedure 1 Display the menu. Press the button to display the menu. 2 Select a tab. Turn the dial to select a tab. 3 Select the desired item. Turn the dial to select the item, then press . 4 Select the setting. Turn the dial to select the desired setting. The current setting is indicated in blue. 5 Set the desired setting. Press to set it. 6 Exit the menu. Press the button to exit the menu and return to camera shooting. The explanation of menu functions hereinafter assumes that you have pressed the button to display the menu screen. You can also use to set menu settings. (Except for [3 Erase images] and [5 Format].) 41
-
 1
1 -
2
-
3
-
4
-
5
-
6
-
7
-
8
-
9
-
10
-
11
-
12
-
13
-
14
-
15
-
16
-
17
-
18
-
19
-
20
-
21
-
22
-
23
-
24
-
25
-
26
-
27
-
28
-
29
-
30
-
31
-
32
-
33
-
34
-
35
-
 36
36 -
 37
37 -
 38
38 -
 39
39 -
 40
40 -
 41
41 -
 42
42 -
 43
43 -
 44
44 -
 45
45 -
 46
46 -
47
-
48
-
49
-
50
-
51
-
52
-
53
-
54
-
55
-
56
-
57
-
58
-
59
-
60
-
61
-
62
-
63
-
64
-
65
-
66
-
67
-
68
-
69
-
70
-
71
-
72
-
73
-
74
-
75
-
76
-
77
-
78
-
79
-
80
-
81
-
82
-
83
-
84
-
85
-
86
-
87
-
88
-
89
-
90
-
91
-
92
-
93
-
94
-
95
-
96
-
97
-
98
-
99
-
100
-
101
-
102
-
103
-
104
-
105
-
106
-
107
-
108
-
109
-
110
-
111
-
112
-
113
-
114
-
115
-
116
-
117
-
118
-
119
-
120
-
121
-
122
-
123
-
124
-
125
-
126
-
127
-
128
-
129
-
130
-
131
-
132
-
133
-
134
-
135
-
136
-
137
-
138
-
139
-
140
-
141
-
142
-
143
-
144
-
145
-
146
-
147
-
148
-
149
-
150
-
151
-
152
-
153
-
154
-
155
-
156
-
157
-
158
-
159
-
160
-
161
-
162
-
163
-
164
-
165
-
166
-
167
-
168
-
169
-
170
-
171
-
172
-
173
-
174
-
175
-
176
-
177
-
178
-
179
-
180
-
181
-
182
-
183
-
184
-
185
-
186
-
187
-
188
-
189
-
190
-
191
-
192
-
193
-
194
-
195
-
196
-
197
-
198
-
199
-
200
-
201
-
202
-
203
-
204
-
205
-
206
-
207
-
208
-
209
-
210
-
211
-
212
-
213
-
214
-
215
-
216
-
217
-
218
-
219
-
220
-
221
-
222
-
223
-
224
-
225
-
226
-
227
-
228
 |
 |

41
3
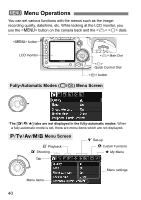
Menu Operations
1
Display the menu.
Press the <
M
> button to display
the menu.
2
Select a tab.
Turn the <
6
> dial to select a tab.
3
Select the desired item.
Turn the <
5
> dial to select the item,
then press <
0
>.
4
Select the setting.
Turn the <
5
> dial to select the
desired setting.
The current setting is indicated in
blue.
5
Set the desired setting.
Press <
0
> to set it.
6
Exit the menu.
Press the <
M
> button to exit the
menu and return to camera shooting.
Menu Setting Procedure
The explanation of menu functions hereinafter assumes that you have
pressed the <
M
> button to display the menu screen.
You can also use <
9
> to set menu settings. (Except for [
3
Erase
images
] and [
5
Format
].)