Canon EOS Digital Rebel EOS DIGITAL Software Instruction Manual (EOS Viewer Ut - Page 15
Connecting the Camera to Your Computer, the Second Time or Later - driver download
 |
View all Canon EOS Digital Rebel manuals
Add to My Manuals
Save this manual to your list of manuals |
Page 15 highlights
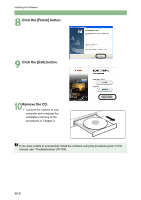
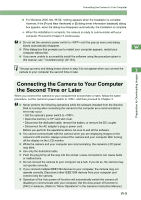
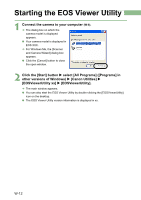
Connecting the Camera to Your Computer O For Windows 2000, Me, 98 SE, nothing appears when the installation is complete. However, if the [Found New Hardware] or [Building driver information database] dialog box appears, when the dialog box disappears automatically, the installation is complete. ¿ When the installation is complete, the camera is ready to communicate with your computer. Proceed to Chapter 3 continuously. O Do not set the camera's power switch to until the pop-up menu and dialog boxes automatically disappear. O If the dialog box that prompts you to restart your computer appears, restart your W computer without fail. O If you were unable to successfully install the software using the procedure given in this manual, see "Troubleshooting" (W-104). The pop-up menu and dialog boxes shown in step 3 do not appear when you connect the camera to your computer the second time or later. 2 Preparation for Downloading Images Connecting the Camera to Your Computer the Second Time or Later When you connect the camera to your computer the second time or later, follow the same procedure, set the camera's power switch to , and then proceed to Chapter 3. O Never perform the following operations while the software installed from the Solution Disk is running after connecting the camera to the computer as a communications error may occur. • Set the camera's power switch to . • Open the memory or CF card slot cover. • Disconnect the dedicated cable, remove the battery, or remove the DC coupler. • Disconnect the AC adapter's plug or power cord. Before you perform the operations above, be sure to exit all the software. O You cannot communicate with the camera when you are displaying images on the camera's LCD monitor. Always connect the camera and your computer after turning off the display on the LCD monitor. O While the camera and your computer are communicating, the camera's LCD panel may blink. O Use only the dedicated cable. O Push the plug firmly all the way into the socket. Loose connections can cause faults or malfunctions. O Do not connect the camera to your computer via a hub. If you do so, the camera may not operate correctly. O If you connect multiple IEEE1394 devices to your computer, the camera may not operate correctly. Disconnect other IEEE1394 devices from your computer and connect only the camera. O Operation of the Auto power off function will automatically switch the camera off, disabling to communicate with your computer. Set the Auto power off function to [OFF] in advance. (Refer to "Menu Operations" in the camera's Instruction Manual.) W-9
-
 1
1 -
2
-
3
-
4
-
5
-
6
-
7
-
8
-
9
-
 10
10 -
 11
11 -
 12
12 -
 13
13 -
 14
14 -
 15
15 -
 16
16 -
 17
17 -
 18
18 -
 19
19 -
 20
20 -
21
-
22
-
23
-
24
-
25
-
26
-
27
-
28
-
29
-
30
-
31
-
32
-
33
-
34
-
35
-
36
-
37
-
38
-
39
-
40
-
41
-
42
-
43
-
44
-
45
-
46
-
47
-
48
-
49
-
50
-
51
-
52
-
53
-
54
-
55
-
56
-
57
-
58
-
59
-
60
-
61
-
62
-
63
-
64
-
65
-
66
-
67
-
68
-
69
-
70
-
71
-
72
-
73
-
74
-
75
-
76
-
77
-
78
-
79
-
80
-
81
-
82
-
83
-
84
-
85
-
86
-
87
-
88
-
89
-
90
-
91
-
92
-
93
-
94
-
95
-
96
-
97
-
98
-
99
-
100
-
101
-
102
-
103
-
104
-
105
-
106
-
107
-
108
-
109
-
110
-
111
-
112
-
113
-
114
-
115
-
116
-
117
-
118
-
119
-
120
-
121
-
122
-
123
-
124
-
125
-
126
-
127
-
128
-
129
-
130
-
131
-
132
-
133
-
134
-
135
-
136
-
137
-
138
-
139
-
140
-
141
-
142
-
143
-
144
-
145
-
146
-
147
-
148
-
149
-
150
-
151
-
152
-
153
-
154
-
155
-
156
-
157
-
158
-
159
-
160
-
161
-
162
-
163
-
164
-
165
-
166
-
167
-
168
-
169
-
170
-
171
-
172
-
173
-
174
-
175
-
176
-
177
-
178
-
179
-
180
-
181
-
182
-
183
-
184
-
185
-
186
-
187
-
188
-
189
-
190
-
191
-
192
-
193
-
194
-
195
-
196
-
197
-
198
-
199
-
200
-
201
-
202
-
203
-
204
-
205
-
206
-
207
-
208
-
209
-
210
-
211
-
212
-
213
-
214
-
215
-
216
-
217
-
218
-
219
-
220
-
221
-
222
 |
 |