Canon FAXPHONE B95 FAXPHONE B95 User's Guide - Page 111
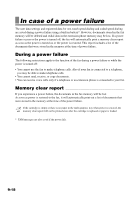
MID PAUSE SET setting, MSG DATA LOST message
 |
View all Canon FAXPHONE B95 manuals
Add to My Manuals
Save this manual to your list of manuals |
Page 111 highlights
Index Lower case letter mode 2-4 M Main unit 1-1 MAN/AUTO SWITCH setting 8-4 MANUAL MODE description 6-1 receiving in 6-4 setting 6-4 Manual redialing 5-9 canceling 5-9 Manual sending 5-4 canceling 5-5 Memory deleting document from 5-15 documents in 5-14 printing document in 5-14 printing list of documents in 5-14 receiving when problem occurs 6-6 sending (See Memory sending) MEMORY CLEAR REPORT description 9-18 MEMORY FULL message 9-16 MEMORY RX setting 8-4 Memory sending 5-3 canceling 5-5 Menu (See individual menu names) PRINTER SETTINGS 8-4 REPORT SETTINGS 8-3 RX (Reception) SETTINGS 8-4 SYSTEM SETTINGS 8-5 TAM SETTINGS 8-6 TX (Transmission) SETTINGS 8-3 USER SETTINGS 8-2 MESSAGE LENGTH setting 8-6 Messages deleting 7-7 forwarding telephone 7-13 LCD 9-15 (See also individual message names) playing telephone 7-9 recording the outgoing 7-1 setting the recording time for a 7-3 types that can be recorded 7-1 Microphone 2-2 MID PAUSE SET setting 8-3 Mistakes, correcting 2-5 Modes, switching number and letter 2-4 MSG DATA LOST message 9-16 Multi-purpose tray 2-1 capacity S-1 jams in 9-1 loading paper in 1-7 MULTI TX/RX (Transaction) REPORT 8-8 N NO DATA message 9-17 NO OGM message 9-17 Nozzle check pattern printing 9-4 Number mode 2-4 Numbers, entering 2-4 NUMBER TO REJECT setting 6-8, 8-6 Numeric buttons 2-2, 2-4 O OFFHOOK ALARM setting 5-4, 8-2 One-touch speed dialing buttons 2-2 description 2-11 list (See One-touch speed dialing list) registering numbers and names for 2-11 sending a document using 5-5 One-touch speed dialing list description 8-8 printing 8-7 Operation panel 2-1, 2-2, 2-3 OUTGOING MESSAGE description 7-1 recording 7-1 OUT OF AREA setting 6-7, 8-6 Outside line access number, registering 2-7 P Paper guide 1-7 guidelines 1-6 limit mark (See Paper limit mark) loading 1-6 loading in multi-purpose tray 1-7 quantity S-1 requirements 3-3 size 3-3 weight S-1 Paper feeding problems 9-7 Paper limit mark 1-6 PAPER SIZE setting 8-4 PASSWORD setting in TAM SETTINGS menu 8-6 Pause, entering 5-8 PIN ENTRY setting 7-15, 8-6 Play button 2-3, 7-9 Playing telephone messages 7-9 Polling button 2-2, 6-7 Power cord 1-1, 1-5 Power failure during 9-18 in case of 9-18 Power supply, safety instructions vii Print head cleaning 9-5 testing 9-4 Print quality problems 9-13 Printable area 3-3 Printer cover 2-1 PRINTER SETTINGS menu 8-4 Printing 1-TOUCH LIST 8-7 ACTIVITY REPORT 8-7 CODED DIAL LIST 8-7 List of documents in memory 8-7 I-3
-
 1
1 -
2
-
3
-
4
-
5
-
6
-
7
-
8
-
9
-
10
-
11
-
12
-
13
-
14
-
15
-
16
-
17
-
18
-
19
-
20
-
21
-
22
-
23
-
24
-
25
-
26
-
27
-
28
-
29
-
30
-
31
-
32
-
33
-
34
-
35
-
36
-
37
-
38
-
39
-
40
-
41
-
42
-
43
-
44
-
45
-
46
-
47
-
48
-
49
-
50
-
51
-
52
-
53
-
54
-
55
-
56
-
57
-
58
-
59
-
60
-
61
-
62
-
63
-
64
-
65
-
66
-
67
-
68
-
69
-
70
-
71
-
72
-
73
-
74
-
75
-
76
-
77
-
78
-
79
-
80
-
81
-
82
-
83
-
84
-
85
-
86
-
87
-
88
-
89
-
90
-
91
-
92
-
93
-
94
-
95
-
96
-
97
-
98
-
99
-
100
-
101
-
102
-
103
-
104
-
105
-
 106
106 -
 107
107 -
 108
108 -
 109
109 -
 110
110 -
 111
111 -
 112
112 -
 113
113 -
 114
114 -
 115
115 -
 116
116
 |
 |