Canon FAXPHONE L75 User Guide - Page 52
If you selected, in step 8, to select START DATE/TIME.
 |
View all Canon FAXPHONE L75 manuals
Add to My Manuals
Save this manual to your list of manuals |
Page 52 highlights
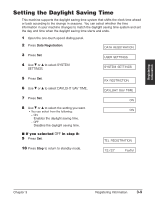
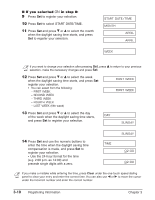
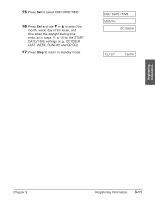
■ If you selected ON in step 8: 9 Press Set to register your selection. 10 Press Set to select START DATE/TIME. 11 Press Set and press ∂ or ¨ to select the month when the daylight saving time starts, and press Set to register your selection. START DATE/TIME MONTH APRIL APRIL WEEK n If you want to change your selection after pressing Set, press ¨ to return to your previous selection, make the necessary changes and press Set. 12 Press Set and press ∂ or ¨ to select the week when the daylight saving time starts, and press Set register your selection. • You can select from the following: - FIRST WEEK - SECOND WEEK - THIRD WEEK - FOURTH WEEK - LAST WEEK (fifth week) FIRST WEEK FIRST WEEK 13 Press Set and press ∂ or ¨ to select the day of the week when the daylight saving time starts, DAY and press Set to register your selection. SUNDAY 14 Press Set and use the numeric buttons to enter the time when the daylight saving time compensation is made, and press Set to register your selection. • Use the 24-hour format for the time (e.g. 2:00 p.m. as 14:00) and precede single digits with a zero. TIME SUNDAY 02:00 02:00 n If you make a mistake while entering the time, press Clear under the one-touch speed dialing panel to clear your entry and enter the correct time. You can also use ¬ or ® to move the cursor under the incorrect number and enter the correct number. 3-10 Registering Information Chapter 3
-
 1
1 -
2
-
3
-
4
-
5
-
6
-
7
-
8
-
9
-
10
-
11
-
12
-
13
-
14
-
15
-
16
-
17
-
18
-
19
-
20
-
21
-
22
-
23
-
24
-
25
-
26
-
27
-
28
-
29
-
30
-
31
-
32
-
33
-
34
-
35
-
36
-
37
-
38
-
39
-
40
-
41
-
42
-
43
-
44
-
45
-
46
-
 47
47 -
 48
48 -
 49
49 -
 50
50 -
 51
51 -
 52
52 -
 53
53 -
 54
54 -
 55
55 -
 56
56 -
 57
57 -
58
-
59
-
60
-
61
-
62
-
63
-
64
-
65
-
66
-
67
-
68
-
69
-
70
-
71
-
72
-
73
-
74
-
75
-
76
-
77
-
78
-
79
-
80
-
81
-
82
-
83
-
84
-
85
-
86
-
87
-
88
-
89
-
90
-
91
-
92
-
93
-
94
-
95
-
96
-
97
-
98
-
99
-
100
-
101
-
102
-
103
-
104
-
105
-
106
-
107
-
108
-
109
-
110
-
111
-
112
-
113
-
114
-
115
-
116
-
117
-
118
-
119
-
120
-
121
-
122
-
123
-
124
-
125
-
126
-
127
-
128
-
129
-
130
-
131
-
132
-
133
-
134
-
135
-
136
-
137
-
138
-
139
-
140
-
141
-
142
-
143
-
144
-
145
-
146
-
147
-
148
-
149
-
150
-
151
-
152
-
153
-
154
-
155
-
156
-
157
-
158
-
159
-
160
-
161
-
162
-
163
-
164
-
165
-
166
-
167
-
168
-
169
-
170
-
171
-
172
-
173
-
174
-
175
-
176
-
177
-
178
-
179
-
180
-
181
-
182
-
183
-
184
-
185
-
186
-
187
-
188
-
189
-
190
-
191
-
192
-
193
-
194
-
195
-
196
-
197
-
198
-
199
-
200
-
201
 |
 |