Canon PowerShot A1300 PowerShot A4000 IS / A3400 IS / A2400 IS / A2300 / A1300 - Page 119
Choose [i-Contrast]., Choose an image., Choose an option., Save as a new image and review.
 |
View all Canon PowerShot A1300 manuals
Add to My Manuals
Save this manual to your list of manuals |
Page 119 highlights
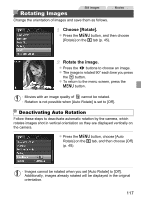
Editing Still Images • Editing is not possible for images shot at a resolution of saved as in step 3. • Images cannot be resized to a higher resolution. (p. 62) or Correcting Image Brightness (i-Contrast) Excessively dark image areas (such as faces or backgrounds) can be detected and automatically adjusted to the optimal brightness. Insufficient overall image contrast is also automatically corrected, to make subjects stand out better. Choose from four correction levels, and then save the image as a separate file. Choose [i-Contrast]. z Press the n button, and then choose [i- Contrast] on the 1 tab (p. 45). Choose an image. z Press the qr buttons to choose an image, and then press the m button. Choose an option. z Press the qr buttons to choose an option, and then press the m button. Save as a new image and review. z Follow steps 4 - 5 on p. 118. • For some images, correction may be inaccurate or may cause images to appear grainy. • Images may look grainy after repeated editing using this function. 119
-
 1
1 -
2
-
3
-
4
-
5
-
6
-
7
-
8
-
9
-
10
-
11
-
12
-
13
-
14
-
15
-
16
-
17
-
18
-
19
-
20
-
21
-
22
-
23
-
24
-
25
-
26
-
27
-
28
-
29
-
30
-
31
-
32
-
33
-
34
-
35
-
36
-
37
-
38
-
39
-
40
-
41
-
42
-
43
-
44
-
45
-
46
-
47
-
48
-
49
-
50
-
51
-
52
-
53
-
54
-
55
-
56
-
57
-
58
-
59
-
60
-
61
-
62
-
63
-
64
-
65
-
66
-
67
-
68
-
69
-
70
-
71
-
72
-
73
-
74
-
75
-
76
-
77
-
78
-
79
-
80
-
81
-
82
-
83
-
84
-
85
-
86
-
87
-
88
-
89
-
90
-
91
-
92
-
93
-
94
-
95
-
96
-
97
-
98
-
99
-
100
-
101
-
102
-
103
-
104
-
105
-
106
-
107
-
108
-
109
-
110
-
111
-
112
-
113
-
 114
114 -
 115
115 -
 116
116 -
 117
117 -
 118
118 -
 119
119 -
 120
120 -
 121
121 -
 122
122 -
 123
123 -
 124
124 -
125
-
126
-
127
-
128
-
129
-
130
-
131
-
132
-
133
-
134
-
135
-
136
-
137
-
138
-
139
-
140
-
141
-
142
-
143
-
144
-
145
-
146
-
147
-
148
-
149
-
150
-
151
-
152
-
153
-
154
-
155
-
156
-
157
-
158
-
159
-
160
-
161
-
162
-
163
-
164
-
165
-
166
-
167
-
168
-
169
-
170
-
171
-
172
-
173
-
174
-
175
-
176
-
177
-
178
-
179
-
180
-
181
-
182
 |
 |
