Canon PowerShot SX110 IS User Manual - Page 85
Setting the Shutter Speed
 |
View all Canon PowerShot SX110 IS manuals
Add to My Manuals
Save this manual to your list of manuals |
Page 85 highlights
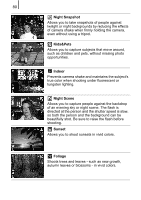
Shooting Using the Mode Dial 83 Setting the Shutter Speed Available Shooting Modes p. 222 When you set the shutter speed, the camera automatically selects an aperture value to match the brightness. Faster shutter speeds allow you to catch an instantaneous image of a moving subject, while slower speeds create a flowing effect and allow you to shoot without a flash in dark areas. 1 Set the mode dial to . 2 Configure the shutter speed. 1. Use the control dial to change the shutter speed. Shutter speed 3 Shoot. • If the aperture value is shown in red, the image is underexposed (insufficient light) or overexposed (too much light). Use the control dial to adjust the shutter speed until the aperture value shows in white (Safety Shift (p. 84)). The nature of CCDs is such that noise in the recorded image increases at slow shutter speeds. This camera, however, applies special processing to images shot at shutter speeds slower than 1.3 seconds to eliminate the noise, thereby producing high-quality images. (However, a certain amount of processing time may be required before the next image can be shot.)
-
 1
1 -
2
-
3
-
4
-
5
-
6
-
7
-
8
-
9
-
10
-
11
-
12
-
13
-
14
-
15
-
16
-
17
-
18
-
19
-
20
-
21
-
22
-
23
-
24
-
25
-
26
-
27
-
28
-
29
-
30
-
31
-
32
-
33
-
34
-
35
-
36
-
37
-
38
-
39
-
40
-
41
-
42
-
43
-
44
-
45
-
46
-
47
-
48
-
49
-
50
-
51
-
52
-
53
-
54
-
55
-
56
-
57
-
58
-
59
-
60
-
61
-
62
-
63
-
64
-
65
-
66
-
67
-
68
-
69
-
70
-
71
-
72
-
73
-
74
-
75
-
76
-
77
-
78
-
79
-
 80
80 -
 81
81 -
 82
82 -
 83
83 -
 84
84 -
 85
85 -
 86
86 -
 87
87 -
 88
88 -
 89
89 -
 90
90 -
91
-
92
-
93
-
94
-
95
-
96
-
97
-
98
-
99
-
100
-
101
-
102
-
103
-
104
-
105
-
106
-
107
-
108
-
109
-
110
-
111
-
112
-
113
-
114
-
115
-
116
-
117
-
118
-
119
-
120
-
121
-
122
-
123
-
124
-
125
-
126
-
127
-
128
-
129
-
130
-
131
-
132
-
133
-
134
-
135
-
136
-
137
-
138
-
139
-
140
-
141
-
142
-
143
-
144
-
145
-
146
-
147
-
148
-
149
-
150
-
151
-
152
-
153
-
154
-
155
-
156
-
157
-
158
-
159
-
160
-
161
-
162
-
163
-
164
-
165
-
166
-
167
-
168
-
169
-
170
-
171
-
172
-
173
-
174
-
175
-
176
-
177
-
178
-
179
-
180
-
181
-
182
-
183
-
184
-
185
-
186
-
187
-
188
-
189
-
190
-
191
-
192
-
193
-
194
-
195
-
196
-
197
-
198
-
199
-
200
-
201
-
202
-
203
-
204
-
205
-
206
-
207
-
208
-
209
-
210
-
211
-
212
-
213
-
214
-
215
-
216
-
217
-
218
-
219
-
220
-
221
-
222
-
223
-
224
-
225
-
226
-
227
-
228
 |
 |
