Canon VIXIA HF R200 VIXIA HF R20 / HF R21 / HF R200 Instruction Manual - Page 21
Preparations - power adapter
 |
View all Canon VIXIA HF R200 manuals
Add to My Manuals
Save this manual to your list of manuals |
Page 21 highlights
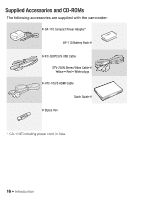
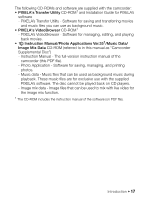
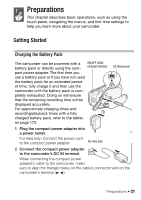
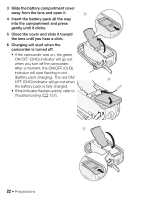
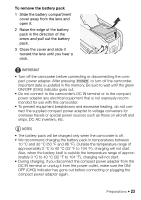
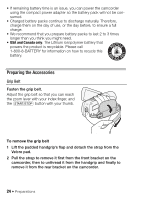
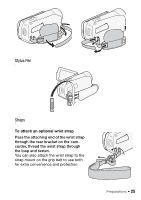
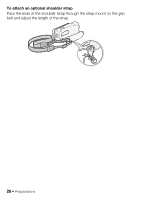
Preparations This chapter describes basic operations, such as using the touch panel, navigating the menus, and first time settings to help you learn more about your camcorder. Getting Started Charging the Battery Pack The camcorder can be powered with a battery pack or directly using the com- ON/OFF (CHG) (charge) indicator pact power adapter. The first time you use a battery pack or if you have not used the battery pack for an extended period of time, fully charge it and then use the camcorder until the battery pack is com- pletely exhausted. Doing so will ensure that the remaining recording time will be displayed accurately. For approximate charging times and recording/playback times with a fully charged battery pack, refer to the tables on page 173. DC IN terminal 1 Plug the compact power adapter into a power outlet. For Asia only: Connect the power cord to the compact power adapter. For Asia only: 2 Connect the compact power adapter to the camcorder's DC IN terminal. When connecting the compact power adapter's cable to the camcorder, make sure to align the triangle marks on the cable's connector and on the camcorder's terminal ( ). Preparations Š 21
-
 1
1 -
2
-
3
-
4
-
5
-
6
-
7
-
8
-
9
-
10
-
11
-
12
-
13
-
14
-
15
-
 16
16 -
 17
17 -
 18
18 -
 19
19 -
 20
20 -
 21
21 -
 22
22 -
 23
23 -
 24
24 -
 25
25 -
 26
26 -
27
-
28
-
29
-
30
-
31
-
32
-
33
-
34
-
35
-
36
-
37
-
38
-
39
-
40
-
41
-
42
-
43
-
44
-
45
-
46
-
47
-
48
-
49
-
50
-
51
-
52
-
53
-
54
-
55
-
56
-
57
-
58
-
59
-
60
-
61
-
62
-
63
-
64
-
65
-
66
-
67
-
68
-
69
-
70
-
71
-
72
-
73
-
74
-
75
-
76
-
77
-
78
-
79
-
80
-
81
-
82
-
83
-
84
-
85
-
86
-
87
-
88
-
89
-
90
-
91
-
92
-
93
-
94
-
95
-
96
-
97
-
98
-
99
-
100
-
101
-
102
-
103
-
104
-
105
-
106
-
107
-
108
-
109
-
110
-
111
-
112
-
113
-
114
-
115
-
116
-
117
-
118
-
119
-
120
-
121
-
122
-
123
-
124
-
125
-
126
-
127
-
128
-
129
-
130
-
131
-
132
-
133
-
134
-
135
-
136
-
137
-
138
-
139
-
140
-
141
-
142
-
143
-
144
-
145
-
146
-
147
-
148
-
149
-
150
-
151
-
152
-
153
-
154
-
155
-
156
-
157
-
158
-
159
-
160
-
161
-
162
-
163
-
164
-
165
-
166
-
167
-
168
-
169
-
170
-
171
-
172
-
173
-
174
-
175
-
176
-
177
-
178
-
179
-
180
-
181
-
182
-
183
-
184
-
185
-
186
-
187
-
188
 |
 |