Canon VIXIA HF R200 VIXIA HF R20 / HF R21 / HF R200 Instruction Manual - Page 98
FUNC.], Decoration]
 |
View all Canon VIXIA HF R200 manuals
Add to My Manuals
Save this manual to your list of manuals |
Page 98 highlights
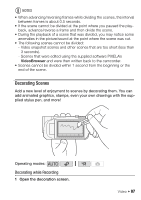
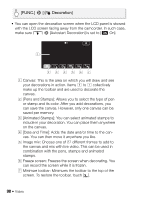
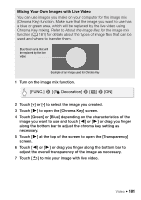
[FUNC.] 8 [ Decoration] • You can open the decoration screen when the LCD panel is stowed with the LCD screen facing away from the camcorder. In such case, make sure 6 8 [Autostart Decoration] is set to [A On]. A Canvas: This is the area on which you will draw and see your decorations in action. Items B to G collectively make up the toolbar and are used to decorate the canvas. B [Pens and Stamps]: Allows you to select the type of pen or stamp and its color. After you add decorations, you can save the canvas. However, only one canvas can be saved per memory. C [Animated Stamps]: You can select animated stamps to include in your decoration. You can place them anywhere on the canvas. D [Date and Time]: Adds the date and/or time to the canvas. You can then move it anywhere you like. E Image mix: Choose one of 27 different frames to add to the canvas and mix with live video. This can be used in combination with the pens, stamps and animated stamps. F Freeze screen: Freezes the screen when decorating. You can record the screen while it is frozen. G Minimize toolbar: Minimizes the toolbar to the top of the screen. To restore the toolbar, touch [ ]. 98 Š Video
-
 1
1 -
2
-
3
-
4
-
5
-
6
-
7
-
8
-
9
-
10
-
11
-
12
-
13
-
14
-
15
-
16
-
17
-
18
-
19
-
20
-
21
-
22
-
23
-
24
-
25
-
26
-
27
-
28
-
29
-
30
-
31
-
32
-
33
-
34
-
35
-
36
-
37
-
38
-
39
-
40
-
41
-
42
-
43
-
44
-
45
-
46
-
47
-
48
-
49
-
50
-
51
-
52
-
53
-
54
-
55
-
56
-
57
-
58
-
59
-
60
-
61
-
62
-
63
-
64
-
65
-
66
-
67
-
68
-
69
-
70
-
71
-
72
-
73
-
74
-
75
-
76
-
77
-
78
-
79
-
80
-
81
-
82
-
83
-
84
-
85
-
86
-
87
-
88
-
89
-
90
-
91
-
92
-
 93
93 -
 94
94 -
 95
95 -
 96
96 -
 97
97 -
 98
98 -
 99
99 -
 100
100 -
 101
101 -
 102
102 -
 103
103 -
104
-
105
-
106
-
107
-
108
-
109
-
110
-
111
-
112
-
113
-
114
-
115
-
116
-
117
-
118
-
119
-
120
-
121
-
122
-
123
-
124
-
125
-
126
-
127
-
128
-
129
-
130
-
131
-
132
-
133
-
134
-
135
-
136
-
137
-
138
-
139
-
140
-
141
-
142
-
143
-
144
-
145
-
146
-
147
-
148
-
149
-
150
-
151
-
152
-
153
-
154
-
155
-
156
-
157
-
158
-
159
-
160
-
161
-
162
-
163
-
164
-
165
-
166
-
167
-
168
-
169
-
170
-
171
-
172
-
173
-
174
-
175
-
176
-
177
-
178
-
179
-
180
-
181
-
182
-
183
-
184
-
185
-
186
-
187
-
188
 |
 |
