Canon imageFORMULA ScanFront 300 ScanFront 300/300P Setup Guide - Page 17
Installing the Scanner and Connecting to a Network, Connecting the AC Adapter
 |
View all Canon imageFORMULA ScanFront 300 manuals
Add to My Manuals
Save this manual to your list of manuals |
Page 17 highlights
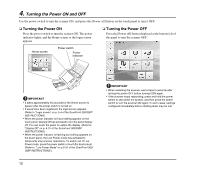
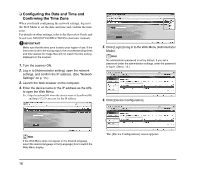
3. Installing the Scanner and Connecting to a Network Before setting up the scanner, you need to move it to the installation site, and connect the AC adaptor and network cable. IMPORTANT For information on installation safety, see p. 3. ❏ Connecting the AC Adapter Follow the procedure shown below to connect the AC adapter. CAUTION Make sure to use only the AC adapter and power cord included with the scanner. The shape of the power plug varies by country and region. a Connect the power cord and AC adapter. b Insert the plug of the AC adapter into the power connector. c Connect the power cord to the wall outlet. ❏ Connecting the Network Cable Insert the network cable connector (RJ-45) into the LAN port. 11
-
 1
1 -
2
-
3
-
4
-
5
-
6
-
7
-
8
-
9
-
10
-
11
-
 12
12 -
 13
13 -
 14
14 -
 15
15 -
 16
16 -
 17
17 -
 18
18 -
 19
19 -
 20
20 -
 21
21 -
 22
22 -
23
-
24
-
25
-
26
-
27
-
28
 |
 |

11
3.
Installing the Scanner and Connecting to a Network
Before setting up the scanner, you need to move it to the installation site, and connect the AC adaptor and network cable.
IMPORTANT
For information on installation safety, see p. 3.
❏
Connecting the AC Adapter
Follow the procedure shown below to connect the AC adapter.
CAUTION
Make sure to use only the AC adapter and power cord included with the scanner.
a
Connect the power cord and AC adapter.
b
Insert the plug of the AC adapter into the power connector.
c
Connect the power cord to the wall outlet.
❏
Connecting the Network Cable
Insert the network cable connector (RJ-45) into the LAN port.
The shape of the power plug
varies by country and region.