Canon imageFORMULA ScanFront 300 ScanFront 300/300P Setup Guide - Page 25
The [Scan / Delivery Options] screen appears.
 |
View all Canon imageFORMULA ScanFront 300 manuals
Add to My Manuals
Save this manual to your list of manuals |
Page 25 highlights
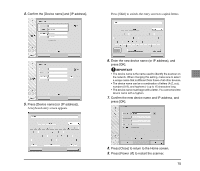
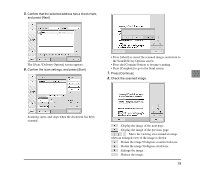
5. Confirm that the selected address has a check mark, and press [Next]. The [Scan / Delivery Options] screen appears. 6. Confirm the scan settings, and press [Start]. • Press [Abort] to cancel the scanned images and return to the Scan/Delivery Options screen. • Press the [Continue] button to resume scanning. • Press [Complete] to go to the Send screen. 7. Press [Continue]. 8. Check the scanned image. Scanning starts, and stops when the document has been scanned. : Display the image of the next page. : Display the image of the previous page. : Move the viewing area around an image when an enlarged view of the image is shown. : Rotate the image 90 degrees counterclockwise. : Rotate the image 90 degrees clockwise. : Enlarge the image. : Reduce the image. 19
-
 1
1 -
2
-
3
-
4
-
5
-
6
-
7
-
8
-
9
-
10
-
11
-
12
-
13
-
14
-
15
-
16
-
17
-
18
-
19
-
 20
20 -
 21
21 -
 22
22 -
 23
23 -
 24
24 -
 25
25 -
 26
26 -
 27
27 -
 28
28
 |
 |
