Canon imagePROGRAF TM-300 MFP L36ei L24ei L36ei Scanner User Manual V1.00 EN - Page 45
Scan to PC
 |
View all Canon imagePROGRAF TM-300 MFP L36ei manuals
Add to My Manuals
Save this manual to your list of manuals |
Page 45 highlights
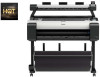
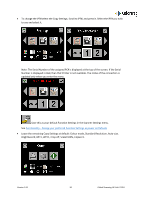
Scan to PC Ensure the ScanApp Lei is running on the PC to which you wish to send the scan file. See Configuring the PCs Ensure ScanApp Lei is has been configured with the scan folder of your choice. See ScanApp Lei Operation Insert a document into the approximate centre of the scanner, face up. The exact position is not critical as we will scan using Auto-Size. From the Home page, enter the Scan to PC menu. The PC to be used for Scanning to PC is shown on the Scan to PC page. This example shows the current PC selected as PCX. This means the scanner will complete an Auto PC search and prompt the user to select the PC before completing each scan. To change the PC# select the Scan to PC Settings. Scroll and select PC#. Select the PC# you wish to use. Version 1.00 45 Global Scanning UK Ltd © 2018
-
 1
1 -
2
-
3
-
4
-
5
-
6
-
7
-
8
-
9
-
10
-
11
-
12
-
13
-
14
-
15
-
16
-
17
-
18
-
19
-
20
-
21
-
22
-
23
-
24
-
25
-
26
-
27
-
28
-
29
-
30
-
31
-
32
-
33
-
34
-
35
-
36
-
37
-
38
-
39
-
 40
40 -
 41
41 -
 42
42 -
 43
43 -
 44
44 -
 45
45 -
 46
46 -
 47
47 -
 48
48 -
 49
49 -
 50
50 -
51
-
52
-
53
-
54
-
55
-
56
-
57
-
58
-
59
-
60
-
61
-
62
-
63
-
64
-
65
-
66
-
67
-
68
-
69
-
70
-
71
-
72
-
73
-
74
-
75
-
76
-
77
-
78
-
79
-
80
-
81
-
82
-
83
-
84
-
85
-
86
-
87
-
88
-
89
-
90
-
91
-
92
 |
 |
