Canon imagePROGRAF iPF815 MFP M40 iPF815/iPF825 Setup Guide - Page 10
IP Address Speci
 |
View all Canon imagePROGRAF iPF815 MFP M40 manuals
Add to My Manuals
Save this manual to your list of manuals |
Page 10 highlights
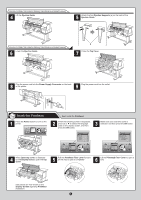
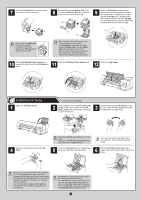
11 After reviewing the installation results on the Complete Installation window, click Next. 12 In the Finish window, select Restart my computer now and click Restart. 13 The printer driver settings take effect after the computer restarts. The printer driver is now installed. An iPFxxxx Support desktop icon is created after installation. (iPFxxxx represents the printer model.) Next, follow steps 12-16 on page 8 to install the User Manual. When the printer cannot be found on the network If your printer cannot be found when connecting to the network for the first time, setup an IP address for the printer 1 and then configure it on the printer. When ink fills the system for the first time, after printhead adjustment is finished, specify the IP address on the printer's control panel. Press the Menu button to display MAIN MENU. OK 2 Press ▲ or ▼ to select Interface Setup, and then press the ► button. 3 Press ▲ or ▼ to select TCP/IP, and then press the ► button. • When ink fills the system for the first time, do not operate the printer until printhead adjustment is finished. 4 Press ▲ or ▼ to select IP Setting, and then press the ► button. 6 Enter the IP address. 1.Press ◄ or ► to move the cursor (_) to each field for entering numbers. IP Address 5 Press ▲ or ▼ to select IP Address, and then press the ► button. L/R Up/Down [OK] / [Stop] 2.Press ▲ or ▼ to enter the number, and then press the OK button. • Holding down either the ▲ or ▼ keys MEMO continually increases or decreases the value. 7 Press the Online button. 8 Press OK on the registration confirmation message that appears. The IP address is set on the printer. Next, restart installation of the printer driver. 9 In the Search Results window, select Specify the IP address of available printers in the network and click Next. The IP Address Specification window appears. Follow steps 8-11 on page 12 to finish installing the printer driver. Next, follow steps 12-16 on page 8 to install the User Manual. • If the following screen appears, click Retry MEMO and select Specify the IP address of available printers in the network on the next screen that appears. 10
-
 1
1 -
2
-
3
-
4
-
 5
5 -
 6
6 -
 7
7 -
 8
8 -
 9
9 -
 10
10 -
 11
11 -
 12
12 -
 13
13 -
 14
14 -
 15
15 -
16
 |
 |
