Casio PX-320CS User Guide
Casio PX-320CS - SPEC. 202 TONE DIGITAL Manual
 |
UPC - 079767343255
View all Casio PX-320CS manuals
Add to My Manuals
Save this manual to your list of manuals |
Casio PX-320CS manual content summary:
- Casio PX-320CS | User Guide - Page 1
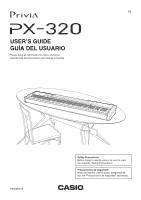
'S GUIDE GUÍA DEL USUARIO Please keep all information for future reference. Guarde toda documentación para futuras consultas. PX320ES1A Safety Precautions Before trying to use the piano, be sure to read the separate "Safety Precautions". Precauciones de seguridad Antes de intentar usar el piano - Casio PX-320CS | User Guide - Page 2
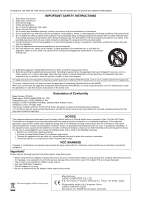
SERVICING TO QUALIFIED SERVICE PERSONNEL. IMPORTANT SAFETY INSTRUCTIONS 1. Read these instructions. 2. Keep these instructions. 3. Heed all warnings. 4. Follow all instructions of Conformity Model Number: PX-320 Trade Name: CASIO COMPUTER CO., LTD. Responsible party: CASIO AMERICA, INC. Address: - Casio PX-320CS | User Guide - Page 3
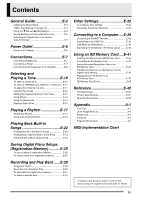
Memory Card E-43 Transferring Data from an SD Memory Card to Digital Piano Memory E-45 Playing Back a File Stored on an SD Memory Card E-47 SD Memory Card Errors E-48 Reference E-49 Troubleshooting E-49 Product Specifications E-51 Operating Precautions E-52 Appendix A-1 Tone List A-1 Drum - Casio PX-320CS | User Guide - Page 4
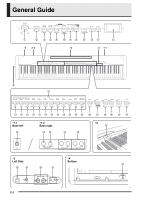
General Guide 1 2 3 4 5 6 7 8 9 bk bl bm ∗4 ∗1-2 ∗5 ∗2 ∗1-1 ∗3 bn bo bp bq br bs bt ck cl cm cn co cp cq cr cs ct dk dl *1-1 Back left dm *1-2 Back right dn do dp dq *2 dr *3 *4 Left Side Bottom em ds dt ek el E-2 - Casio PX-320CS | User Guide - Page 5
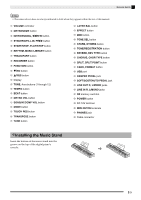
General Guide NOTE • The names shown here are always indicated in bold when they appear within the text of this manual. 1 VOLUME controller 2 METRONOME button 3 INTRO/ENDING, WWREW button 4 SYNCHRO/FILL-IN, FFXX button 5 music stand into the groove on the top of the digital piano's console. E-3 - Casio PX-320CS | User Guide - Page 6
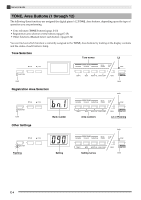
General Guide TONE, Area Buttons (1 through 12) The following three functions are assigned the digital piano's 12 TONE, Area buttons, depending upon the type of operation you are performing. • Tone selection (TONE buttons) (page E-10) • Registration area selection (Area buttons) (page E- - Casio PX-320CS | User Guide - Page 7
changes on the display. Example: Rhythm number 01 • The rhythm number (page E-17) appears first whenever you turn on the digital piano. See the applicable pages in this manual for detailed information about each type of setting. • Each press of the T/NO and S/YES button will increase or decrease the - Casio PX-320CS | User Guide - Page 8
tight while it is in use. During Movement • Before moving the digital piano, be sure to unplug the AC adaptor from the power outlet. During Storage never wind it around the AC adaptor. IMPORTANT! • Make sure the digital piano is turned off before plugging in or unplugging the AC adaptor. • The AC - Casio PX-320CS | User Guide - Page 9
level too high when using headphones. Connecting a Pedal The back of the digital piano has two pedal jacks, one for a damper pedal and one for a soft/ pedal (SP-3) to perform, connect the pedal's cable either to the digital piano's DAMPER PEDAL jack or SOFT/SOSTENUTO PEDAL jack. If you want to use - Casio PX-320CS | User Guide - Page 10
. You can then use the pedals for expression that is similar to that available on an acoustic piano. Bottom Pedal connector NOTE • The SP-30 Pedal Unit supports half-pedal operation (pressing the pedal part way), and you can adjust the amount of the pedal effect applied when the pedal is pressed - Casio PX-320CS | User Guide - Page 11
are compatible with the equipment you are connecting. Connecting to Audio Equipment 2 Use commercially available cables to connect the external audio equipment to the piano's LINE OUT jacks as shown in Figure 2. LINE OUT R jack output is right channel sound, while LINE OUT L/MONO jack output is left - Casio PX-320CS | User Guide - Page 12
METRO VOL TONE REVERB CHORUS METRONOME VOLUME /YES /NO Your digital piano has the following types of tones built in. Tone Numbers - GM TONES SPLIT TONE/REGISTRATION IMPORTANT! • When you turn on the digital piano, it performs a startup routine, during which the following messages appears on - Casio PX-320CS | User Guide - Page 13
VARIOUS tone, GM tone, or drum set number you want. Example: 003 MODERN PIANO 2. Press the VARIOUS/GM TONES button. • The button's lamp will light indicating number will be displayed while the button is depressed. Example: 001 LA PIANO 3. You can change the tone currently assigned to the VARIOUS/GM - Casio PX-320CS | User Guide - Page 14
Settings" on page E-32 for more information. • You cannot layer the keyboard while in the Duet Mode or when recording to Track 2 on the digital piano. Splitting the Keyboard between Two Tones You can assign different tones to keys on the left side (low range) and the right side (high range - Casio PX-320CS | User Guide - Page 15
keyboard is split, the chorus on/off setting affects the low range tone only. NOTE • The chorus effect cannot be turned on while the digital piano is in the Duet Mode. E-13 - Casio PX-320CS | User Guide - Page 16
Selecting and Playing a Tone Using the Metronome 1. Press the METRONOME button. • This will start the metronome. • The two lamps above the START/STOP button will flash along with the metronome beats. Flashes on the first beat of each measure. Flashes on subsequent beats. 2. To change the beats - Casio PX-320CS | User Guide - Page 17
Using the Optional SP-30 Pedal Unit NOTE • The SP-3 Pedal Unit does not support half-pedal operation. 1. Press the MUSIC LIBRARY button so the MUSIC LIBRARY lamp (below -3 connected to digital piano's DAMPER PEDAL jack Right side damper pedal SP-3 connected to digital piano's SOFT/SOSTENUTO jack, - Casio PX-320CS | User Guide - Page 18
Selecting and Playing a Tone Changing the Octaves of the Keyboards You can change the ranges of the left and right keyboards in octave units from their initial default settings. This comes in handy, for example, if the initial default range is not enough when one person is playing the left hand part - Casio PX-320CS | User Guide - Page 19
Playing a Rhythm RHYTHM START/STOP FUNCTION /NO /YES SYNCHRO/FILL-IN INTRO/ENDING MODE Selecting a Rhythm You can select from among 70 built-in rhythms. 1. Press the RHYTHM button so the lamp above it is lit. • Each press of the button toggles between the lamps above and below the button. To - Casio PX-320CS | User Guide - Page 20
the CASIO CHORD mode. • See "How to Play Chords" on page E-19 for details about Auto Accompaniment modes and their chord fingerings. 4. Press the FUNCTION button again. • This will cause the lamp above the button to go out. 5. Press the SYNCHRO/FILL-IN button. • This configures the digital piano so - Casio PX-320CS | User Guide - Page 21
Chords The way you finger chords depends on the current Auto Accompaniment mode. If you want to play without Auto Accompaniment, use the NORMAL mode. „ CASIO CHORD Even if you do not know how to play chords normally, this mode lets you play four different types of chords using simplified fingerings - Casio PX-320CS | User Guide - Page 22
Example: Major Chords Pressing a single accompaniment keyboard range key in the CASIO CHORD mode will play the major chord whose name is marked above the Inverted fingerings (see "Fingered Chord Notes" on page E-21) are not supported for these chords. The lowest note fingered is used as the root. - Casio PX-320CS | User Guide - Page 23
Fingered Chord Notes • Except for the chords whose names have *1 after them in the above examples, you also can use inverted fingerings. This means that fingering either E-G-C or G-C-E will produces a C chord. • Except for the chords whose names have *2 after them in the above examples, you need to - Casio PX-320CS | User Guide - Page 24
playing something on the keyboard will cause sound output of the keyboard notes to stop. Playing Back All of the Built-in Songs Your digital piano has a total of 71 built-in songs. You can use the procedure below to play back all of the songs, one after the other. Type - Casio PX-320CS | User Guide - Page 25
plus up to 10 songs (61 to 70) that have been saved to digital piano memory from a computer* or SD memory card (page E-41). You can download music data from the Internet and then transfer it from your computer to digital piano memory. See "Expanding the Selections in the Music Library" on page E-40 - Casio PX-320CS | User Guide - Page 26
. NOTE • The Music Library includes duet tunes (song numbers 12, 37, and 45). While a duet is selected, you can turn off the first piano (Primo) or second piano (Secondo) tone and play along with the song. • A number of tunes have tempo changes part way through in order to produce specific musical - Casio PX-320CS | User Guide - Page 27
Setups (Registration Memory) Area buttons (1 through 12) /YES /NO STORE TONE/REGISTRATION You can save up to 96 digital piano setups in registration memory, including tone, rhythm, and tempo settings, for quick and easy recall whenever you need them. Registration Areas and Banks Each setup - Casio PX-320CS | User Guide - Page 28
an SD Memory Card" on page E-41 for more information. IMPORTANT! • CASIO COMPUTER CO., LTD. takes no responsibility for any damages, lost profits, or the following conditions exists. Eliminate the problem condition and perform the procedure from step 2. • The digital piano is in the Duet Mode. • - Casio PX-320CS | User Guide - Page 29
from area 3-1 NOTE • Registration data cannot be recalled when any one of the following conditions exists. Eliminate the problem condition and perform the procedure from step 1. • The digital piano is in the Duet Mode. • RECORDER button PLAY lamp is flashing. • To check the current selected song or - Casio PX-320CS | User Guide - Page 30
While playing back. . . Track 2 Melody Record Memory Capacity • Digital piano memory can hold about 50,000 notes total, for five songs. Each song an SD Memory Card" on page E-41 for more information. IMPORTANT! • CASIO COMPUTER CO., LTD. takes no responsibility for any damages, lost profits, or - Casio PX-320CS | User Guide - Page 31
: Recording will start as soon as you play anything on the keyboard. • At this time the 1/L lamp also will flash to indicate that the digital piano is standing by for recording to Track 1. E-29 - Casio PX-320CS | User Guide - Page 32
Recording and Play Back 7. When you are finished, press the START/ STOP button to stop recording. • To stop recording with a rhythm/Auto Accompaniment ending pattern, press the INTRO/ ENDING button. • Stopping recording will cause the REC lamp to go out and the PLAY lamp to light. • To play back the - Casio PX-320CS | User Guide - Page 33
the selected track and enter record standby. • To cancel the operation, press the T/NO button in place of the S/YES button. NOTE • All digital piano operations except for the RECORDER button and the T/NO and S/YES buttons are disabled from step 5 until the delete operation is executed in step 6 of - Casio PX-320CS | User Guide - Page 34
Other Settings FUNCTION TRANSPOSE EFFECT /YES /NO OTHERS MIDI This section explains how to configure key, touch, pedal, MIDI, and other settings. • The basic procedure below is used for configuring all settings. The only difference is the button that you press to select a parameter. • See the " - Casio PX-320CS | User Guide - Page 35
To change the setting of one of the EFFECT button parameters Press the EFFECT button in step 3 of the "To configure other settings" procedure to toggle between the two parameters shown below. Brilliance parameter ("b" stands for "brilliance".) Other Settings To change the setting of one of the - Casio PX-320CS | User Guide - Page 36
See page E-13. See page E-11. When the damper pedal is pressed, acoustic resonance reproduces the harmonic resonance similar to that of a grand piano. This parameter turns acoustic resonance on or off. When configuring the setting of this parameter, use the procedure under "To change the setting of - Casio PX-320CS | User Guide - Page 37
parameters" on page E-33. Auto Accompaniment MODE mode oFF : NORMAL C.C. : CASIO CHORD FnG : FINGERED FUL : FULL RANGE CHORD NOTE • When playing a song in the Duet Mode. Raises or lowers the overall pitch of the digital piano to match another instrument. The setting range is plus or minus 99 cents - Casio PX-320CS | User Guide - Page 38
Registration Filter OTHERS F.oF: Off F.on: On Description Soft pedal is the initial power on default setting for a pedal connected to the digital piano's SOFT/ SOSTENUTO PEDAL jack. This parameter can be used to change the pedal to a sostenuto pedal. When configuring the setting of this parameter - Casio PX-320CS | User Guide - Page 39
settings*, and restore them when it is turned on again. When "Off" is selected, settings are reset to their initial defaults whenever the digital piano is turned on. When configuring the setting of this parameter, use the procedure under "To change the setting of one of the OTHERS button parameters - Casio PX-320CS | User Guide - Page 40
about how to configure them. Connecting to the USB Port The digital piano's USB port makes it quick and simple to connect to a computer. For details about how to install the USB MIDI driver, see the "CASIO USB MIDI Driver User's Guide" (manual_e.pdf) that also is on the bundled CD-ROM. 2. - Casio PX-320CS | User Guide - Page 41
piano into your computer's CD-ROM drive. 2. On the CD-ROM, navigate to the "Adobe"/ "English" folder and double-click "ar601enu.exe" (or "ar505enu.exe"). Follow the instructions MIDI device functions in the USB mode, see the "CASIO USB MIDI Driver User's Guide" (manual_e.pdf) on the bundled CD-ROM. z - Casio PX-320CS | User Guide - Page 42
Place the CD-ROM that comes with the digital piano into the CD-ROM drive of a computer that click the "SMFConv-e.exe" file. Next, follow the instructions that appear on your computer screen to install the software Programs] - [CASIO] - [SMF Converter] - [manual]. A browser that supports frames (like - Casio PX-320CS | User Guide - Page 43
for you to store song data on a commercially available SD memory card. The digital piano also can read SMF song data and CASIO format song data from an SD memory card. z Supported SD Memory Cards The maximum supported SD memory card size is 2 GB. Use of any SD memory card with greater capacity - Casio PX-320CS | User Guide - Page 44
the instructions and data between the digital piano and an SD memory service life. After very long use, you may start to experience problems with storing data to, or reading or deleting data from the memory card. When this happens, you need to purchase a new SD memory card. * Note that CASIO - Casio PX-320CS | User Guide - Page 45
Insert an SD memory card that has been formatted on the digital piano into the digital piano's SD memory card slot. Make sure that the write-protect switch CSR file) to appear on the display. This setting will save song data in CASIO CSR format. • If you want to save the song data in SMF Format 0, - Casio PX-320CS | User Guide - Page 46
saving data. • The message "CPL" (complete) will appear on the display to let you know when the save operation is complete. After that, the digital piano will return to playback standby. z To cancel the save operation, press the CARD button. z If the SD memory card already contains a data file with - Casio PX-320CS | User Guide - Page 47
to 70 *2 Memory area where songs recorded on the digital piano are stored. *3 Memory area where registration data on the piano is stored. z Supported Data User Area SMF format data and song data converted using SMF conversion software (CASIO CM2 format) Recorder Area.......Song data recorded on the - Casio PX-320CS | User Guide - Page 48
) appears on the display. 4. Use the T/NO and S/YES buttons to display the file number of the song data you want to transfer to digital piano memory. 5. When everything is the way you want, press the FUNCTION button to begin data transfer. • The message "CPL" (complete) will appear on the display - Casio PX-320CS | User Guide - Page 49
. Insert an SD memory card that has been formatted on the digital piano into the memory card slot of your computer, and copy the data count settings for playback. See "Other Settings" on page E-32 for more information. CASIO format song 2. Use the T/NO and S/YES buttons to display the song number of - Casio PX-320CS | User Guide - Page 50
any data that is supported by this digital piano. 1. Change to an SD memory card that contains data saved by or supported by this digital piano. 2. When copying data to enable writing. (Page E-42) There is a problem with the SD memory card data format or the data is corrupted. Use different data - Casio PX-320CS | User Guide - Page 51
Troubleshooting Problem Cause Action See Page No sound is 1. The VOLUME controller is set to produced when I "MIN". press a keyboard key. 2. Headphones are connected to the digital piano sound source user's guide No sound is produced card is not supported by the digital piano. 5. The SD - Casio PX-320CS | User Guide - Page 52
SD memory card with a supported capacity. 3. Use a different SD memory card. 4. Move the data to the "MUSICDAT" folder. Stop song playback, disconnect the USB cable from the digital piano, and then reconnect it. Next, try playing back the song again. If this does not solve the problem, quit the MIDI - Casio PX-320CS | User Guide - Page 53
Model PX-320 Keyboard 88-key piano keyboard, , SYNCHRO/FILL-IN • Auto Accompaniment modes: NORMAL, CASIO CHORD, FINGERED, FULL RANGE CHORD • Accompaniment Volume Level multi-timbre receive SD Memory Card • SD memory card slot • Supported SD Memory Cards: Up to 2 GB • Functions: SMF playback - Casio PX-320CS | User Guide - Page 54
, is prohibited. Except for your own, personal use, any other use of the contents of this manual without the consent of CASIO is prohibited under copyright laws. • IN NO EVENT SHALL CASIO BE LIABLE FOR ANY DAMAGES WHATSOEVER (INCLUDING, WITHOUT LIMITATION, DAMAGES FOR LOSS OF PROFITS, BUSINESS - Casio PX-320CS | User Guide - Page 55
Appendix/Apéndice Tone List/Lista de tonos No./ Tone Name/ Nº Nombre de tonos 01 GRAND PIANO MODERN 02 GRAND PIANO CLASSIC 03 GRAND PIANO VARIATION 04 ROCK PIANO 05 ELEC PIANO 1 06 ELEC PIANO 2 07 60'S E.PIANO 08 ROCK ORGAN 09 JAZZ ORGAN 10 STRINGS 11 SYNTH-VOICE Various 001 LA - Casio PX-320CS | User Guide - Page 56
103 0 64 166 GM SITAR 104 0 128 167 GM BANJO 105 0 128 168 GM SHAMISEN 106 0 128 169 GM KOTO 107 0 128 170 GM THUMB PIANO 108 0 128 171 GM BAGPIPE 109 0 64 172 GM FIDDLE 110 0 128 173 GM SHANAI 111 0 128 174 GM TINKLE BELL 112 0 128 175 GM - Casio PX-320CS | User Guide - Page 57
Drum Assignment List/ Lista de sonidos de batería Key/Note Number Número de clave/nota Eb1 27 E1 28 F1 29 G1 31 A1 33 B1 35 F#1 30 Ab1 32 Bb1 34 C2 36 D2 38 E2 40 C#2 37 Eb2 39 F2 41 G2 43 A2 45 B2 47 F#2 42 Ab2 44 Bb2 46 C3 48 D3 50 E3 52 C#3 49 Eb3 51 F3 53 G3 55 A3 57 B3 59 F#3 54 Ab3 - Casio PX-320CS | User Guide - Page 58
BEGUINE SAMBA MAMBO RHUMBA CHA-CHA-CHA BOLERO SALSA REGGAE COUNTRY 8 BEAT COUNTRY BALLAD COUNTRY SHUFFLE FAST GOSPEL SLOW GOSPEL STR QUARTET Category/Categoría FOR PIANO No./Nº 51 52 53 54 55 56 57 58 59 60 61 62 63 64 65 66 67 68 69 70 Rhythm Name/ Nombre de - Casio PX-320CS | User Guide - Page 59
./Nº 01 02 03 04 05 06 07 08 09 10 11 Tone Name/ Nombre de tonos GRAND PIANO (MODERN) GRAND PIANO (CLASSIC) GRAND PIANO (VARIATION) ROCK PIANO ELEC PIANO 1 ELEC PIANO 2 60's E.PIANO ROCK ORGAN JAZZ ORGAN STRINGS SYNTH-VOICE Song Name/ Nombre de canciones Pr_lude [Suite bergamasque] 3 Romances Sans - Casio PX-320CS | User Guide - Page 60
Appendix/Apéndice Fingered Chord Chart/Cuadro de acordes digitados (Fingered) A-6 Chord Type Root M m 7 m7 dim7 M7 dim m7b5 Chord Type Root aug sus4 7sus4 m add9 mM7 7b5 add9 C C C#/(D b) C#/(D b) D (D#)/Eb D (D#)/Eb E F F#/(Gb) E F F#/(Gb) G (G#)/Ab A (A#)/Bb B G (G#)/Ab A - Casio PX-320CS | User Guide - Page 61
Model PX-320 MIDI Implementation Chart Version : 1.0 Function Transmitted Recognized Remarks Basic Channel Exclusive Message • For details about footnotes 3 through 5, see MIDI Implementation at http://world.casio.com/. *5 : Mensaje exclusivo del sistema de este modelo • Si desea más informaci - Casio PX-320CS | User Guide - Page 62
This recycle mark indicates that the packaging conforms to the environmental protection legislation in Germany. Esta marca de reciclaje indica que el empaquetado se ajusta a la legislación de protección ambiental en Alemania. C MA0708-A Printed in China PX320ES1A
-
 1
1 -
 2
2 -
 3
3 -
 4
4 -
 5
5 -
 6
6 -
 7
7 -
8
-
9
-
10
-
11
-
12
-
13
-
14
-
15
-
16
-
17
-
18
-
19
-
20
-
21
-
22
-
23
-
24
-
25
-
26
-
27
-
28
-
29
-
30
-
31
-
32
-
33
-
34
-
35
-
36
-
37
-
38
-
39
-
40
-
41
-
42
-
43
-
44
-
45
-
46
-
47
-
48
-
49
-
50
-
51
-
52
-
53
-
54
-
55
-
56
-
57
-
58
-
59
-
60
-
61
-
62
 |
 |
PX320ES1A
ES
USER’S GUIDE
GUÍA DEL USUARIO
Please keep all information for future reference.
Guarde toda documentación para futuras consultas.
Safety Precautions
Before trying to use the piano, be sure to read
the separate “Safety Precautions”.
Precauciones de seguridad
Antes de intentar usar el piano, asegúrese de
leer las “Precauciones de seguridad” separadas.