Casio PX-320CS User Guide - Page 5
Installing the Music Stand
 |
UPC - 079767343255
View all Casio PX-320CS manuals
Add to My Manuals
Save this manual to your list of manuals |
Page 5 highlights
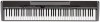
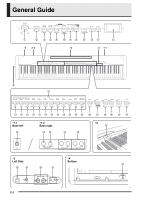
General Guide NOTE • The names shown here are always indicated in bold when they appear within the text of this manual. 1 VOLUME controller 2 METRONOME button 3 INTRO/ENDING, WWREW button 4 SYNCHRO/FILL-IN, FFXX button 5 START/STOP, PLAY/STOP button 6 RHYTHM, MUSIC LIBRARY button 7 TRACK/PART button 8 RECORDER button 9 FUNCTION button bk T/NO button bl S/YES button bm Display bn TONE, Area buttons (1 through 12) bo TEMPO button bp BEAT button bq METRO VOL button br SONG/ACCOMP VOL button bs MODE button bt TOUCH RES button ck TRANSPOSE button cl TUNE button cm LAYER BAL button cn EFFECT button co MIDI button cp TONE SEL button cq STORE, OTHERS button cr TONE/REGISTRATION button cs REVERB, REV TYPE button ct CHORUS, CHOR TYPE button dk SPLIT, SPLIT POINT button dl CARD, FORMAT button dm USB port dn DAMPER PEDAL jack do SOFT/SOSTENUTO PEDAL jack dp LINE OUT R, L/MONO jacks dq LINE IN R, L/MONO jacks dr SD memory card slot ds POWER button dt DC 12V terminal ek MIDI OUT/IN terminals el PHONES jack em Pedal connector *5 Installing the Music Stand Insert the bottom of the music stand into the groove on the top of the digital piano's console. E-3
-
 1
1 -
 2
2 -
 3
3 -
 4
4 -
 5
5 -
 6
6 -
 7
7 -
 8
8 -
 9
9 -
 10
10 -
 11
11 -
12
-
13
-
14
-
15
-
16
-
17
-
18
-
19
-
20
-
21
-
22
-
23
-
24
-
25
-
26
-
27
-
28
-
29
-
30
-
31
-
32
-
33
-
34
-
35
-
36
-
37
-
38
-
39
-
40
-
41
-
42
-
43
-
44
-
45
-
46
-
47
-
48
-
49
-
50
-
51
-
52
-
53
-
54
-
55
-
56
-
57
-
58
-
59
-
60
-
61
-
62
 |
 |
