Cisco 2610 Hardware Installation Guide - Page 50
Mounting the Chassis in a Rack, Brackets for Cisco 261x, Cisco 262x, and Cisco 265x Series Routers
 |
UPC - 746320089614
View all Cisco 2610 manuals
Add to My Manuals
Save this manual to your list of manuals |
Page 50 highlights
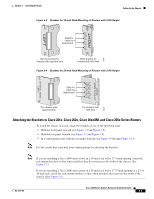
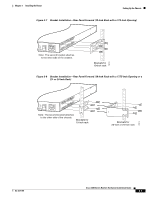
Setting Up the Chassis Chapter 3 Installing the Router Figure 3-1 Rubber Feet Locations on Cisco 2600 Series Routers of 1-RU Height Fan H4795 Step 3 Place the router top-side up on a flat, smooth, secure surface. Caution Do not place anything on top of the router that weighs more than 10 pounds (4.5 kg). Excessive weight on top could damage the chassis. After the router has been installed, you must connect the chassis to a reliable earth ground. For the chassis ground connection procedures, see the "Installing the Chassis Ground Connection" section on page 3-13. Mounting the Chassis in a Rack This section describes the procedures for rack-mounting the chassis. Cisco 2600 series routers with a chassis height of 1 rack-unit (1RU) ship with brackets for use with a 19-inch rack or, if specified in your order, optional larger brackets for use with a 23- or 24-inch rack. Cisco 2600 series routers with a chassis height of 2 rack-units (2RU) ship with brackets for use with 19-inch racks and with NEBS/ETSI-compliant brackets for use with 23-inch racks. The brackets are shown in Figure 3-2, Figure 3-3, and Figure 3-4. Figure 3-2 Brackets for Cisco 261x, Cisco 262x, Cisco 26xxXM, and Cisco 265x Series Routers 27711 Bracket for use with a 19-inch rack Bracket for use with a 23-inch or 24-inch rack Cisco 2600 Series Routers Hardware Installation Guide 3-4 OL-2171-06
-
 1
1 -
2
-
3
-
4
-
5
-
6
-
7
-
8
-
9
-
10
-
11
-
12
-
13
-
14
-
15
-
16
-
17
-
18
-
19
-
20
-
21
-
22
-
23
-
24
-
25
-
26
-
27
-
28
-
29
-
30
-
31
-
32
-
33
-
34
-
35
-
36
-
37
-
38
-
39
-
40
-
41
-
42
-
43
-
44
-
 45
45 -
 46
46 -
 47
47 -
 48
48 -
 49
49 -
 50
50 -
 51
51 -
 52
52 -
 53
53 -
 54
54 -
 55
55 -
56
-
57
-
58
-
59
-
60
-
61
-
62
-
63
-
64
-
65
-
66
-
67
-
68
-
69
-
70
-
71
-
72
-
73
-
74
-
75
-
76
-
77
-
78
-
79
-
80
-
81
-
82
-
83
-
84
-
85
-
86
-
87
-
88
-
89
-
90
-
91
-
92
-
93
-
94
-
95
-
96
-
97
-
98
-
99
-
100
-
101
-
102
-
103
-
104
 |
 |
