Cisco 2610 Hardware Installation Guide - Page 55
Attaching the Brackets to a Router of 2-RU Height, Bracket Installation-Front Mounting
 |
UPC - 746320089614
View all Cisco 2610 manuals
Add to My Manuals
Save this manual to your list of manuals |
Page 55 highlights
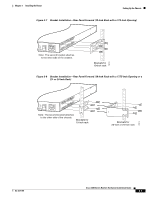
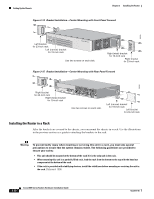
RIGHT 23" ETSI, NEBS RIGHT 82691 Chapter 3 Installing the Router Setting Up the Chassis Attaching the Brackets to a Router of 2-RU Height To install the chassis in a rack, attach the brackets in one of the following ways: • With the front panel forward (see Figure 3-12) • With the rear panel forward (see Figure 3-13) • In a center-mount rack (see Figure 3-14 and Figure 3-15) Note Use the screws that came with your router package for attaching the brackets. Figure 3-12 Bracket Installation-Front Mounting LEFT 23" ETSI, NEBS LEFT Left bracket for 23-inch rack Left (narrow) bracket for 19-inch rack SERSEIERSIES Right (wide) bracket Use two screws on each side. for 19-inch rack Right bracket for 23-inch rack Figure 3-13 Bracket Installation-Rear Mounting RIGHT 23" ETSI, NEBS RIGHT NM-HDV 23" ETSI, NEBS LEFT LEFT Right bracket for 23-inch rack AL BANK 4 BANK 3 BANK 2 VWIC 2MFT-E1 BANK 1 BANK 0 CTRLR E2 LP CD CTRLR E1 SEE IBMNEASFNTOAURLAELLATION V0 EN SEE MANUAL BEFORE INSTALLATION DSU 56K TD RD LP AL CD TD RD LP AL CD SEE MANUAL BEFORE INSTALLATION DSU 56K SEE MANUAL BEFORE INSTALLATION Right (wide) bracket for 19-inch rack Left (narrow) bracket for 19-inch rack Four screws are required on each side. Left bracket for 23-inch rack 82692 OL-2171-06 Cisco 2600 Series Routers Hardware Installation Guide 3-9
-
 1
1 -
2
-
3
-
4
-
5
-
6
-
7
-
8
-
9
-
10
-
11
-
12
-
13
-
14
-
15
-
16
-
17
-
18
-
19
-
20
-
21
-
22
-
23
-
24
-
25
-
26
-
27
-
28
-
29
-
30
-
31
-
32
-
33
-
34
-
35
-
36
-
37
-
38
-
39
-
40
-
41
-
42
-
43
-
44
-
45
-
46
-
47
-
48
-
49
-
 50
50 -
 51
51 -
 52
52 -
 53
53 -
 54
54 -
 55
55 -
 56
56 -
 57
57 -
 58
58 -
 59
59 -
 60
60 -
61
-
62
-
63
-
64
-
65
-
66
-
67
-
68
-
69
-
70
-
71
-
72
-
73
-
74
-
75
-
76
-
77
-
78
-
79
-
80
-
81
-
82
-
83
-
84
-
85
-
86
-
87
-
88
-
89
-
90
-
91
-
92
-
93
-
94
-
95
-
96
-
97
-
98
-
99
-
100
-
101
-
102
-
103
-
104
 |
 |
