Cisco E2100L User Guide - Page 28
Create a Shared Folder, Return to Upper Folder
 |
View all Cisco E2100L manuals
Add to My Manuals
Save this manual to your list of manuals |
Page 28 highlights
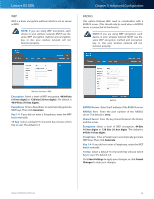
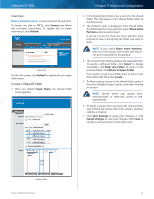
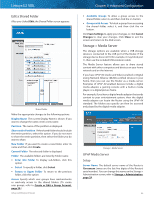
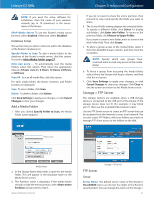
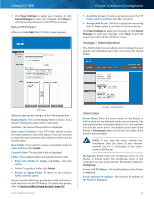
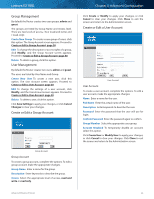
Linksys E2100L Claim Disk Enter a partition's name Create a name for the partition. To format the disk as FAT32, click Format and follow the on‑screen instructions. To update the on-screen information, click Refresh. Claim Disk On the Disk screen, click Refresh to update the on-screen information. Create a Shared Folder 1. After you clicked Create Share, the Shared Folder screen appears. Chapter 3: Advanced Configuration 2. In the Display Name field, enter a name for the shared folder. This will appear in the Shared Folder table on the Disk screen. 3. The Partition name is displayed. If the shared folder should include the entire partition, select Share entire Partition and proceed to step 5. If you do not want to share the entire partition, then proceed to step 4 and specify the folder you want to share. NOTE: If you select Share entire Partition, then all of the Groups with Access (see step 5) can access any folder in the partition. 4. The Current Folder setting displays the selected folder. To specify a different folder, click Select. To display sub-folders, click Enter into Folder. To return to the previous folder, click Return to Upper Folder. If you want to create a new folder, enter its name in the New Folder field. Then click Create. 5. To allow a group access to the shared folder, select it from the Available Groups column, and then click the >> button. NOTE: Specify which user groups have read‑and-write or read-only access to the shared folder. 6. To block a group from accessing the shared folder, select it from the Groups with Access column, and then click the
-
 1
1 -
2
-
3
-
4
-
5
-
6
-
7
-
8
-
9
-
10
-
11
-
12
-
13
-
14
-
15
-
16
-
17
-
18
-
19
-
20
-
21
-
22
-
 23
23 -
 24
24 -
 25
25 -
 26
26 -
 27
27 -
 28
28 -
 29
29 -
 30
30 -
 31
31 -
 32
32 -
 33
33 -
34
-
35
-
36
-
37
-
38
-
39
-
40
-
41
-
42
-
43
-
44
-
45
-
46
-
47
-
48
-
49
-
50
-
51
-
52
-
53
-
54
-
55
-
56
-
57
-
58
-
59
-
60
-
61
-
62
-
63
-
64
-
65
-
66
-
67
-
68
-
69
-
70
-
71
-
72
-
73
-
74
-
75
-
76
-
77
-
78
 |
 |
