Compaq 400 320 321 420 421 620 and 621 Notebook PC and 420 and 620 Notebook PC - Page 69
To remove the hard drive bracket, follow these steps, them in the computer.
 |
View all Compaq 400 manuals
Add to My Manuals
Save this manual to your list of manuals |
Page 69 highlights
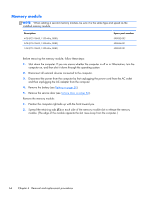
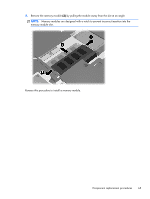
To remove the hard drive bracket, follow these steps: 1. If it is necessary to replace the hard drive bracket, remove the two Phillips PM3.0×4.0 hard drive bracket screws (1) from each side of the hard drive. 2. Lift the bracket (2) straight up to remove it from the hard drive. It is necessary to attach rubber or foam bumpers to drives and/or hard drive brackets before installing them in the computer. For a 39.6-cm (15.6-in) computer using a 9.5mm thick hard drive, attach 2 pieces of 15×5×3mm rubber from spares kit 652169-001 to the hard drive. For a 39.6-cm (15.6-in) computer using a 7.0mm thick hard drive, attach 2 pieces of 12×5.5×7mm rubber from spares kit 652169-001 to the hard drive. Component replacement procedures 61
-
 1
1 -
2
-
3
-
4
-
5
-
6
-
7
-
8
-
9
-
10
-
11
-
12
-
13
-
14
-
15
-
16
-
17
-
18
-
19
-
20
-
21
-
22
-
23
-
24
-
25
-
26
-
27
-
28
-
29
-
30
-
31
-
32
-
33
-
34
-
35
-
36
-
37
-
38
-
39
-
40
-
41
-
42
-
43
-
44
-
45
-
46
-
47
-
48
-
49
-
50
-
51
-
52
-
53
-
54
-
55
-
56
-
57
-
58
-
59
-
60
-
61
-
62
-
63
-
 64
64 -
 65
65 -
 66
66 -
 67
67 -
 68
68 -
 69
69 -
 70
70 -
 71
71 -
 72
72 -
 73
73 -
 74
74 -
75
-
76
-
77
-
78
-
79
-
80
-
81
-
82
-
83
-
84
-
85
-
86
-
87
-
88
-
89
-
90
-
91
-
92
-
93
-
94
-
95
-
96
-
97
-
98
-
99
-
100
-
101
-
102
-
103
-
104
-
105
-
106
-
107
-
108
-
109
-
110
-
111
-
112
-
113
-
114
-
115
-
116
-
117
-
118
-
119
-
120
-
121
-
122
-
123
-
124
-
125
-
126
-
127
-
128
-
129
-
130
-
131
-
132
-
133
-
134
-
135
-
136
-
137
-
138
-
139
-
140
-
141
-
142
-
143
-
144
-
145
-
146
-
147
-
148
-
149
-
150
-
151
-
152
-
153
-
154
-
155
-
156
-
157
-
158
-
159
-
160
-
161
-
162
-
163
-
164
-
165
-
166
-
167
-
168
-
169
-
170
-
171
-
172
 |
 |

To remove the hard drive bracket, follow these steps:
1.
If it is necessary to replace the hard drive bracket, remove the two Phillips PM3.0×4.0 hard drive
bracket screws
(1)
from each side of the hard drive.
2.
Lift the bracket
(2)
straight up to remove it from the hard drive.
It is necessary to attach rubber or foam bumpers to drives and/or hard drive brackets before installing
them in the computer.
For a
39.6-cm
(15.6-in) computer using a 9.5mm thick hard drive, attach 2 pieces of 15×5×3mm
rubber from spares kit 652169-001 to the hard drive.
For a
39.6-cm
(15.6-in) computer using a 7.0mm thick hard drive, attach 2 pieces of 12×5.5×7mm
rubber from spares kit 652169-001 to the hard drive.
Component replacement procedures
61