Compaq Mini CQ10-500 HP Notebook Reference Guide - Windows 7 - Page 48
Removing an eSATA device, Click the remove hardware icon in the notification area
 |
View all Compaq Mini CQ10-500 manuals
Add to My Manuals
Save this manual to your list of manuals |
Page 48 highlights
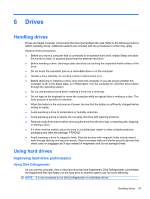
▲ To connect an eSATA device to the computer, connect the eSATA cable for the device to the eSATA port. You will hear a sound when the device has been detected. Removing an eSATA device CAUTION: To reduce the risk of damage to an eSATA connector, do not pull on the cable to remove the eSATA device. CAUTION: To reduce the risk of loss of information or an unresponsive system, use the following procedure to safely remove the device. 1. To remove an eSATA device, save your information and close all programs associated with the device. 2. Click the remove hardware icon in the notification area, at the far right of the taskbar, and then follow the on-screen instructions. 3. Remove the device. 38 Chapter 5 External cards and devices
-
 1
1 -
2
-
3
-
4
-
5
-
6
-
7
-
8
-
9
-
10
-
11
-
12
-
13
-
14
-
15
-
16
-
17
-
18
-
19
-
20
-
21
-
22
-
23
-
24
-
25
-
26
-
27
-
28
-
29
-
30
-
31
-
32
-
33
-
34
-
35
-
36
-
37
-
38
-
39
-
40
-
41
-
42
-
 43
43 -
 44
44 -
 45
45 -
 46
46 -
 47
47 -
 48
48 -
 49
49 -
 50
50 -
 51
51 -
 52
52 -
 53
53 -
54
-
55
-
56
-
57
-
58
-
59
-
60
-
61
-
62
-
63
-
64
-
65
-
66
-
67
-
68
-
69
-
70
-
71
-
72
-
73
-
74
-
75
 |
 |
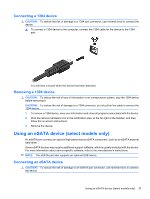
▲
To connect an eSATA device to the computer, connect the eSATA cable for the device to the
eSATA port.
You will hear a sound when the device has been detected.
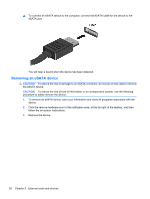
Removing an eSATA device
CAUTION:
To reduce the risk of damage to an eSATA connector, do not pull on the cable to remove
the eSATA device.
CAUTION:
To reduce the risk of loss of information or an unresponsive system, use the following
procedure to safely remove the device.
1.
To remove an eSATA device, save your information and close all programs associated with the
device.
2.
Click the remove hardware icon in the notification area, at the far right of the taskbar, and then
follow the on-screen instructions.
3.
Remove the device.
38
Chapter 5
External cards and devices