Compaq W4000 Compaq Evo Workstation W4000 CMT Hardware Reference Guide - Page 34
Installing a 3.5-Inch Drive into a 5.25-Inch Drive Bay, Connecting the Drive Cables
 |
View all Compaq W4000 manuals
Add to My Manuals
Save this manual to your list of manuals |
Page 34 highlights
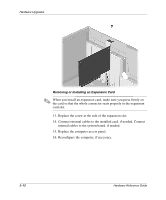
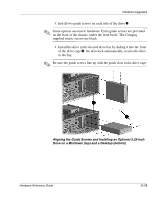
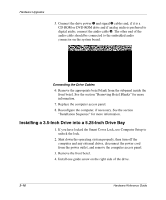
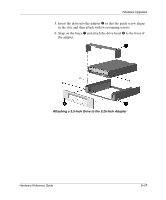
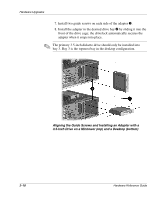
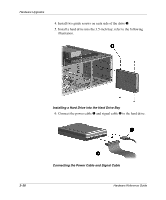
Hardware Upgrades 5. Connect the drive power 1 and signal 2 cables and, if it is a CD-ROM or DVD-ROM drive and if analog audio is preferred to digital audio, connect the audio cable 3. The other end of the audio cable should be connected to the embedded audio connector on the system board. Connecting the Drive Cables 6. Remove the appropriate bezel blank from the subpanel inside the front bezel. See the section "Removing Bezel Blanks" for more information. 7. Replace the computer access panel. 8. Reconfigure the computer, if necessary. See the section "Installation Sequence" for more information. Installing a 3.5-Inch Drive into a 5.25-Inch Drive Bay 1. If you have locked the Smart Cover Lock, use Computer Setup to unlock the lock. 2. Shut down the operating system properly, then turn off the computer and any external drives, disconnect the power cord from the power outlet, and remove the computer access panel. 3. Remove the front bezel. 4. Install one guide screw on the right side of the drive. 2-16 Hardware Reference Guide
-
 1
1 -
2
-
3
-
4
-
5
-
6
-
7
-
8
-
9
-
10
-
11
-
12
-
13
-
14
-
15
-
16
-
17
-
18
-
19
-
20
-
21
-
22
-
23
-
24
-
25
-
26
-
27
-
28
-
 29
29 -
 30
30 -
 31
31 -
 32
32 -
 33
33 -
 34
34 -
 35
35 -
 36
36 -
 37
37 -
 38
38 -
 39
39 -
40
-
41
-
42
-
43
-
44
-
45
-
46
-
47
-
48
-
49
-
50
-
51
-
52
-
53
-
54
-
55
-
56
-
57
-
58
-
59
-
60
-
61
-
62
-
63
-
64
-
65
-
66
 |
 |