Cub Cadet CC 30 H Operation Manual
Cub Cadet CC 30 H Manual
 |
View all Cub Cadet CC 30 H manuals
Add to My Manuals
Save this manual to your list of manuals |
Cub Cadet CC 30 H manual content summary:
- Cub Cadet CC 30 H | Operation Manual - Page 1
Product Care Operator's Manual Riding Mower Table of Contents Important Safe Operation Practices 2 Assembly & Set-Up 7 Controls & Operation 11 Product Care 15 Parts/Warranty See Separate Supplement WARNING READ AND FOLLOW ALL SAFETY RULES AND INSTRUCTIONS IN THIS MANUAL BEFORE ATTEMPTING TO - Cub Cadet CC 30 H | Operation Manual - Page 2
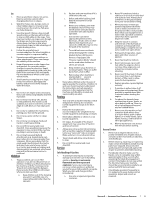
overhead clearances carefully before driving under low hanging tree instructions provided with the approved accessory or attachment. 28. Data indicates that operators, age 60 years and above, are involved in a large percentage of riding mower gauge included as part of this manual to measure slopes - Cub Cadet CC 30 H | Operation Manual - Page 3
loaded dump cart, lawn roller, etc.) on behind and down for small children. d. Never carry instructions and safe operation practices in this manual "zero-turn" ride-on mower). Make wide turns skin and change clothes build-up. Clean up oil or fuel spillage and storing. General Service 1. Never parts - Cub Cadet CC 30 H | Operation Manual - Page 4
(O.E.M.) blade(s) only, listed in this manual. "Use of parts which do not meet the original equipment specifications may lead to improper performance and compromise safety!" 6. Mower blades are sharp. Wrap the blade or wear gloves, and use extra caution when servicing them. 7. Keep all nuts, bolts - Cub Cadet CC 30 H | Operation Manual - Page 5
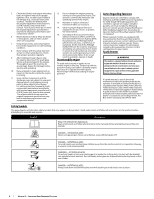
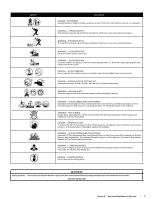
fires around dry vegetation. Do not drive through piles of dry leaves or tall dry free of debris. WARNING- HOT SURFACE Engine parts, especially the muffler, become extremely hot during operation instructions in this manual and on the machine. SAVE THESE INSTRUCTIONS! Section 2 - Cub Cadet CC 30 H | Operation Manual - Page 6
6 Slope Gauge Section 2 - Important Safe Operation Practices (OK) Figure 1 12°/21% Slope (TOO STEEP) Figure 2 12°/21% Slope 12°/21% dashed line USE THIS SLOPE GAUGE TO DETERMINE IF A SLOPE IS TOO STEEP FOR SAFE OPERATION! To check the slope, proceed as follows: 1. Remove this page and fold - Cub Cadet CC 30 H | Operation Manual - Page 7
Assembly (1) • Oil Siphon (1) † • Mulch Plug (1) † • Product Registration Card (1) † - If Equipped Note: This Operator's Manual covers several models. Riding mower features may vary by model. Not all features in this manual are applicable to all riding mower models and the riding mower depicted may - Cub Cadet CC 30 H | Operation Manual - Page 8
or socket. 8. Remove the pedestal cap mount screw factory installed and located on the riding mower's steering console. Retain the screw for later instructions. 9. Slide the pedestal cap (a) down onto the riding mower and slightly rotate to the right to clip into place. Secure the pedestal cap - Cub Cadet CC 30 H | Operation Manual - Page 9
of the deck chute (b). The small tab (d) on the deck lip area WARNING Never operate this riding mower without either the mulch the hex screws (a) for later instructions. See Figure 2-11. (b) (a) (b) and the rear cover (c) on your rider. See Figure 2-12. (c) (b) (a) (d) related accessories contain - Cub Cadet CC 30 H | Operation Manual - Page 10
unevenly. Gas & Oil Fill-up The gasoline tank is located under the left side of the seat on 30" deck models and oil level before operating. Be careful not to overfill. Service and check the engine oil as instructed in the Engine Operator's Manual packed with your riding mower. Read the instructions - Cub Cadet CC 30 H | Operation Manual - Page 11
manual for detailed instructions regarding the Ignition Switch Module and operating the riding mower in REVERSE CAUTION MODE . * -- Refer to Oil Fill Cap for location of your oil switch when the riding mower is not in use. Forward Drive Pedal (Hydro riding mowers) (C) The forward drive pedal is - Cub Cadet CC 30 H | Operation Manual - Page 12
on the engine to the rear of the riding mower on 24" deck models. Refer to the Assembly & Set-up section in this manual for instructions for 30" deck models and the Engine Operator's Manual for 24" deck models for fuel filling instructions. Oil Fill Cap (N) The oil fill cap is located under the left - Cub Cadet CC 30 H | Operation Manual - Page 13
. Note: Refer to the Assembly & Set-Up section of this manual for gasoline and oil fill-up instructions. 1. Insert the key into the ignition module. 2. Place the PTO lever in the disengaged (OFF) position. 3. Engage the riding mower's parking brake. 4. Activate the choke control (if equipped) by - Cub Cadet CC 30 H | Operation Manual - Page 14
brush and weeds and extremely tall grass. Your riding mower is designed to mow lawns, NOT clear brush. • Keep the blade sharp and replace the blade when worn. Refer to Cutting Blade in the Service section of this manual for proper blade sharpening instructions. 14 Section 3 - Controls & Operation - Cub Cadet CC 30 H | Operation Manual - Page 15
manual are applicable to all riding mower models and the riding mower depicted may differ from yours. Post-Operation Rider Care After each operation of the rider, the following procedures should be implemented to extend the life of your rider and ensure safe operating conditions. DANGER 1. Drive - Cub Cadet CC 30 H | Operation Manual - Page 16
burns. Your rider should be instructed in the Engine Operator's Manual packed with your riding mower. Follow the instructions carefully. Changing Engine Oil Note: An oil siphon is needed to drain the oil from the crankcase on the 24" Deck model equipped with Briggs & Stratton engines. See the Parts - Cub Cadet CC 30 H | Operation Manual - Page 17
oil as instructed in the Engine Operator's Manual packed with your riding mower. Pivot Points & Linkage Lubricate all the pivot points on the drive service dealer to have your brakes properly adjusted. Deck Note: Check the riding mower and will cause serious starting problems. To prevent gum deposits - Cub Cadet CC 30 H | Operation Manual - Page 18
distribute the oil. Replace the spark plug. Draining the Fuel 1. Locate the fuel filter, it may instructed earlier in this section first. Skip this step if deciding to change the deck belt with the mowing deck still installed on the riding mower. Otherwise, remove the cutting deck now. 2. If changing - Cub Cadet CC 30 H | Operation Manual - Page 19
charging your tractor's battery, use only a charger designed for 12V lead-acid batteries. Read your battery charger's Owner's Manual prior to charging your tractor's battery. Always follow its instructions and heed its warnings. If your tractor has not been put into use for an extended period of - Cub Cadet CC 30 H | Operation Manual - Page 20
to 30° part number stamped in it) facing the ground when the mower change the tractor's drive belt. See an authorized service dealer to have your drive belt replaced or phone Customer Support to find a dealer near you. See page 2 for details. Troubleshooting Engine Operator's Manual. Mower will not - Cub Cadet CC 30 H | Operation Manual - Page 21
15 Piezas/Garantía..........Consulte el suplemento que se adjunta por separado ADVERTENCIA LEA Y CUMPLA TODAS LAS NORMAS E INSTRUCCIONES DE SEGURIDAD DE ESTE MANUAL ANTES DE INTENTAR HACER FUNCIONAR ESTA MÁQUINA. SI NO RESPETA ESTAS INSTRUCCIONES PUEDE PROVOCAR LESIONES PERSONALES. NOTA: Este - Cub Cadet CC 30 H | Operation Manual - Page 22
Esta máquina está diseñada para operar de acuerdo con las normas de seguridad contenidas en este manual. Al igual que con cualquier tipo de máquina eléctrica, un descuido o error por parte del operador puede producir lesiones graves. Esta máquina es capaz de amputar manos y pies y de arrojar objetos - Cub Cadet CC 30 H | Operation Manual - Page 23
quina. Los niños de 14 años en adelante deben leer y entender las instrucciones de funcionamiento y las normas de seguridad contenidas en este manual y en la máquina y deben estar capacitados y supervisados por un adulto. Remolque 1. Remolque únicamente con una máquina que tenga un enganche diseñado - Cub Cadet CC 30 H | Operation Manual - Page 24
, verifique frecuentemente todos los componentes y reemplácelos inmediatamente sólo por repuestos de los fabricantes del equipo original (O.E.M.) listados en este manual. "El uso de piezas que no cumplen con las especificaciones del equipo original podría resultar en rendimiento inadecuado y adem - Cub Cadet CC 30 H | Operation Manual - Page 25
de corte. ADVERTENCIA Su responsabilidad-Limite el uso de esta máquina motorizada a las personas que lean, comprendan y respeten las advertencias e instrucciones que figuran en este manual y en la máquina. ¡GUARDE ESTAS INSTRUCCIONES! Sección 2 - Importantes Medidas de Seguridad 5 - Cub Cadet CC 30 H | Operation Manual - Page 26
6 Pendiente de Calibre Sección 2 - Importantes Medidas de Seguridad (ACEPTAR) Figura 1 12°/21% Pendiente 12°/21% Pendiente (DEMASIADO ESCARPADO) Figura 2 12°/21% línea discontinua USO DE ESTE PENDIENTE DE CALIBRE PARA DETERMINAR SI UNA PENDIENTE ES DEMASIADO ESCARPADO PARA UNA OPERACIÓN SEGURA! - Cub Cadet CC 30 H | Operation Manual - Page 27
está ubicada en el interior del neumático derecho, cerca de la parte posterior del tractor. Acople la varilla de derivación tirando hacia afuera y 1/4" Movimiento manual del tractor En unidades de 6 velocidades, mueva la palanca de cambios a NEUTRAL (punto muerto). En las unidades Hydro (hidrostá - Cub Cadet CC 30 H | Operation Manual - Page 28
del asiento cuando sujete la tuerca de seguridad. 7. Para ajustar la posición del asiento, extraiga la perilla de ajuste (d) que está ubicada en la parte inferior del asiento. Deslice el asiento hacia adelante o hacia atrás, según lo desee. Vuelva a ajustar el perno de ajuste (d). Consulte la Figura - Cub Cadet CC 30 H | Operation Manual - Page 29
la plataforma (b) en la abertura de descarga sobre la plataforma. Los espárragos (c) en la superficie de la plataforma calzarán en los orificios de la parte superior del canal de la plataforma (b). La pequeña lengüeta (d) del borde de la plataforma calzará en el recorte cuadrado de la - Cub Cadet CC 30 H | Operation Manual - Page 30
ía se pone en funcionamiento después de la fecha indicada en la parte superior o al costado de la misma, cárguela siguiendo las instrucciones los modelos de plataforma de 30"de conformidad con la Figura 2-15 , para los modelos de plataforma de 24" consulte el Manual del Operador del motor. Figura - Cub Cadet CC 30 H | Operation Manual - Page 31
, 30" (F) (L) (A) (B) (P) (N*) (H) (I) (M) (N*) (K) (J) 3 Transmisión de 6 velocidades, 24" (F) (B) (P) (H) (I) (J) (K) (N*) (M) Nota: Este manual del no se encuentra en uso. Pedal de marcha adelante (tractores cortacésped Hydro) (C) El pedal de marcha adelante está ubicado a la derecha de - Cub Cadet CC 30 H | Operation Manual - Page 32
del freno de mano (tractor cortacésped Hydro) (G) Para poner el freno de mano, parte posterior de los modelos de tractor cortacésped con plataforma de 24". Consulte la sección Montaje y Configuración del presente manual para obtener instrucciones para los modelos con plataforma de 30" y el manual - Cub Cadet CC 30 H | Operation Manual - Page 33
de la plataforma en la sección Mantenimiento y Ajustes de este manual para obtener instrucciones más detalladas sobre diferentes para el ajuste de y llévela hasta el ajuste de velocidad deseado. En los tractores cortacésped Hydro, presione el pedal del freno y mueva la palanca del freno de mano para - Cub Cadet CC 30 H | Operation Manual - Page 34
al arrancar el motor, cuando se desplaza marcha atrás, y si el operador abandona su asiento. Consulte la sección Interruptores de interbloqueo de Seguridad de este manual. Abono (Si está equipada) El abono es un proceso por el cual se recirculan los recortes de césped de manera repetida debajo de la - Cub Cadet CC 30 H | Operation Manual - Page 35
oa otros y puede causar daños en el tractor. Limpieza de la parte inferior del piso Deck Wash System™ (si viene equipado) La plataforma de de mano y detenga el motor. 3. Enrosque el acople de manguera (embalado con el Manual del Operador de su tractor) en el extremo de la manguera de jardín. 4. Una - Cub Cadet CC 30 H | Operation Manual - Page 36
de sifón de aceite (pieza n.° 490-8500008). Consulte el Manual del operador del motor que se incluye con este tractor cortacésped de aceite en el costado del motor y el tapón de llenado de aceite en la parte superior del motor. 4. Desenrosque el tapón de llenado de aceite y extraiga la varilla de - Cub Cadet CC 30 H | Operation Manual - Page 37
Lubrique el motor con aceite para motor, tal como se indica en el Manual del operador del motor que viene embalado con su tractor cortacésped. Puntos alrededor de las aletas de refrigeración del motor ni en ninguna otra parte de la máquina. Importante: NO se recomienda el uso de una lavadora de - Cub Cadet CC 30 H | Operation Manual - Page 38
del camino. 8. Extraiga con cuidado el cable de la PTO de la parte posterior de la plataforma de corte. Retire el resorte del soporte de polea polea y luego debe seguir sacándola todo alrededor de la polea hasta que se sale de la polea. 4. Lleve la correa hacia el frente del tractor cortacésped, - Cub Cadet CC 30 H | Operation Manual - Page 39
del tractor, alejado de la batería. Acople a una parte sin pintura para asegurarse de que haya una buena ías de plomo-ácido de 12V. Lea el manual del operador del cargador de la batería antes siguiente manera: 1. Para los modelos con plataforma de 30": a. Ajuste el cargador de batería para que - Cub Cadet CC 30 H | Operation Manual - Page 40
no se haya quemado. Se encuentra en la parte posterior del tractor cortacésped, debajo del guardabarros de caída y a un ángulo de 25° a 30°. Afile siempre cada borde de las cuchillas de corte de plataforma o el adaptador para abono. 5. Consulte el Manual del operador del motor. La cortadora de césped
-
 1
1 -
 2
2 -
 3
3 -
 4
4 -
 5
5 -
 6
6 -
 7
7 -
8
-
9
-
10
-
11
-
12
-
13
-
14
-
15
-
16
-
17
-
18
-
19
-
20
-
21
-
22
-
23
-
24
-
25
-
26
-
27
-
28
-
29
-
30
-
31
-
32
-
33
-
34
-
35
-
36
-
37
-
38
-
39
-
40
 |
 |

Important Safe Operation Practices • Assembly & Set-Up • Controls & Operation • Product Care
WARNING
READ AND FOLLOW ALL SAFETY RULES AND INSTRUCTIONS IN THIS MANUAL
BEFORE ATTEMPTING TO OPERATE THIS MACHINE.
FAILURE TO COMPLY WITH THESE INSTRUCTIONS MAY RESULT IN PERSONAL INJURY.
O
PERATOR
’
S
M
ANUAL
Form No. 769-17694
(August 31, 2018)
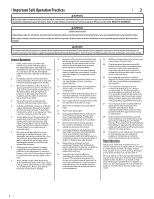
Important Safe Operation Practices
.....................
2
Assembly & Set-Up
..................................................
7
Controls & Operation
.............................................
11
Product Care
...........................................................
15
Parts/Warranty
..............
See Separate Supplement
Table of Contents
NOTE:
This Operator’s Manual covers several models. Features may vary by model. Not all features in this manual are applicable to all
models and the model depicted may differ from yours.
Riding Mower