Cub Cadet CC 30 H Operation Manual - Page 8
Attaching the Seat, Installing the Deck Chute
 |
View all Cub Cadet CC 30 H manuals
Add to My Manuals
Save this manual to your list of manuals |
Page 8 highlights
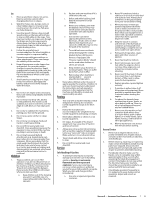
6. Lower the steering wheel assembly (a) onto the lower steering shaft (b) and secure with the shoulder bolt (c) and lock nut (d) previously removed. See Figure 2-3. (a) (c) (d) (c) (b) (d) Figure 2-3 7. Tighten the shoulder bolt and lock nut using a 9/16" wrench or socket and 7/16"wrench or socket. 8. Remove the pedestal cap mount screw factory installed and located on the riding mower's steering console. Retain the screw for later instructions. 9. Slide the pedestal cap (a) down onto the riding mower and slightly rotate to the right to clip into place. Secure the pedestal cap (a) with the screw (b) previously removed. See Figure 2-4. (a) (a) (b) (a) Figure 2-4 Attaching the Seat If the seat for your riding mower was not attached at the factory, follow the applicable instructions below to attach it. 1. Remove the shoulder bolts (a) and lock nuts (b) from the seat mounting bracket (c) included in your hardware pack. See Figure 2-5. (a) (b) (b) (a) (c) Figure 2-5 2. Remove the two self-tapping bolts (a) factory installed on the riding mower. See Figure 2-6. (a) (a) Figure 2-6 3. Align the seat bracket (a) in place over the holes from where the self-tapping bolts (b) were removed, as shown in Figure 2-7. (b) (b) (a) 4. Using a 1/4" drive ratchet with a 3/8" socket, secure the seat bracket (a) with the selftapping bolts (b) removed in step 2. See Figure 2-7. CAUTION Do not use any type of power tool (e.g. impact gun or electric drill with nut driver attached) when tightening the self-tapping bolts to attach the seat bracket. 5. Position the seat assembly over the seat mounting bracket, aligning the holes provided. 6. Install the two shoulder bolts (a) and lock nuts (b) removed from the seat mounting bracket (c) in Step 1. See Figure 2-8. (d) (a) (b) (c) (b) (a) (b) (a) (c) Figure 2-8 Note: Make sure that the bolt's shoulder is completely recessed into the seat bracket when securing the lock nut. 7. To adjust the position of the seat, remove the adjustment knob (d) on the bottom of the seat. Slide the seat forward or backward as desired. Retighten the adjustment bolt (d). Refer to Figure 2-8. Installing the Deck Chute WARNING Never operate this riding mower without either the mulch plug or deck chute installed. 1. Remove the wing knobs (a) installed on the mowing deck and retain for later installation. See Figure 2-9. (a) (a) (b) 8 Section 2 - Assembly & Set-Up Figure 2-7 (c) (e) (f) (g) (c) (d) Figure 2-9
-
 1
1 -
2
-
 3
3 -
 4
4 -
 5
5 -
 6
6 -
 7
7 -
 8
8 -
 9
9 -
 10
10 -
 11
11 -
 12
12 -
 13
13 -
14
-
15
-
16
-
17
-
18
-
19
-
20
-
21
-
22
-
23
-
24
-
25
-
26
-
27
-
28
-
29
-
30
-
31
-
32
-
33
-
34
-
35
-
36
-
37
-
38
-
39
-
40
 |
 |
