Cuisinart CBT-1000 CBT-1000 Manual - Page 4
Use And Care - smoothie blender
 |
UPC - 086279024626
View all Cuisinart CBT-1000 manuals
Add to My Manuals
Save this manual to your list of manuals |
Page 4 highlights
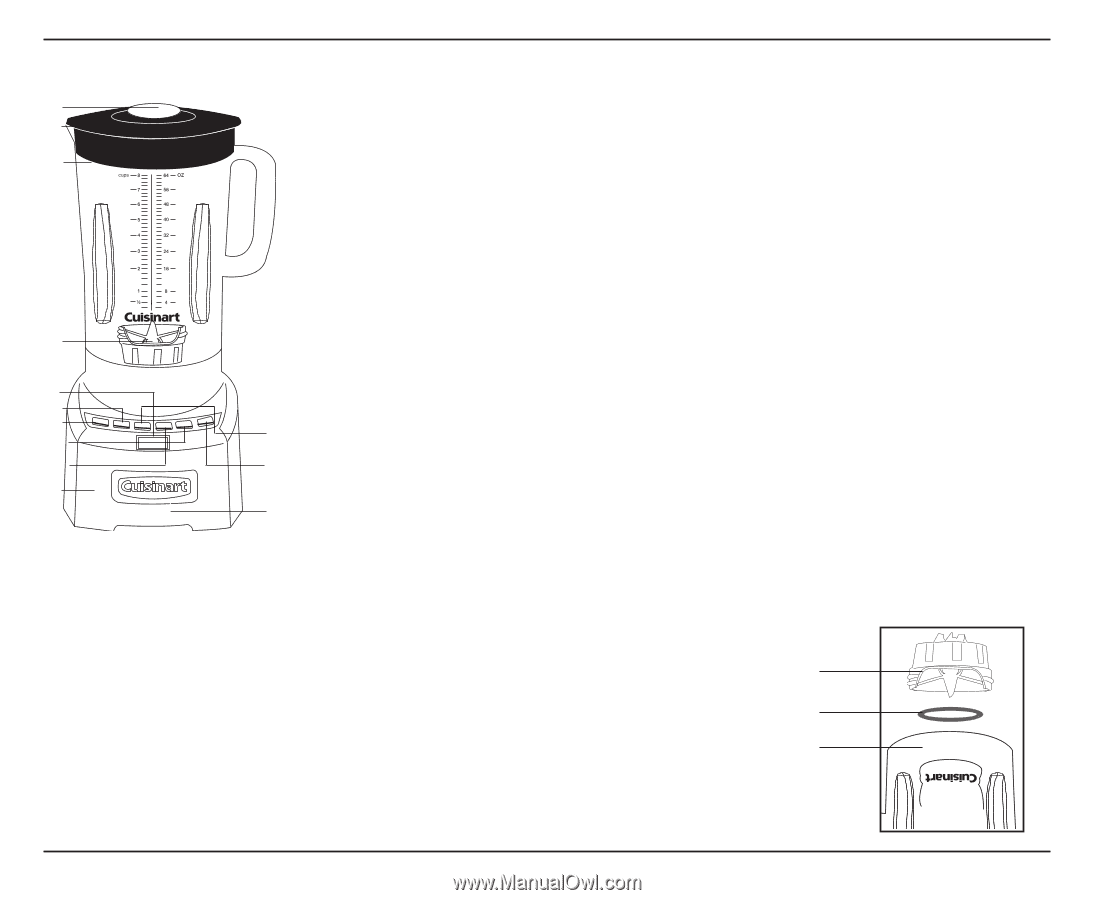
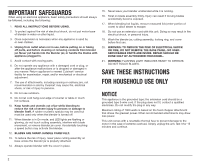
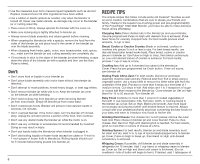
FEATURES AND BENEFITS 2. 1. 3. 4. 5. 6b. 6a. 6c. 6e. 6d. 6f. 8-9. 7. 1. Cover and Leak-Proof PVC Gasket Just press on. Tightfitting seal resists leakage. PVC gasket holds lid snugly in position for safe operation. 2. Measured Pour Lid Allows you to measure and add ingredients without removing the cover. 3. 64-oz. Blender Jar of BPA-Free Tritan™ Co-Polymer Has a unique, sturdy, easy to pour design. 4. High-Quality Blade Assembly with Power6 Turbo-Edge™ Stainless Steel Blade Is strong enough for all blending tasks, including tough jobs like ice crushing or chopping delicate herbs. Note: Blades are sharp... handle carefully. 5. Count-Up™ Timer Timer with blue backlit LCD display times your recipes for perfect results. 6. Backlit Push-Button Controls a) Power On/Off Flashing red LED indicates when power is on. b) High Button Choose High speed to blend ingredients to the desired consistency. Blue backlit LED lights will indicate which speed you are using. c) Low Button Choose Low speed to blend ingredients to the desired consistency. Blue backlit LED lights will indicate which speed you are using. d) Pre-Programmed Smoothie Button The perfect combination of speed and power, timed to develop results in under 30 seconds! e) Pre-Programmed Pulse Button Set bursts of power at two-second intervals, so you can blend ingredients only as much as needed. f) Pre-Programmed Ice Crush Button Press Ice Crush and begin crushing. This button is pre-programmed using the best combination of speed and timed pulsing for crushing ice without overprocessing. 7. Heavy-Duty Die Cast Metal Housing Is stable and secure with a low center of gravity, to prevent blender from "walking" on your countertop. 8. Slip-Proof Feet (not shown) Prevent movement during use and prevent damaging marks on countertops or tables. 9. Cord Storage (not shown) Keeps countertop safe and neat by conveniently storing excess cord. USE AND CARE ASSEMBLY To use your Cuisinart® PowerEdge® 1000-Watt Blender, begin by assembling the blender jar. 1. Turn the blender jar (a) upside down, and place it flat on a sturdy surface. 2. Position the rubber gasket (b) on the round opening on the bottom of the blender jar. 3. Turn the blade assembly (c) upside down, and place the blade end in the blender jar opening. Note: Blades are sharp... handle carefully. c. b. a. 4
-
 1
1 -
 2
2 -
 3
3 -
 4
4 -
 5
5 -
 6
6 -
 7
7 -
 8
8 -
 9
9 -
 10
10 -
11
-
12
-
13
-
14
-
15
-
16
-
17
-
18
-
19
-
20
-
21
-
22
-
23
-
24
-
25
-
26
-
27
-
28
-
29
 |
 |