D-Link DCS-932L Product Manual - Page 10
Installation - won t connect
 |
UPC - 790069351129
View all D-Link DCS-932L manuals
Add to My Manuals
Save this manual to your list of manuals |
Page 10 highlights
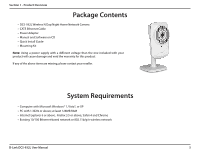
Section 2 - Installation Installation Hardware Installation Connect the Ethernet Cable Connect the included Ethernet cable to the network cable connector located on the back panel of the DCS-932L and attach it to the network. Attach the External Power Supply Attach the external power supply to the DC Power receptor located on the rear back panel of the DCS-932L and connect it to your wall outlet or power strip. Power is confirmed when the green LED Power Indicator located below the lens on the DCS-932L is illuminated. D-Link DCS-932L User Manual 10
-
 1
1 -
2
-
3
-
4
-
 5
5 -
 6
6 -
 7
7 -
 8
8 -
 9
9 -
 10
10 -
 11
11 -
 12
12 -
 13
13 -
 14
14 -
 15
15 -
16
-
17
-
18
-
19
-
20
-
21
-
22
-
23
-
24
-
25
-
26
-
27
-
28
-
29
-
30
-
31
-
32
-
33
-
34
-
35
-
36
-
37
-
38
-
39
-
40
-
41
-
42
-
43
-
44
-
45
-
46
-
47
-
48
-
49
-
50
-
51
-
52
-
53
-
54
-
55
-
56
-
57
-
58
-
59
-
60
-
61
-
62
-
63
-
64
-
65
-
66
-
67
-
68
-
69
-
70
 |
 |

10
D-Link DCS-932L User Manual
Section 2 - Installation
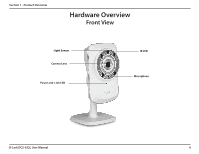
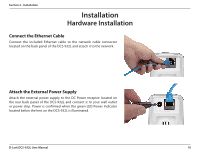
Hardware Installation
Connect the Ethernet Cable
Connect the included Ethernet cable to the network cable connector
located on the back panel of the DCS-932L and attach it to the network.
Attach the External Power Supply
Attach the external power supply to the DC Power receptor located on
the rear back panel of the DCS-932L and connect it to your wall outlet
or power strip. Power is confirmed when the green LED Power Indicator
located below the lens on the DCS-932L is illuminated.
Installation