D-Link DCS-932L Product Manual - Page 23
setting, or - ip address
 |
UPC - 790069351129
View all D-Link DCS-932L manuals
Add to My Manuals
Save this manual to your list of manuals |
Page 23 highlights
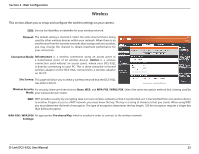
Section 4 - Web Configuration Click Next to continue. If you have a Dynamic DNS account and would like the camera to update your IP address automatically, enable DDNS and enter your host information. Click Next to continue. Enter a name for your camera. Click Next to continue. Configure the correct time to ensure that all events triggered, captured and scheduled at the right time. Click Next to continue. This page displays your configured settings. Click Apply to save and activate the setting, or Back to change your settings. D-Link DCS-932L User Manual 23
-
 1
1 -
2
-
3
-
4
-
5
-
6
-
7
-
8
-
9
-
10
-
11
-
12
-
13
-
14
-
15
-
16
-
17
-
 18
18 -
 19
19 -
 20
20 -
 21
21 -
 22
22 -
 23
23 -
 24
24 -
 25
25 -
 26
26 -
 27
27 -
 28
28 -
29
-
30
-
31
-
32
-
33
-
34
-
35
-
36
-
37
-
38
-
39
-
40
-
41
-
42
-
43
-
44
-
45
-
46
-
47
-
48
-
49
-
50
-
51
-
52
-
53
-
54
-
55
-
56
-
57
-
58
-
59
-
60
-
61
-
62
-
63
-
64
-
65
-
66
-
67
-
68
-
69
-
70
 |
 |

23
D-Link DCS-932L User Manual
Section 4 - Web Configuration
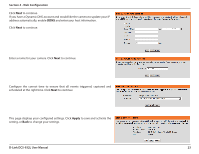
Enter a name for your camera. Click
Next
to continue.
Configure the correct time to ensure that all events triggered, captured and
scheduled at the right time. Click
Next
to continue.
This page displays your configured settings. Click
Apply
to save and activate the
setting, or
Back
to change your settings.
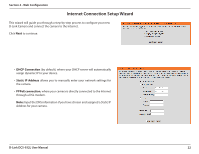
Click
Next
to continue.
If you have a Dynamic DNS account and would like the camera to update your IP
address automatically, enable
DDNS
and enter your host information.
Click
Next
to continue.