D-Link DSM-622H Product Manual - Page 8
Hardware Installation
 |
UPC - 790069263521
View all D-Link DSM-622H manuals
Add to My Manuals
Save this manual to your list of manuals |
Page 8 highlights
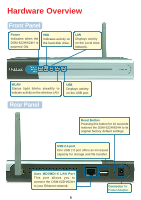
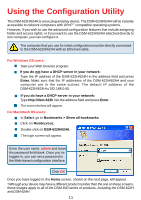
Hardware Installation 1 Connect the power adapter to the connector on the back panel of the DSM-622H/624H. Then plug the other end of the power adapter into a wall outlet or power strip. The Power LED will be ON to indicate proper operation. 2 Connect an Ethernet cable to the Ethernet jack located on the back of the DSM-622H/624H. 3 After the Ethernet cable is securely connected, connect the other end of the Ethernet cable to your network router or switch. (The router is pictured here.) 4 The antenna is removable and can be screwed on or off. 8
-
 1
1 -
2
-
 3
3 -
 4
4 -
 5
5 -
 6
6 -
 7
7 -
 8
8 -
 9
9 -
 10
10 -
 11
11 -
 12
12 -
 13
13 -
14
-
15
-
16
-
17
-
18
-
19
-
20
-
21
-
22
-
23
-
24
-
25
-
26
-
27
-
28
-
29
-
30
-
31
-
32
-
33
-
34
-
35
-
36
-
37
-
38
-
39
-
40
-
41
-
42
-
43
-
44
-
45
-
46
 |
 |

8
Connect the power adapter to the
connector on the back panel of the
DSM-622H/624H. Then plug the
other end of the power adapter into
a wall outlet or power strip. The
Power LED will be ON to indicate
proper operation.
Connect an Ethernet cable to the
Ethernet jack located on the back of
the DSM-
622H/
624H.
After the Ethernet cable is securely
connected, connect the other end of
the Ethernet cable to your network
router or switch. (The router is
pictured here.)
Hardware Installation
1
2
3
The antenna is removable and can be
screwed on or off.
4