Dacor EO230 Installation Instructions - Page 11
Planning the Installation, Installation Instructions
 |
View all Dacor EO230 manuals
Add to My Manuals
Save this manual to your list of manuals |
Page 11 highlights
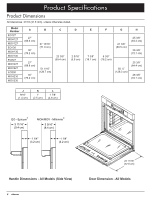
Planning the Installation Electrical Specifications important • Preheat times and cavity temperature recovery times will be increased slightly if operating on less than a 240 Vac circuit. • This appliance is provided with electrical connection leads in a flexible metal conduit. These leads may be a smaller gage than the standard household wiring of the dedicated supply circuit, but they are suitable for connection to these circuits under the jurisdiction of the National Electric Code, and/or the local inspection authority. • Locate the junction box so that the wiring may be disconnected without removing the oven from the wall. It is the owner's responsibility to ensure that a qualified electrician performs the electrical connection of this appliance. The electrical installation, including minimum supply wire size, must comply with the National Electric Code ANSI/NFPA 70 (latest revision) and local codes and ordinances. A copy of this standard may be obtained from: National Fire Protection Association 1 Batterymarch Park Quincy, Massachusetts 02269-9101 The correct voltage, frequency and amperage must be supplied to the appliance from a dedicated, grounded, single phase circuit that is protected by a properly sized circuit breaker or time-delay fuse. If a time-delay fuse is utilized, fuse both sides of the line (L1 and L2). Model Type Single 27" Single 30" Dedicated Circuit Requirements 240 Vac 60 Hz., 4 wire*, 30 Amp. dedicated Total Connected Load 4.6 kW (19.5 Amp.) Double 27" Double 30" 240 Vac 60 Hz., 4 wire*, 50 Amp. dedicated 9.25 kW (38.9 Amp.) * Two 120 Vac hot (L1 and L2), one neutral, one ground. The above electrical ratings are for reference only. For the exact ratings see the product data plate. See page 3 for location. Installation Instructions Parts List Verify that all the parts are included. If any item is missing • Standard oven racks two (2) for a single oven, five (5) or damaged, please contact your dealer immediately. Also for a double oven make certain that you have all tools and parts necessary to ensure a proper installation before proceeding. ◊ 27" standard rack - PN 72747 or • Exhaust deflector ◊ 30" standard rack - PN 72713 ◊ 27" defector - PN 46050B or ◊ 30" deflector - PN 46051B • GlideRack™ oven rack, one (1) ◊ 27" GlideRack™ oven rack - PN 72948 or • Mounting and exhaust deflector screw kit ◊ 30" GlideRack™ oven rack - PN 72949 ◊ Single oven screw kit - four (4) 3/4" mounting screws, four (4) 1 1/4" mounting screws and three (3) exhaust deflector screws - PN 700486-1 or • Stainless steel cleaner - stainless steel models only PN A302 • Product literature ◊ Double oven screw kit - Six (6) 3/4" mounting screws, six (6) 1 1/4" mounting screws and three (3) exhaust deflector screws - PN 700486-2 • Meat probe, one (1) - PN 72723 • Broiler grill and pan - PN 12157 9
-
 1
1 -
2
-
3
-
4
-
5
-
 6
6 -
 7
7 -
 8
8 -
 9
9 -
 10
10 -
 11
11 -
 12
12 -
 13
13 -
 14
14 -
 15
15 -
 16
16 -
17
-
18
-
19
-
20
 |
 |
