Dacor EO230 Installation Instructions - Page 12
Installation Instructions
 |
View all Dacor EO230 manuals
Add to My Manuals
Save this manual to your list of manuals |
Page 12 highlights
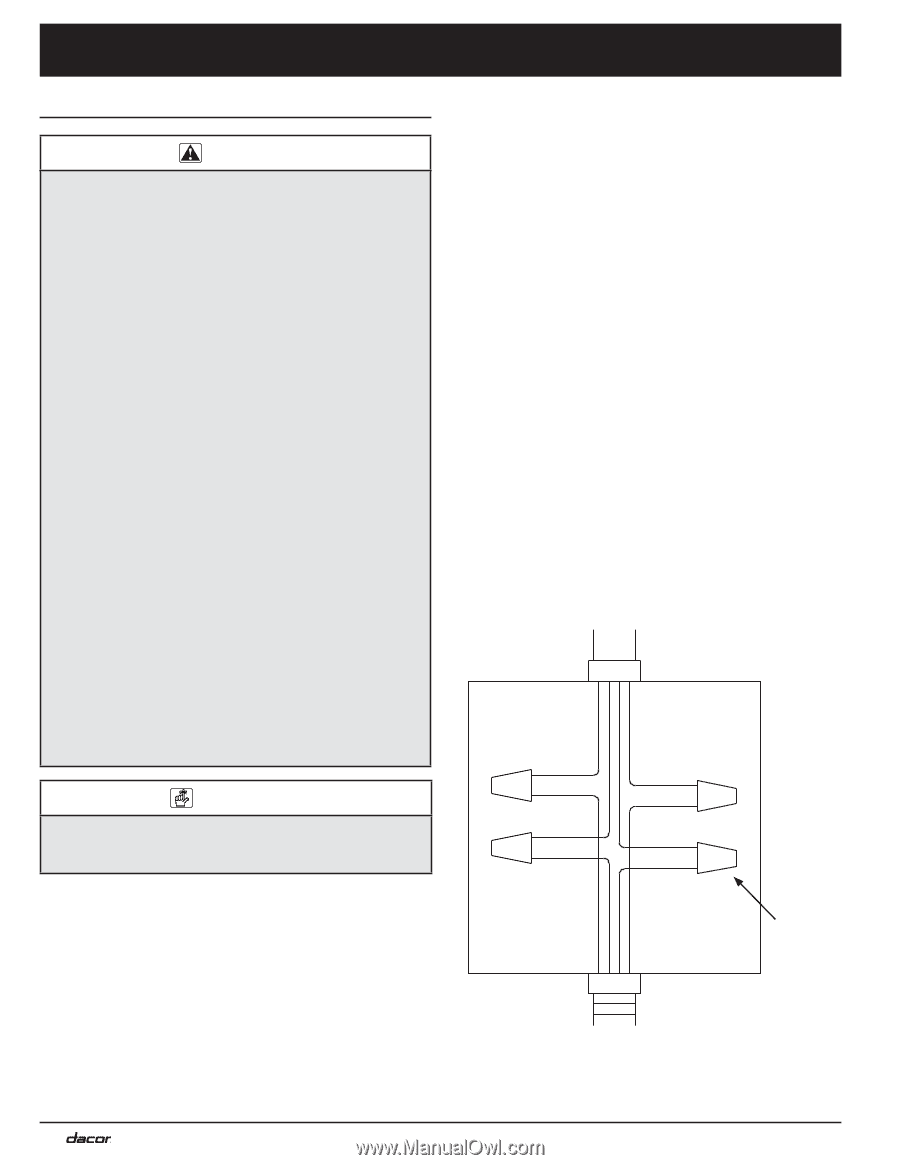
Installation Instructions Electrical Service Installation warning • Wire the oven only in compliance with local ordinances. • If the electrical service provided does not meet the product specifications, do not proceed with the installation. Call a licensed electrician to install the required wiring. • To prevent an electric shock or fire hazard, turn off power to the circuit at the circuit breaker or fuse box prior to connecting the wiring to the oven. • Improper connection of the electrical wiring can cause an electric shock hazard and damage the appliance. Dacor is not responsible for damages resulting from improper installation. • Connect the ground terminal (or lead) on the appliance to a grounded, metallic, permanent wiring system or grounding conductor. • Do not use an extension cord with this appliance. Such use may result in fire, electric shock or other personal injury. • Do not install a fuse in the neutral or ground circuit. A fuse in the neutral or ground circuit may result in an electric shock hazard. • The appliance must be connected to the power supply with copper wire only. The use of aluminum wire may result in unsatisfactory connections. • Flexible armored or non-metallic, sheathed copper cable (with grounding wire) should be used to connect the appliance to the junction box. An UL-listed connector must be used to directly connect the cable to the junction box. IMPORTANT Make sure that the conduit is long enough to allow the oven to be pulled out for service without disconnecting it from power. 1. Before proceeding, turn off power to the circuit to which the oven will be connected at the circuit breaker or fuse box. 2. Position the oven directly in front of the cabinet cutout. 3. Feed the appliance conduit into the electrical junction box and attach it using a UL approved strain relief. 4. Depending upon local codes, utilize one of three methods to connect the appliance to the electrical power: ◊ Connect to a four (4) wire electrical system ◊ Connect to a three (3) wire electrical system, where local codes permit ◊ Connect to a three (3) wire electrical system with external ground, according to local codes. Connecting to a Four (4) Wire Electrical System 1. Separate the wires coming out of the appliance conduit. 2. Connect the white wire from the appliance conduit to the white (neutral) supply wire in the junction box. 3. Connect the black wire from the appliance conduit to the black (L1) supply wire in the junction box. 4. Connect the red wire from the appliance conduit to the red (L2) supply wire in the junction box. 5. Connect the green wire from the appliance conduit to the green (ground) wire in the junction box. Junction box Cable from circuit breaker panel or fuse box RED RED GREEN GREEN WHITE WHITE BLACK BLACK Conduit to wall oven Wire nut (4 places) Four (4) Wire Junction Box Connection 10
-
 1
1 -
2
-
3
-
4
-
5
-
6
-
 7
7 -
 8
8 -
 9
9 -
 10
10 -
 11
11 -
 12
12 -
 13
13 -
 14
14 -
 15
15 -
 16
16 -
 17
17 -
18
-
19
-
20
 |
 |