Dell Alienware 25 Gaming AW2523HF Alienware AW2523HF Monitor Users Guide - Page 10
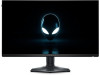
Bottom view, between the monitor and the computer.
 |
View all Dell Alienware 25 Gaming AW2523HF manuals
Add to My Manuals
Save this manual to your list of manuals |
Page 10 highlights
Bottom view 1 23 4 5 6 7 8 9 10 11 12 13 Label Description Use 1 Power connector Connect the power cable (shipped with your monitor). 2 USB Type-B Connect the USB cable (shipped with your monitor) to upstream port this port and your computer to enable the USB ports on your monitor. 3,4, Super speed 7,9 USB 5 Gbps (USB 3.2 Gen1) Type-A downstream ports (4) Connect your USB peripherals such as mouse and keyboard. Port with battery icon supports Battery Charging Rev. 1.2. NOTE: To use these ports, you must connect the USB upstream cable (shipped with your monitor) between the monitor and the computer. 5 Barcode, serial Refer to this label if you need to contact Dell for number, and technical support. The Service Tag is a unique Service Tag label alphanumeric identifier that enables Dell service technicians to identify the hardware components in your computer and access warranty information. 6 Joystick Use it to control the OSD menu. 8 Headphone port Connect your headphone. WARNING: The possible long-term effect of listening to audio at high volume through the headphones may cause damage to your hearing ability. 10 Security lock slot Secures monitor with security cable lock (sold (based on separately). Kensington Security SlotTM) 11 HDMI 1 port Connect your computer with the HDMI cable. HDMI 2 port 12 DisplayPort Connect your computer with the DisplayPort cable (shipped with your monitor). 13 Line-out port Connect your speakers. NOTE: This port does not support headphones. 10 | About your monitor
-
 1
1 -
2
-
3
-
4
-
 5
5 -
 6
6 -
 7
7 -
 8
8 -
 9
9 -
 10
10 -
 11
11 -
 12
12 -
 13
13 -
 14
14 -
 15
15 -
16
-
17
-
18
-
19
-
20
-
21
-
22
-
23
-
24
-
25
-
26
-
27
-
28
-
29
-
30
-
31
-
32
-
33
-
34
-
35
-
36
-
37
-
38
-
39
-
40
-
41
-
42
-
43
-
44
-
45
-
46
-
47
-
48
-
49
-
50
-
51
-
52
-
53
-
54
-
55
-
56
-
57
-
58
-
59
-
60
-
61
-
62
-
63
 |
 |
