Dell Force10 E600i E600 TeraScale Installation Guide - Page 15
Installing the Chassis, Unpacking the E600i System, Installing the Equipment Rack Shelf Bar
 |
View all Dell Force10 E600i manuals
Add to My Manuals
Save this manual to your list of manuals |
Page 15 highlights
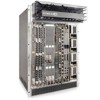
4 Installing the Chassis This chapter provides instructions to rack mount your E600i system into a standard 19-inch or 23-inch equipment rack. It contains the following sections: • Unpacking the E600i System • Installing the Equipment Rack Shelf Bar • Standard Front Chassis Rack Mounting • Installing the Chassis into an Equipment Cabinet Unpacking the E600i System WARNING: The E600i packaging and contents weigh approximately 400 pounds. The unpacked chassis and floater pallet weigh approximately 100 pounds. Do not attempt to lift or move the chassis without the use of a hand cart, pallet jack, or forklift. Remove all contents from the shipping packaging and move the chassis with a hand cart, pallet jack or fork lift to its rack. CAUTION: Lift the E600i chassis from the bottom only. Lifting by the chassis shelves or fan tray opening will cause chassis damage. Do not remove the protective front shipping cover until you have completed the chassis installation. WARNING: Complete the chassis installation into the rack before you install any other component (fan tray, AC power supplies or DC PEMs, line cards, RPMs, SFMs, cables). WARNING: Electrostatic discharge (ESD) damage can occur when components are mishandled. Always wear an ESD-preventative wrist or foot-heal ground strap when handling RPMs, SFMs, or line cards. After you remove the original packaging, place RPMs, SFMs, and line cards on an antistatic surface. Installing the Equipment Rack Shelf Bar The rack shelf bar (Figure 4-1) enables you to easily position the chassis into the rack and provides the unit additional stability in the rack. Installing the Chassis | 15
-
 1
1 -
2
-
3
-
4
-
5
-
6
-
7
-
8
-
9
-
 10
10 -
 11
11 -
 12
12 -
 13
13 -
 14
14 -
 15
15 -
 16
16 -
 17
17 -
 18
18 -
 19
19 -
 20
20 -
21
-
22
-
23
-
24
-
25
-
26
-
27
-
28
-
29
-
30
-
31
-
32
-
33
-
34
-
35
-
36
-
37
-
38
-
39
-
40
-
41
-
42
-
43
-
44
-
45
-
46
-
47
-
48
-
49
-
50
-
51
-
52
-
53
-
54
-
55
-
56
-
57
-
58
-
59
-
60
-
61
-
62
-
63
-
64
-
65
-
66
-
67
-
68
-
69
-
70
-
71
-
72
-
73
-
74
-
75
-
76
 |
 |
