Dell Inspiron 300m Service Manual - Page 15
Display Assembly
 |
View all Dell Inspiron 300m manuals
Add to My Manuals
Save this manual to your list of manuals |
Page 15 highlights
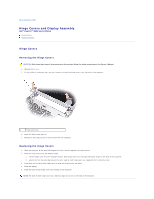
Display Assembly Removing the Display Assembly CAUTION: Before you begin any of the procedures in this section, follow the safety instructions in the Owner's Manual. NOTICE: Disconnect the computer and any attached devices from electrical outlets. NOTICE: To avoid ESD, ground yourself by using a wrist grounding strap or by touching an unpainted metal surface on the computer. NOTICE: Read "Before You Begin" before performing the following procedure. 1. Remove the battery. 2. Remove the keyboard. 3. Turn the computer over, and remove the two M3 x 5-mm screws from the bottom of the computer. 1 M3 x 5-mm screws (2) 4. Turn the computer over and open the display 180 degrees.
-
 1
1 -
2
-
3
-
4
-
5
-
6
-
7
-
8
-
9
-
 10
10 -
 11
11 -
 12
12 -
 13
13 -
 14
14 -
 15
15 -
 16
16 -
 17
17 -
 18
18 -
 19
19 -
 20
20 -
21
-
22
-
23
-
24
-
25
-
26
-
27
-
28
-
29
-
30
-
31
-
32
-
33
-
34
-
35
-
36
-
37
-
38
-
39
-
40
-
41
-
42
-
43
-
44
-
45
-
46
-
47
-
48
-
49
-
50
 |
 |

Display Assembly
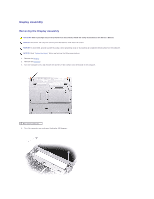
Removing the Display Assembly
1.
Remove the
battery
.
2.
Remove the
keyboard
.
3.
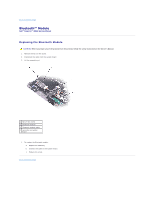
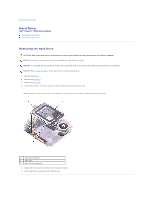
Turn the computer over, and remove the two M3 x 5-mm screws from the bottom of the computer.
4.
Turn the computer over and open the display 180 degrees.
CAUTION:
Before you begin any of the procedures in this section, follow the safety instructions in the
Owner's Manual
.
NOTICE:
Disconnect the computer and any attached devices from electrical outlets.
NOTICE:
To avoid ESD, ground yourself by using a wrist grounding strap or by touching an unpainted metal surface on the computer.
NOTICE:
Read "
Before You Begin
" before performing the following procedure.
1
M3 x 5-mm screws (2)