Dell Inspiron 9100 Service Manual - Page 35
seat the fan in place., To remove fan 3
 |
View all Dell Inspiron 9100 manuals
Add to My Manuals
Save this manual to your list of manuals |
Page 35 highlights
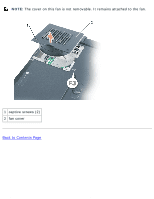
Fans: Dell Inspiron XPS and Inspiron 9100 Service Manual 1 fan 2 fan release lever 3 M2.5 x 6-mm screw 5. Use the fan release lever to lift the fan out of the computer. When replacing fan 2, press down on the fan surface labeled "Press here" to securely seat the fan in place. To remove fan 3: 1. Unscrew the two captive screws labeled "F3." 2. Lift the fan out of the computer. file:///F|/Service%20Manuals/Dell/Inspiron/9100/fan.htm (3 of 4) [2/28/2004 7:45:50 AM]
-
 1
1 -
2
-
3
-
4
-
5
-
6
-
7
-
8
-
9
-
10
-
11
-
12
-
13
-
14
-
15
-
16
-
17
-
18
-
19
-
20
-
21
-
22
-
23
-
24
-
25
-
26
-
27
-
28
-
29
-
 30
30 -
 31
31 -
 32
32 -
 33
33 -
 34
34 -
 35
35 -
 36
36 -
 37
37 -
 38
38 -
 39
39 -
 40
40 -
41
-
42
-
43
-
44
-
45
-
46
-
47
-
48
-
49
-
50
-
51
-
52
-
53
-
54
-
55
-
56
-
57
-
58
-
59
-
60
-
61
-
62
-
63
-
64
-
65
-
66
-
67
-
68
-
69
-
70
-
71
-
72
-
73
-
74
-
75
-
76
-
77
-
78
-
79
-
80
-
81
-
82
-
83
-
84
-
85
-
86
-
87
 |
 |

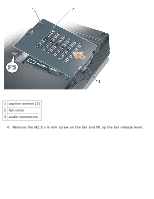
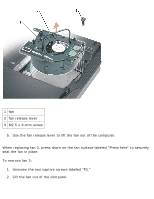
Fans: Dell Inspiron XPS and Inspiron 9100 Service Manual
1 fan
2
fan release lever
3
M2.5 x 6-mm screw
5.
Use the fan release lever to lift the fan out of the computer.
When replacing fan 2, press down on the fan surface labeled "Press here" to securely
seat the fan in place.
To remove fan 3:
1.
Unscrew the two captive screws labeled "F3."
2.
Lift the fan out of the computer.
file:///F|/Service%20Manuals/Dell/Inspiron/9100/fan.htm (3 of 4) [2/28/2004 7:45:50 AM]