Dell Latitude D620 ATG User's Guide - Page 62
Wireless Cards
 |
View all Dell Latitude D620 ATG manuals
Add to My Manuals
Save this manual to your list of manuals |
Page 62 highlights
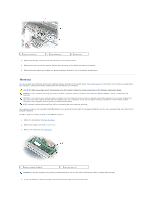
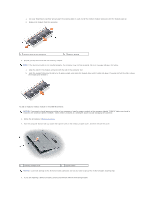
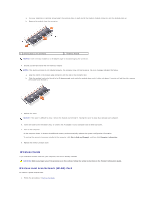
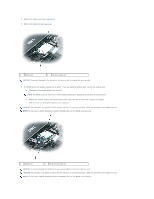
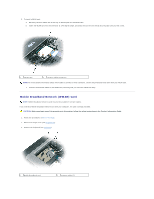
a. Use your fingertips to carefully spread apart the securing clips on each end of the memory module connector until the module pops up. b. Remove the module from the connector. 1 securing clips (2 per connector) 2 memory module NOTICE: Insert memory modules at a 45-degree angle to avoid damaging the connector. 4. Ground yourself and install the new memory module: NOTE: If the memory module is not installed properly, the computer may not boot properly. No error message indicates this failure. a. Align the notch in the module edge connector with the tab in the connector slot. b. Slide the module firmly into the slot at a 45-degree angle, and rotate the module down until it clicks into place. If you do not feel the click, remove the module and reinstall it. 5. Replace the cover. NOTICE: If the cover is difficult to close, remove the module and reinstall it. Forcing the cover to close may damage your computer. 6. Insert the battery into the battery bay, or connect the AC adapter to your computer and an electrical outlet. 7. Turn on the computer. As the computer boots, it detects the additional memory and automatically updates the system configuration information. To confirm the amount of memory installed in the computer, click Start®Help and Support, and then click Computer Information. 8. Replace the memory module cover. Wireless Cards If you ordered a wireless card with your computer, the card is already installed. CAUTION: Before you begin any of the procedures in this section, follow the safety instructions in the Product Information Guide. Wireless Local Area Network (WLAN) Card To install or replace a WLAN card: 1. Follow the procedures in Before You Begin.
-
 1
1 -
2
-
3
-
4
-
5
-
6
-
7
-
8
-
9
-
10
-
11
-
12
-
13
-
14
-
15
-
16
-
17
-
18
-
19
-
20
-
21
-
22
-
23
-
24
-
25
-
26
-
27
-
28
-
29
-
30
-
31
-
32
-
33
-
34
-
35
-
36
-
37
-
38
-
39
-
40
-
41
-
42
-
43
-
44
-
45
-
46
-
47
-
48
-
49
-
50
-
51
-
52
-
53
-
54
-
55
-
56
-
 57
57 -
 58
58 -
 59
59 -
 60
60 -
 61
61 -
 62
62 -
 63
63 -
 64
64 -
 65
65 -
 66
66 -
 67
67 -
68
-
69
-
70
-
71
-
72
-
73
-
74
-
75
-
76
-
77
-
78
-
79
-
80
-
81
-
82
-
83
-
84
-
85
-
86
-
87
-
88
-
89
-
90
-
91
-
92
-
93
-
94
-
95
-
96
-
97
-
98
-
99
-
100
-
101
-
102
-
103
-
104
-
105
-
106
-
107
 |
 |
