Dell Studio One 19 1909 Studio One 19 Service Manual - Page 34
Replacing the Side I/O Panel
 |
View all Dell Studio One 19 1909 manuals
Add to My Manuals
Save this manual to your list of manuals |
Page 34 highlights
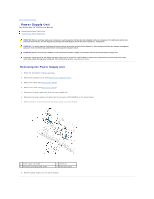
1 screw 3 connector (SIDE_BOARD_1) 2 connector (F_AUDIO) Replacing the Side I/O Panel 1. Follow the procedures in Before You Begin. 2. To replace the side I/O panel, route the cables back into position and connect them to the connectors (F_AUDIO and SIDE_BOARD_1) on the system board. 3. Slide the side I/O panel towards the clamps until it is firmly seated. 4. Replace the screw that secures the side I/O panel to the chassis. 5. Replace the hard drive (see Replacing the Hard Drive). 6. Replace the left speaker (see Replacing the Left Speaker). 7. Replace the stand (see Replacing the Stand). 8. Replace the shield (see Replacing the Shield). 9. Replace the computer cover (see Replacing the Computer Cover). Back to Contents Page
-
 1
1 -
2
-
3
-
4
-
5
-
6
-
7
-
8
-
9
-
10
-
11
-
12
-
13
-
14
-
15
-
16
-
17
-
18
-
19
-
20
-
21
-
22
-
23
-
24
-
25
-
26
-
27
-
28
-
 29
29 -
 30
30 -
 31
31 -
 32
32 -
 33
33 -
 34
34 -
 35
35 -
 36
36 -
 37
37 -
 38
38 -
 39
39 -
40
-
41
-
42
-
43
-
44
-
45
-
46
-
47
-
48
-
49
-
50
-
51
-
52
-
53
 |
 |

Replacing the Side I/O Panel
1.
Follow the procedures in
Before You Begin
.
2.
To replace the side I/O panel, route the cables back into position and connect them to the connectors (F_AUDIO and SIDE_BOARD_1) on the system
board.
3.
Slide the side I/O panel towards the clamps until it is firmly seated.
4.
Replace the screw that secures the side I/O panel to the chassis.
5.
Replace the hard drive (see
Replacing the Hard Drive
).
6.
Replace the left speaker (see
Replacing the Left Speaker
).
7.
Replace the stand (see
Replacing the Stand
).
8.
Replace the shield (see
Replacing the Shield
).
9.
Replace the computer cover (see
Replacing the Computer Cover
).
Back to Contents Page
1
screw
2
connector (F_AUDIO)
3
connector (SIDE_BOARD_1)